Cirkit Designer Logo
Cirkit Designer
Your all-in-one circuit design IDE
Home / 
Component Documentation

How to Use Adafruit Crickit HAT for Raspberry Pi: Examples, Pinouts, and Specs

Image of Adafruit Crickit HAT for Raspberry Pi
Cirkit Designer LogoDesign with Adafruit Crickit HAT for Raspberry Pi in Cirkit Designer

Introduction

The Adafruit Crickit HAT for Raspberry Pi is an innovative robotics extension board that transforms your Raspberry Pi into a powerful platform for hardware hacking and robotic control. This HAT (Hardware Attached on Top) is designed to work seamlessly with the Raspberry Pi, providing an easy-to-use interface for driving a wide range of actuators including motors, servos, and solenoids, as well as interfacing with sensors and other electronic components.

Explore Projects Built with Adafruit Crickit HAT for Raspberry Pi

Use Cirkit Designer to design, explore, and prototype these projects online. Some projects support real-time simulation. Click "Open Project" to start designing instantly!
Raspberry Pi 5 Smart Weather Station with GPS and AI Integration
Image of Senior Design: A project utilizing Adafruit Crickit HAT for Raspberry Pi in a practical application
This circuit integrates a Raspberry Pi 5 with various peripherals including an 8MP 3D stereo camera, an AI Hat, a BMP388 sensor, a 16x2 I2C LCD, and an Adafruit Ultimate GPS module. The Raspberry Pi serves as the central processing unit, interfacing with the camera for image capture, the AI Hat for AI processing, the BMP388 for environmental sensing, the LCD for display, and the GPS module for location tracking, with a USB Serial TTL for serial communication.
Cirkit Designer LogoOpen Project in Cirkit Designer
Raspberry Pi 4B-Based Multi-Sensor Interface Hub with GPS and GSM
Image of Rocket: A project utilizing Adafruit Crickit HAT for Raspberry Pi in a practical application
This circuit features a Raspberry Pi 4B interfaced with an IMX296 color global shutter camera, a Neo 6M GPS module, an Adafruit BMP388 barometric pressure sensor, an MPU-6050 accelerometer/gyroscope, and a Sim800l GSM module for cellular connectivity. Power management is handled by an MT3608 boost converter, which steps up the voltage from a Lipo battery, with a resettable fuse PTC and a 1N4007 diode for protection. The Adafruit Perma-Proto HAT is used for organizing connections and interfacing the sensors and modules with the Raspberry Pi via I2C and GPIO pins.
Cirkit Designer LogoOpen Project in Cirkit Designer
Adafruit Circuit Playground Bluefruit and Crickit-Based Smart RGB LED and Temperature Monitoring System
Image of Example: A project utilizing Adafruit Crickit HAT for Raspberry Pi in a practical application
This circuit integrates an Adafruit Circuit Playground Bluefruit with an Adafruit Crickit for Circuit Playground Express to control a temperature sensor, a loudspeaker, and a series of WS2812 RGB LED strips. The Crickit board reads temperature data, drives the loudspeaker, and controls the LED strips to create visual effects based on the sensor input.
Cirkit Designer LogoOpen Project in Cirkit Designer
Raspberry Pi 4B-Based Current Monitoring System with I2C OLED Display
Image of Virtual Energy Monitoring Circuit: A project utilizing Adafruit Crickit HAT for Raspberry Pi in a practical application
This circuit features a Raspberry Pi 4B as the central processing unit, interfaced with an Adafruit ADS1115 16-bit I2C ADC for analog-to-digital conversion and a 0.96" OLED display for visual output. The ADS1115 is connected to a current sensor for measuring electrical current, with the sensor's output and burden pins connected to the ADC's analog input channels. The Raspberry Pi communicates with both the ADC and the OLED display over the I2C bus, using its GPIO2 and GPIO3 pins for data (SDA) and clock (SCL) lines, respectively.
Cirkit Designer LogoOpen Project in Cirkit Designer

Explore Projects Built with Adafruit Crickit HAT for Raspberry Pi

Use Cirkit Designer to design, explore, and prototype these projects online. Some projects support real-time simulation. Click "Open Project" to start designing instantly!
Image of Senior Design: A project utilizing Adafruit Crickit HAT for Raspberry Pi in a practical application
Raspberry Pi 5 Smart Weather Station with GPS and AI Integration
This circuit integrates a Raspberry Pi 5 with various peripherals including an 8MP 3D stereo camera, an AI Hat, a BMP388 sensor, a 16x2 I2C LCD, and an Adafruit Ultimate GPS module. The Raspberry Pi serves as the central processing unit, interfacing with the camera for image capture, the AI Hat for AI processing, the BMP388 for environmental sensing, the LCD for display, and the GPS module for location tracking, with a USB Serial TTL for serial communication.
Cirkit Designer LogoOpen Project in Cirkit Designer
Image of Rocket: A project utilizing Adafruit Crickit HAT for Raspberry Pi in a practical application
Raspberry Pi 4B-Based Multi-Sensor Interface Hub with GPS and GSM
This circuit features a Raspberry Pi 4B interfaced with an IMX296 color global shutter camera, a Neo 6M GPS module, an Adafruit BMP388 barometric pressure sensor, an MPU-6050 accelerometer/gyroscope, and a Sim800l GSM module for cellular connectivity. Power management is handled by an MT3608 boost converter, which steps up the voltage from a Lipo battery, with a resettable fuse PTC and a 1N4007 diode for protection. The Adafruit Perma-Proto HAT is used for organizing connections and interfacing the sensors and modules with the Raspberry Pi via I2C and GPIO pins.
Cirkit Designer LogoOpen Project in Cirkit Designer
Image of Example: A project utilizing Adafruit Crickit HAT for Raspberry Pi in a practical application
Adafruit Circuit Playground Bluefruit and Crickit-Based Smart RGB LED and Temperature Monitoring System
This circuit integrates an Adafruit Circuit Playground Bluefruit with an Adafruit Crickit for Circuit Playground Express to control a temperature sensor, a loudspeaker, and a series of WS2812 RGB LED strips. The Crickit board reads temperature data, drives the loudspeaker, and controls the LED strips to create visual effects based on the sensor input.
Cirkit Designer LogoOpen Project in Cirkit Designer
Image of Virtual Energy Monitoring Circuit: A project utilizing Adafruit Crickit HAT for Raspberry Pi in a practical application
Raspberry Pi 4B-Based Current Monitoring System with I2C OLED Display
This circuit features a Raspberry Pi 4B as the central processing unit, interfaced with an Adafruit ADS1115 16-bit I2C ADC for analog-to-digital conversion and a 0.96" OLED display for visual output. The ADS1115 is connected to a current sensor for measuring electrical current, with the sensor's output and burden pins connected to the ADC's analog input channels. The Raspberry Pi communicates with both the ADC and the OLED display over the I2C bus, using its GPIO2 and GPIO3 pins for data (SDA) and clock (SCL) lines, respectively.
Cirkit Designer LogoOpen Project in Cirkit Designer

Common Applications and Use Cases

  • Educational robotics projects
  • DIY home automation systems
  • Interactive art installations
  • Prototyping for industrial automation
  • Custom remote-controlled vehicles or drones

Technical Specifications

Key Technical Details

  • Operating Voltage: 5V (supplied by the Raspberry Pi)
  • Logic Voltage: 3.3V (compatible with Raspberry Pi logic)
  • Output Channels: Multiple, including 4 x Analog/Digital Servo outputs, 2 x Bi-directional DC motor controllers, 1 x Stepper motor controller, and additional GPIOs
  • Communication Interface: I2C
  • Dimensions: HAT standard size for Raspberry Pi

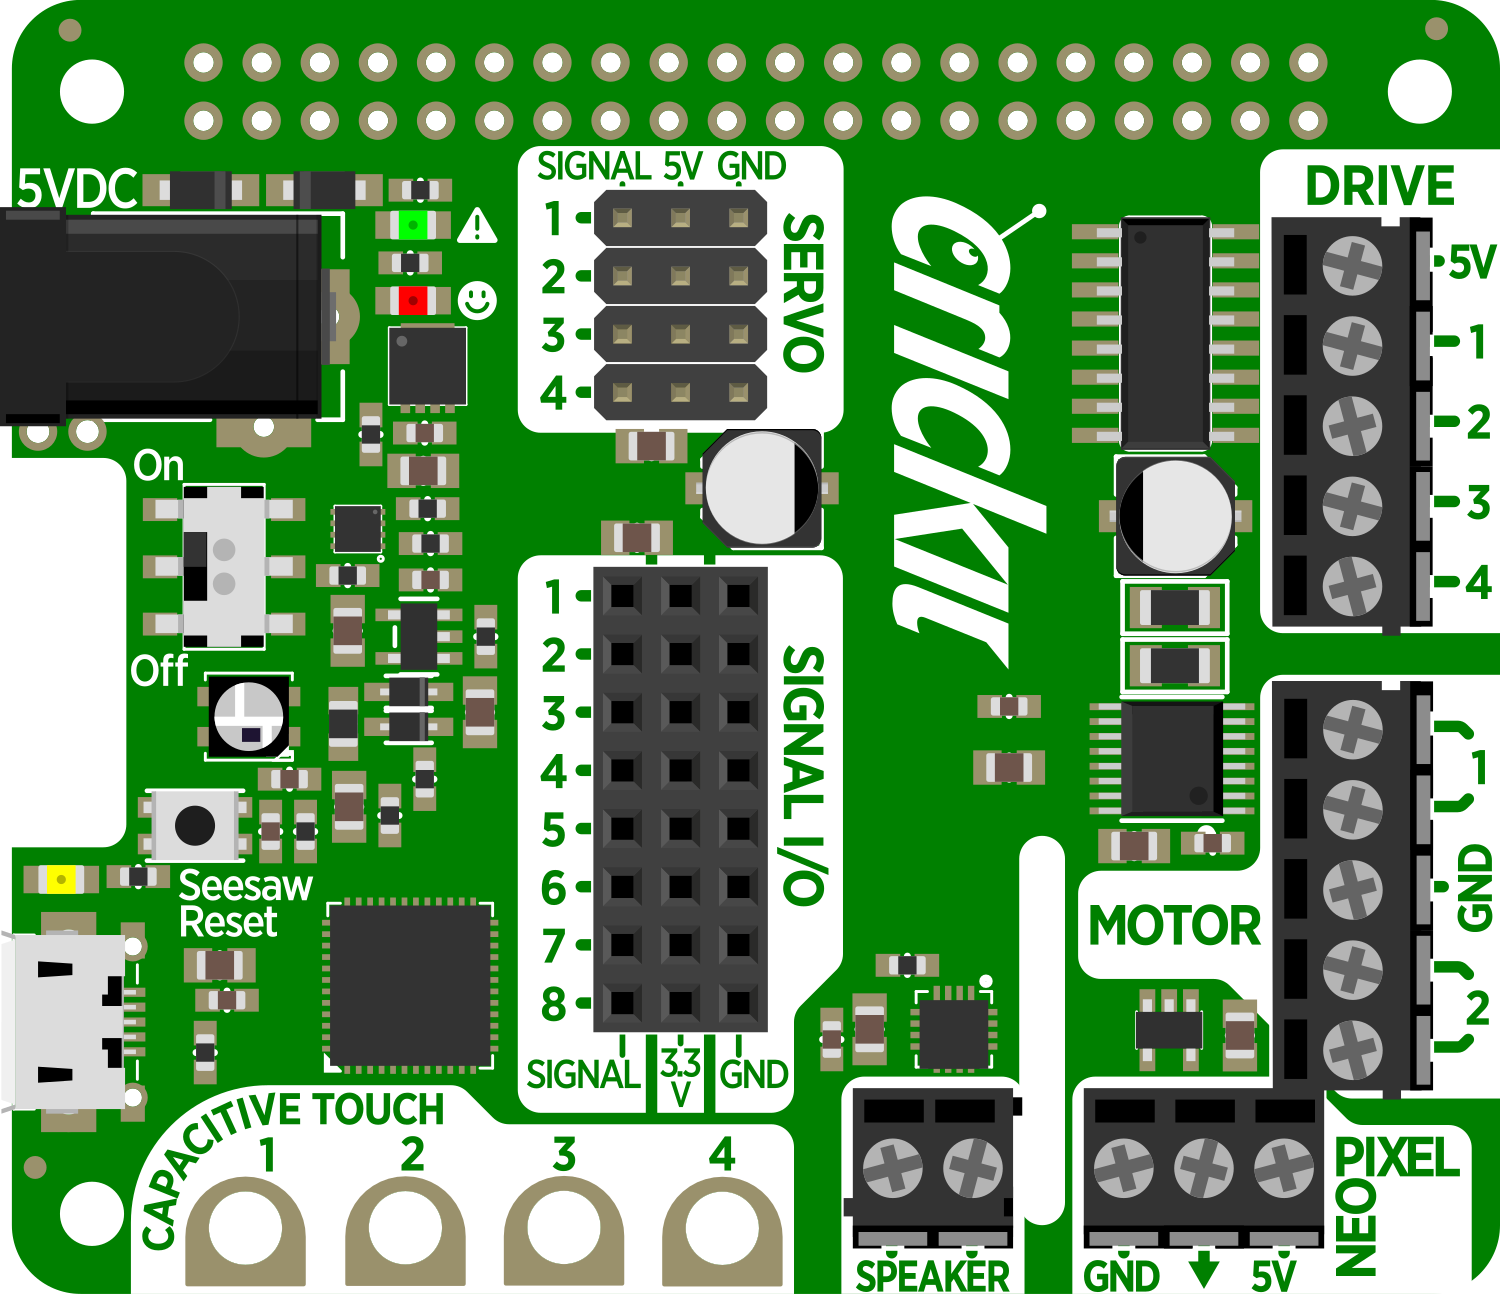
Pin Configuration and Descriptions

Pin Number Function Description
1 3V3 3.3V power supply
2 5V 5V power supply from Raspberry Pi
3 SDA I2C Data line for communication with Raspberry Pi
4 5V 5V power supply
5 SCL I2C Clock line for communication with Raspberry Pi
6 GND Ground
... ... ...
40 GPIO21 General Purpose Input/Output (used for additional I/O)

Note: This table only includes a subset of the pins for brevity.

Usage Instructions

How to Use the Component in a Circuit

  1. Mounting the HAT: Secure the Crickit HAT onto the GPIO header of the Raspberry Pi ensuring proper alignment of the pins.
  2. Power Supply: Connect a 5V power supply to the Raspberry Pi, which will also power the Crickit HAT.
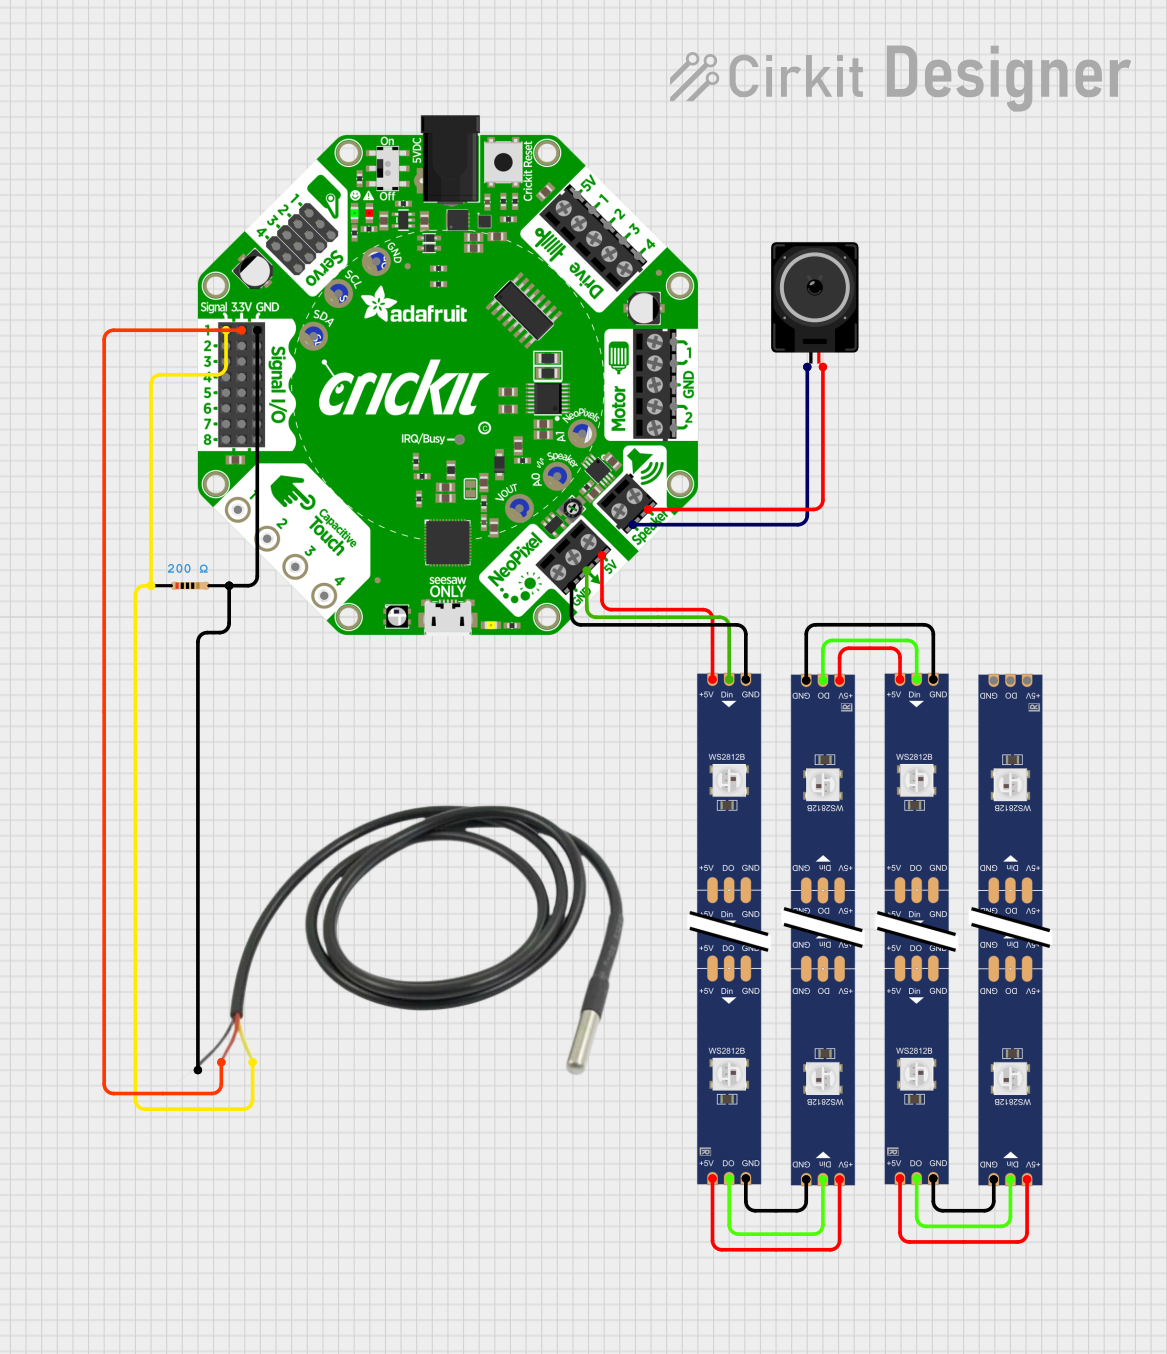
  3. Connecting Actuators: Attach servos, DC motors, or stepper motors to the respective output channels on the Crickit HAT.
  4. Programming: Use the Adafruit CircuitPython library or the Python library to control the Crickit HAT from your Raspberry Pi.

Important Considerations and Best Practices

  • Ensure that the power supply is sufficient for both the Raspberry Pi and the attached actuators.
  • Always disconnect the power before making or altering connections to prevent damage.
  • Use external power sources for high-current actuators to avoid overloading the Raspberry Pi's power supply.
  • Check the compatibility of the actuators with the output channels' specifications.

Troubleshooting and FAQs

Common Issues

  • Motors not responding: Ensure that the motors are properly connected and that the power supply is adequate.
  • Communication errors: Check the I2C connections and ensure that the Raspberry Pi is configured to enable I2C communication.

Solutions and Tips for Troubleshooting

  • Verify all connections and wiring.
  • Check the Raspberry Pi's I2C configuration using raspi-config.
  • Use the i2cdetect command to confirm that the Raspberry Pi recognizes the Crickit HAT.
  • Ensure that the Adafruit libraries are correctly installed and up-to-date.

FAQs

Q: Can I power the Crickit HAT separately from the Raspberry Pi? A: Yes, you can use an external power source for the Crickit HAT, but ensure it is within the recommended voltage range.

Q: How many motors can I control with the Crickit HAT? A: The Crickit HAT can control up to 4 servos, 2 DC motors, and 1 stepper motor simultaneously.

Q: Is the Crickit HAT stackable? A: No, the Crickit HAT is not designed to be stackable due to the high current requirements of motors and actuators.

Example Code for Raspberry Pi

Below is an example Python script to control a servo motor connected to the Crickit HAT using an Arduino UNO:

import time
from adafruit_crickit import crickit

Create a servo object

servo = crickit.servo_1

Sweep the servo motor between 0 and 180 degrees

while True: for angle in range(0, 180, 5): # Move in 5 degree increments servo.angle = angle time.sleep(0.05) for angle in range(180, 0, -5): # Move back in 5 degree increments servo.angle = angle time.sleep(0.05)


Remember to install the `adafruit-crickit` library before running the script. This can be done using the following command:

```shell
pip3 install adafruit-crickit

Ensure that the servo is connected to the correct servo port on the Crickit HAT and that the Raspberry Pi has the I2C interface enabled.