Cirkit Designer Logo
Cirkit Designer
Your all-in-one circuit design IDE
Home / 
Component Documentation

How to Use Speaker: Examples, Pinouts, and Specs

Image of Speaker
Cirkit Designer LogoDesign with Speaker in Cirkit Designer

Introduction

A speaker is an electroacoustic transducer that converts an electrical audio signal into a corresponding sound. The most common type of speaker in use today is the dynamic speaker, invented in the early 1920s by Edward W. Kellogg and Chester W. Rice. Speakers are used in a wide variety of applications, including consumer audio systems, public address systems, and portable audio devices. They can range in size from small personal earphones to large professional concert amplifiers.

Explore Projects Built with Speaker

Use Cirkit Designer to design, explore, and prototype these projects online. Some projects support real-time simulation. Click "Open Project" to start designing instantly!
ESP32-Based Voice Assistant with Battery-Powered Microphone and Speaker
Image of Minor: A project utilizing Speaker in a practical application
This circuit is a voice-controlled system that uses an ESP32 microcontroller to process audio input from a microphone, send the data to a Gemini API for speech-to-text conversion, and output responses through a speaker. It includes an IR sensor for additional input, an LED for status indication, and a battery with a charging module for power management.
Cirkit Designer LogoOpen Project in Cirkit Designer
ESP32-Based Voice-Controlled Speaker
Image of Main Design: A project utilizing Speaker in a practical application
This circuit is a digital voice playback and recording system powered by a 3.7V battery. It features an ESP32 microcontroller for processing, an Adafruit MAX98357A amplifier to drive a loudspeaker for audio output, and an Adafruit MAX9814 microphone amplifier for audio input. A pushbutton provides user interaction, and a 3.3V regulator ensures stable power supply to the components.
Cirkit Designer LogoOpen Project in Cirkit Designer
Arduino UNO Bluetooth-Controlled Speaker
Image of Bluetooth Speaker: A project utilizing Speaker in a practical application
This circuit is designed to function as a Bluetooth-controlled speaker system using an Arduino UNO as the central controller. The Arduino is connected to a Bluetooth Mate Gold module for wireless communication and a speaker for audio output. The Arduino's digital pins D0 and D1 are used for RX and TX communication with the Bluetooth module, while pin D9 is configured to drive the speaker.
Cirkit Designer LogoOpen Project in Cirkit Designer
Arduino UNO Voice Assistant with KY-037 Microphone and Speaker
Image of VOICE PY 2: A project utilizing Speaker in a practical application
This circuit is a voice assistant project that uses an Arduino UNO to interface with a KY-037 microphone and a speaker. The microphone detects voice commands, which are processed by the Arduino, and the speaker provides audio feedback based on the detected commands.
Cirkit Designer LogoOpen Project in Cirkit Designer

Explore Projects Built with Speaker

Use Cirkit Designer to design, explore, and prototype these projects online. Some projects support real-time simulation. Click "Open Project" to start designing instantly!
Image of Minor: A project utilizing Speaker in a practical application
ESP32-Based Voice Assistant with Battery-Powered Microphone and Speaker
This circuit is a voice-controlled system that uses an ESP32 microcontroller to process audio input from a microphone, send the data to a Gemini API for speech-to-text conversion, and output responses through a speaker. It includes an IR sensor for additional input, an LED for status indication, and a battery with a charging module for power management.
Cirkit Designer LogoOpen Project in Cirkit Designer
Image of Main Design: A project utilizing Speaker in a practical application
ESP32-Based Voice-Controlled Speaker
This circuit is a digital voice playback and recording system powered by a 3.7V battery. It features an ESP32 microcontroller for processing, an Adafruit MAX98357A amplifier to drive a loudspeaker for audio output, and an Adafruit MAX9814 microphone amplifier for audio input. A pushbutton provides user interaction, and a 3.3V regulator ensures stable power supply to the components.
Cirkit Designer LogoOpen Project in Cirkit Designer
Image of Bluetooth Speaker: A project utilizing Speaker in a practical application
Arduino UNO Bluetooth-Controlled Speaker
This circuit is designed to function as a Bluetooth-controlled speaker system using an Arduino UNO as the central controller. The Arduino is connected to a Bluetooth Mate Gold module for wireless communication and a speaker for audio output. The Arduino's digital pins D0 and D1 are used for RX and TX communication with the Bluetooth module, while pin D9 is configured to drive the speaker.
Cirkit Designer LogoOpen Project in Cirkit Designer
Image of VOICE PY 2: A project utilizing Speaker in a practical application
Arduino UNO Voice Assistant with KY-037 Microphone and Speaker
This circuit is a voice assistant project that uses an Arduino UNO to interface with a KY-037 microphone and a speaker. The microphone detects voice commands, which are processed by the Arduino, and the speaker provides audio feedback based on the detected commands.
Cirkit Designer LogoOpen Project in Cirkit Designer

Common Applications and Use Cases

  • Home theater systems
  • Personal computers and laptops
  • Mobile phones and portable media players
  • Public address systems in schools, auditoriums, and stadiums
  • Professional audio setups for concerts and events

Technical Specifications

Key Technical Details

  • Impedance: Typically 4, 8, or 16 ohms
  • Power Handling: Varies widely, from less than 1W to several hundred watts
  • Frequency Response: Range of frequencies the speaker can reproduce (e.g., 20 Hz to 20 kHz)
  • Sensitivity: Sound pressure level produced by the speaker at a given power input, usually measured in dB/W/m

Pin Configuration and Descriptions

Pin Number Description
1 Positive Terminal (+)
2 Negative Terminal (-)

Usage Instructions

How to Use the Speaker in a Circuit

  1. Identify the terminals: Locate the positive (+) and negative (-) terminals on the speaker.
  2. Connect to an amplifier: Use speaker wire to connect the speaker's positive terminal to the amplifier's positive output, and the same for the negative terminals.
  3. Set the volume: Start with a low volume on your amplifier before testing the speaker to avoid damage.
  4. Test the speaker: Play an audio source through the amplifier and gradually increase the volume to a comfortable listening level.

Important Considerations and Best Practices

  • Matching Impedance: Ensure that the speaker impedance matches the output impedance of the amplifier.
  • Power Handling: Do not exceed the speaker's maximum power rating to avoid damage.
  • Quality of Wiring: Use appropriate gauge speaker wire for optimal sound quality and to handle the power level.
  • Enclosure: If the speaker is not already in an enclosure, consider placing it in one for better sound quality.

Troubleshooting and FAQs

Common Issues Users Might Face

  • No Sound: Check connections, ensure the amplifier is on and the volume is up.
  • Distortion: Reduce the volume level, check for damaged wiring, or consider if the speaker is being overpowered.
  • Low Volume: Ensure the speaker's sensitivity is appropriate for the amplifier's output, and check for any signal loss in the wiring.

Solutions and Tips for Troubleshooting

  • Check Connections: Loose or faulty connections are often the cause of speaker problems.
  • Inspect for Damage: Look for visible signs of damage to the speaker cone or wiring.
  • Test with Another Speaker: If possible, connect another speaker to the same output to determine if the issue is with the speaker or the amplifier.

FAQs

  • Q: Can I connect multiple speakers to one output?

    • A: Yes, but you must consider the total impedance load on the amplifier. Wiring in series increases impedance, while parallel wiring decreases it.
  • Q: What gauge wire should I use for my speakers?

    • A: It depends on the power handling and distance. For most home applications, 16 to 18 gauge wire is sufficient.
  • Q: How can I improve the bass response of my speaker?

    • A: Use a properly designed enclosure and consider adding a subwoofer for lower frequencies.

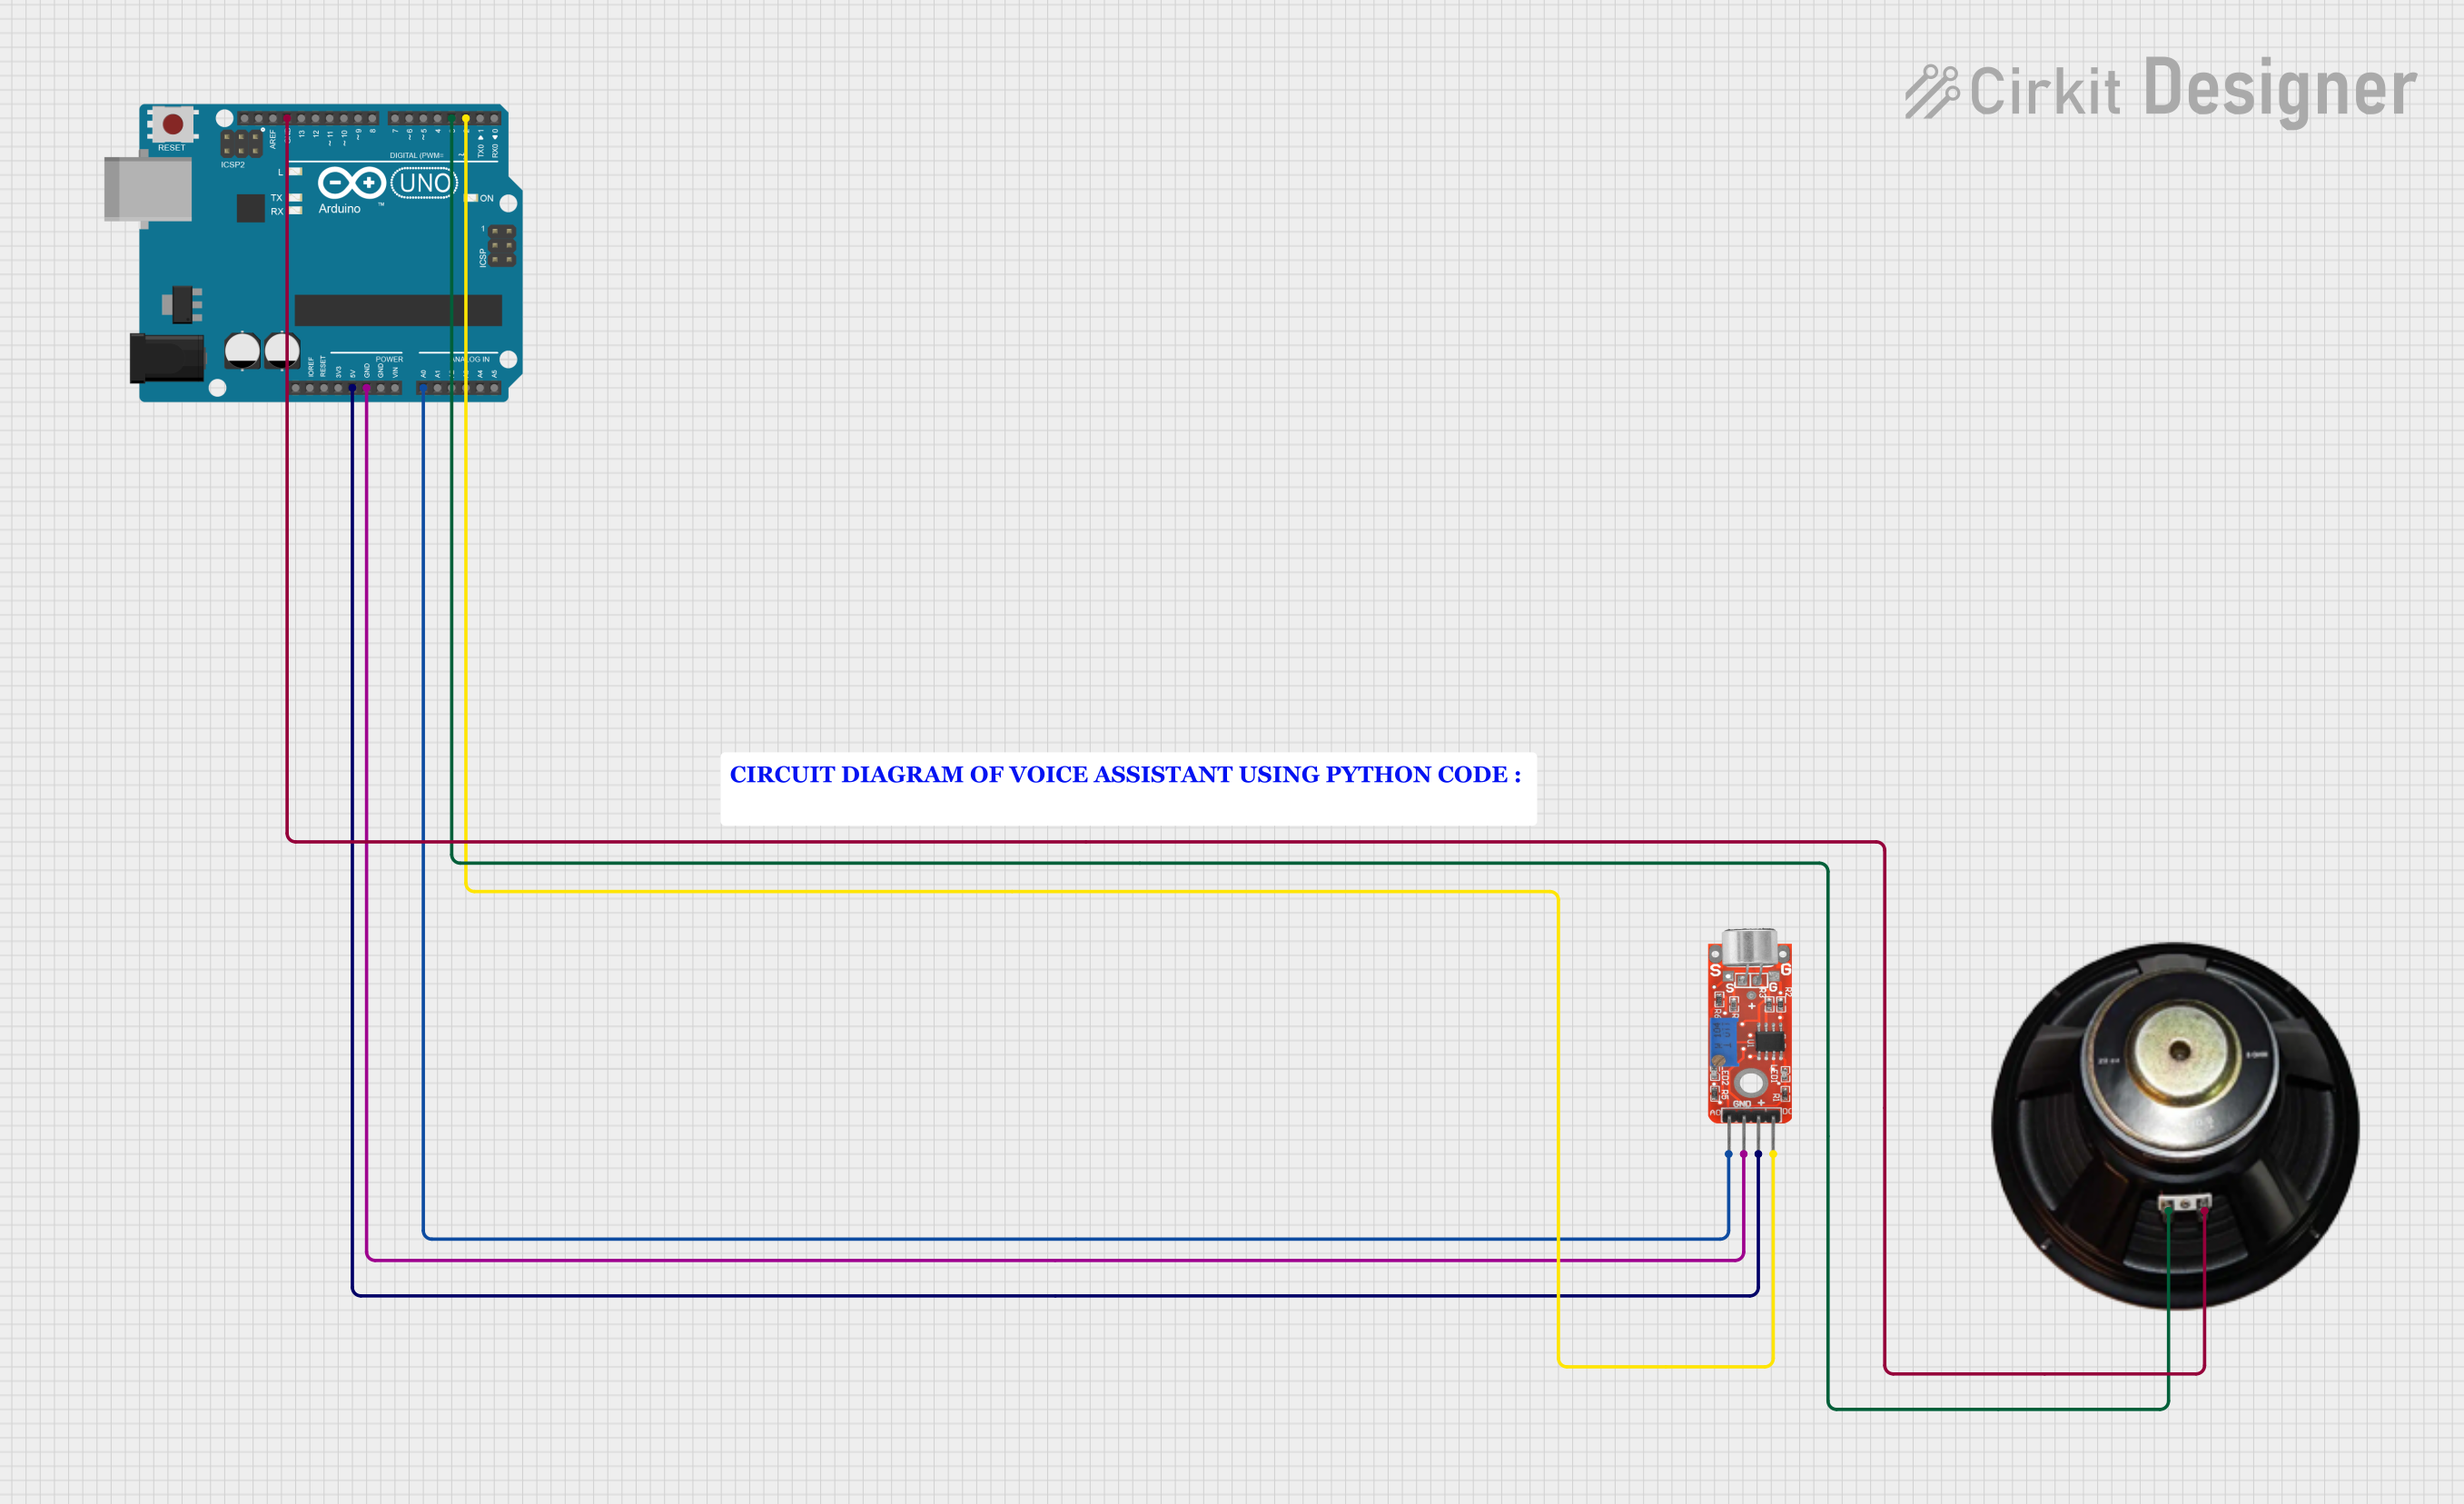
Example Code for Connecting a Speaker to an Arduino UNO

// Define the pin connected to the speaker
const int speakerPin = 9;

void setup() {
  // Initialize the speaker pin as an output
  pinMode(speakerPin, OUTPUT);
}

void loop() {
  // Play a tone on the speaker
  tone(speakerPin, 440); // Play a 440 Hz tone (A4 note)
  delay(1000);           // Delay for 1 second
  noTone(speakerPin);    // Stop the tone
  delay(1000);           // Delay for 1 second
}

Note: The above code uses the tone() function to generate a square wave of the specified frequency (and hence a tone) on a pin. A simple piezo buzzer is often used with Arduino for such applications, but a speaker can also be used with an appropriate driver circuit to amplify the signal.