Cirkit Designer Logo
Cirkit Designer
Your all-in-one circuit design IDE
Home / 
Component Documentation

How to Use Adafruit DotStar Wing: Examples, Pinouts, and Specs

Image of Adafruit DotStar Wing
Cirkit Designer LogoDesign with Adafruit DotStar Wing in Cirkit Designer

Introduction

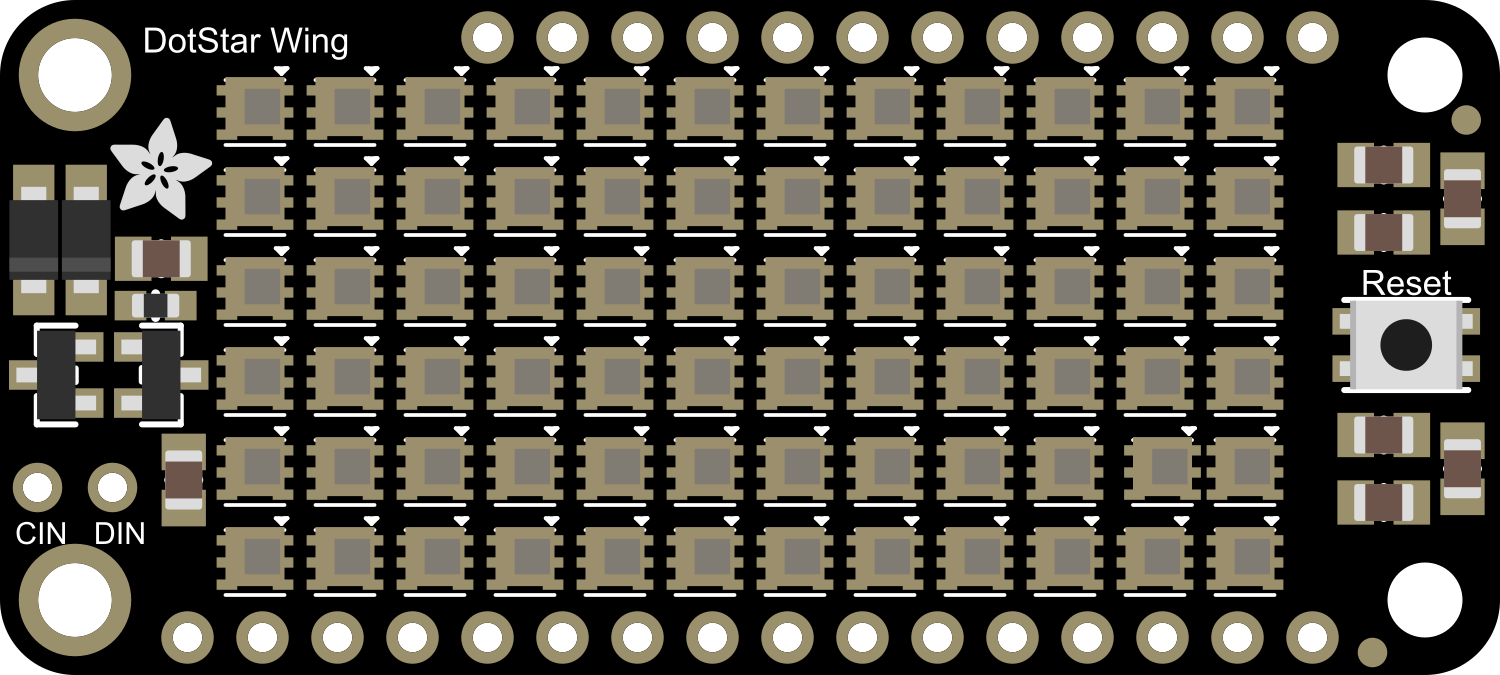
The Adafruit DotStar Wing is an add-on board designed for controlling APA102 LEDs, commonly known as DotStar LEDs. These high-quality RGB LEDs are known for their vibrant colors and fast refresh rates, making them ideal for a wide range of applications including decorative lighting, signal indicators, and advanced light displays. The DotStar Wing simplifies the process of connecting DotStar LED strips to microcontrollers, such as the Arduino UNO, by providing a convenient interface and additional features to enhance LED control.

Explore Projects Built with Adafruit DotStar Wing

Use Cirkit Designer to design, explore, and prototype these projects online. Some projects support real-time simulation. Click "Open Project" to start designing instantly!
ESP32-Based Vibration Feedback System with Quad Alphanumeric Display and ADXL343 Accelerometer
Image of EC444 - Quest 3: A project utilizing Adafruit DotStar Wing in a practical application
This circuit features an Adafruit HUZZAH32 ESP32 Feather board as the central microcontroller, which is connected to an Adafruit Quad AlphaNumeric Featherwing display and an Adafruit ADXL343 accelerometer via I2C communication (SCL and SDA lines). The ESP32 controls a vibration motor connected to one of its GPIO pins (A5_IO4) and shares a common power supply (3.3V) and ground (GND) with the other components. The purpose of this circuit is likely to read acceleration data, display information on the alphanumeric display, and provide haptic feedback through the vibration motor.
Cirkit Designer LogoOpen Project in Cirkit Designer
Arduino UNO and OLED FeatherWing Display: Battery-Powered Hello World Project
Image of ARDUINO_SSD1306: A project utilizing Adafruit DotStar Wing in a practical application
This circuit consists of an Arduino UNO connected to an Adafruit OLED FeatherWing display via I2C communication (SDA and SCL lines). The Arduino is powered through a Vcc source and provides 3.3V and GND connections to the OLED display. The Arduino runs a program to display 'Hello, World!' on the OLED screen.
Cirkit Designer LogoOpen Project in Cirkit Designer
Arduino and Raspberry Pi Controlled LED Strip
Image of led_arduino+rasb: A project utilizing Adafruit DotStar Wing in a practical application
This circuit includes an Arduino Mega 2560, a Raspberry Pi 4B, an Adafruit DotStar LED Strip, and a resistor. The Arduino is configured to control the LED strip via a PWM pin and is connected to the Raspberry Pi through a GPIO pin with a pull-up resistor. The Arduino and Raspberry Pi share a common ground, and the LED strip is powered by the 5V output from the Arduino.
Cirkit Designer LogoOpen Project in Cirkit Designer
Solar-Powered Environmental Data Logger with Adafruit Feather M0 Express
Image of Lake Thoreau Monitoring Station: A project utilizing Adafruit DotStar Wing in a practical application
This circuit is designed for environmental data collection and logging, utilizing an Adafruit Feather M0 Express microcontroller as the central processing unit. It interfaces with a BME280 sensor for atmospheric temperature, humidity, and pressure measurements, an SGP30 sensor for monitoring air quality (eCO2 and TVOC), and a STEMMA soil sensor for detecting soil moisture and temperature. The system is powered by a solar panel and a 3.7v LiPo battery, managed by an Adafruit BQ24074 Solar-DC-USB Lipo Charger, and provides easy access to the microcontroller's connections through an Adafruit Terminal Breakout FeatherWing.
Cirkit Designer LogoOpen Project in Cirkit Designer

Explore Projects Built with Adafruit DotStar Wing

Use Cirkit Designer to design, explore, and prototype these projects online. Some projects support real-time simulation. Click "Open Project" to start designing instantly!
Image of EC444 - Quest 3: A project utilizing Adafruit DotStar Wing in a practical application
ESP32-Based Vibration Feedback System with Quad Alphanumeric Display and ADXL343 Accelerometer
This circuit features an Adafruit HUZZAH32 ESP32 Feather board as the central microcontroller, which is connected to an Adafruit Quad AlphaNumeric Featherwing display and an Adafruit ADXL343 accelerometer via I2C communication (SCL and SDA lines). The ESP32 controls a vibration motor connected to one of its GPIO pins (A5_IO4) and shares a common power supply (3.3V) and ground (GND) with the other components. The purpose of this circuit is likely to read acceleration data, display information on the alphanumeric display, and provide haptic feedback through the vibration motor.
Cirkit Designer LogoOpen Project in Cirkit Designer
Image of ARDUINO_SSD1306: A project utilizing Adafruit DotStar Wing in a practical application
Arduino UNO and OLED FeatherWing Display: Battery-Powered Hello World Project
This circuit consists of an Arduino UNO connected to an Adafruit OLED FeatherWing display via I2C communication (SDA and SCL lines). The Arduino is powered through a Vcc source and provides 3.3V and GND connections to the OLED display. The Arduino runs a program to display 'Hello, World!' on the OLED screen.
Cirkit Designer LogoOpen Project in Cirkit Designer
Image of led_arduino+rasb: A project utilizing Adafruit DotStar Wing in a practical application
Arduino and Raspberry Pi Controlled LED Strip
This circuit includes an Arduino Mega 2560, a Raspberry Pi 4B, an Adafruit DotStar LED Strip, and a resistor. The Arduino is configured to control the LED strip via a PWM pin and is connected to the Raspberry Pi through a GPIO pin with a pull-up resistor. The Arduino and Raspberry Pi share a common ground, and the LED strip is powered by the 5V output from the Arduino.
Cirkit Designer LogoOpen Project in Cirkit Designer
Image of Lake Thoreau Monitoring Station: A project utilizing Adafruit DotStar Wing in a practical application
Solar-Powered Environmental Data Logger with Adafruit Feather M0 Express
This circuit is designed for environmental data collection and logging, utilizing an Adafruit Feather M0 Express microcontroller as the central processing unit. It interfaces with a BME280 sensor for atmospheric temperature, humidity, and pressure measurements, an SGP30 sensor for monitoring air quality (eCO2 and TVOC), and a STEMMA soil sensor for detecting soil moisture and temperature. The system is powered by a solar panel and a 3.7v LiPo battery, managed by an Adafruit BQ24074 Solar-DC-USB Lipo Charger, and provides easy access to the microcontroller's connections through an Adafruit Terminal Breakout FeatherWing.
Cirkit Designer LogoOpen Project in Cirkit Designer

Common Applications and Use Cases

  • Decorative lighting for homes and commercial spaces
  • Wearable electronics and costumes
  • Signage and display panels
  • Dynamic lighting effects for art installations
  • Prototyping and educational projects in electronics and programming

Technical Specifications

Key Technical Details

  • Operating Voltage: 3.3V to 5V
  • Logic Level: 5V tolerant
  • Data Transfer Speed: Up to 8000 Kbps
  • LED Control: APA102/DotStar compatible

Pin Configuration and Descriptions

Pin Number Function Description
1 GND Ground connection
2 VCC Power supply for the LEDs (3.3V to 5V)
3 Data In (DI) Data input for LED control
4 Clock In (CI) Clock input for synchronizing data transmission

Usage Instructions

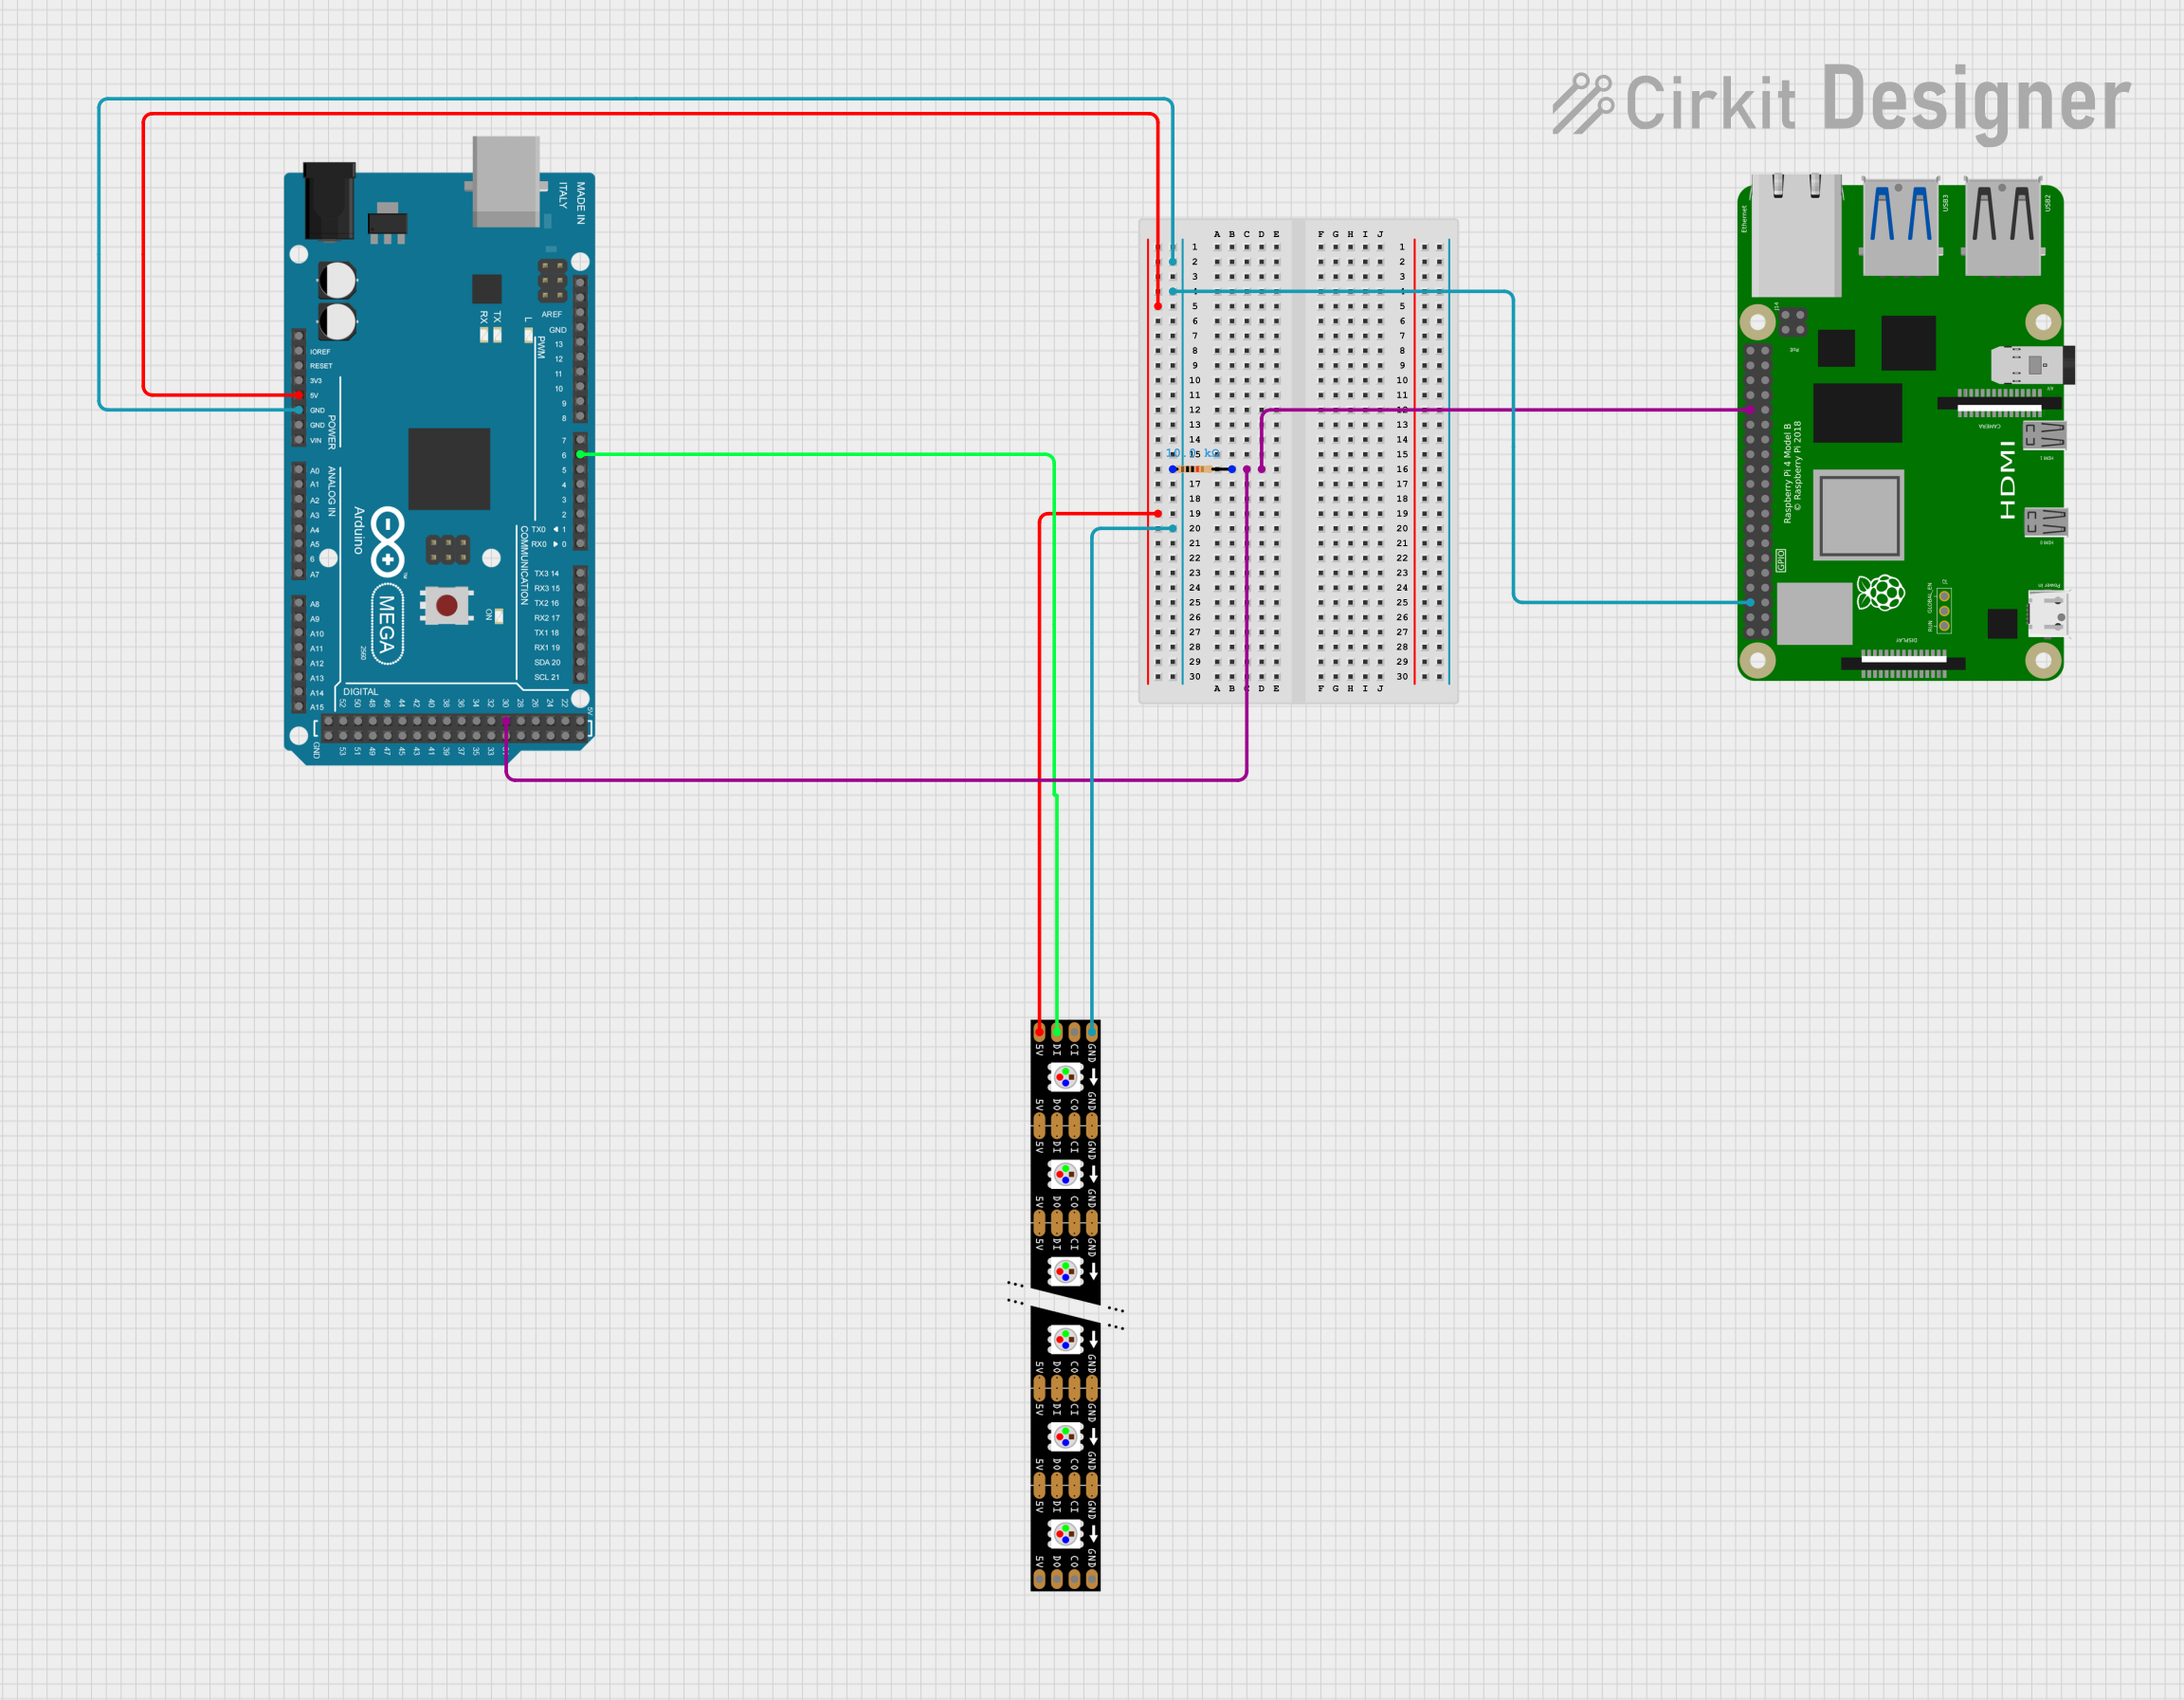
Connecting the DotStar Wing to a Circuit

  1. Connect the VCC pin to a 3.3V or 5V power supply.
  2. Connect the GND pin to the ground of your power supply and microcontroller.
  3. Connect the Data In (DI) pin to a digital output pin on your microcontroller.
  4. Connect the Clock In (CI) pin to another digital output pin on your microcontroller.

Important Considerations and Best Practices

  • Ensure that the power supply can handle the current requirements of your LED strip.
  • Use a level shifter if your microcontroller operates at a logic level below 5V.
  • Keep the wiring as short as possible to prevent signal degradation.
  • Add a capacitor (1000 µF, 6.3V or higher) across the power supply lines to smooth out power supply fluctuations.
  • Include a 300 to 500 Ohm resistor on the data line to prevent spikes that can damage the first LED.

Example Code for Arduino UNO

#include <Adafruit_DotStar.h>
#include <SPI.h> // Use SPI library to communicate with DotStar

#define NUMPIXELS 30 // Number of LEDs in the strip
#define DATAPIN    4 // Data pin connected to DotStar data input
#define CLOCKPIN   5 // Clock pin connected to DotStar clock input

// Create DotStar object
Adafruit_DotStar strip = Adafruit_DotStar(NUMPIXELS, DATAPIN, CLOCKPIN, DOTSTAR_BRG);

void setup() {
  strip.begin(); // Initialize pins for output
  strip.show();  // Turn all LEDs off ASAP
}

void loop() {
  colorWipe(strip.Color(255, 0, 0), 50); // Red color wipe
  colorWipe(strip.Color(0, 255, 0), 50); // Green color wipe
  colorWipe(strip.Color(0, 0, 255), 50); // Blue color wipe
}

// Fill strip with a color, one pixel at a time
void colorWipe(uint32_t color, int wait) {
  for(int i=0; i<strip.numPixels(); i++) { // For each pixel in strip...
    strip.setPixelColor(i, color);         //  Set pixel's color (in RAM)
    strip.show();                          //  Update strip to match
    delay(wait);                           //  Pause for a moment
  }
}

Troubleshooting and FAQs

Common Issues

  • LEDs not lighting up: Check the power supply connections and ensure that the voltage and current ratings are adequate for your LED strip.
  • Flickering LEDs: This can be caused by insufficient power or long wires. Shorten the wires if possible and use a larger power supply.
  • Incorrect colors: Ensure that the data and clock lines are connected properly and that the code matches the LED strip's color order.

Solutions and Tips for Troubleshooting

  • Double-check all connections, especially the orientation of the data and clock lines.
  • Use a multimeter to verify that the power supply is delivering the correct voltage.
  • If using a long LED strip, add power injection points at regular intervals to maintain consistent brightness and color.
  • Update the Arduino library for DotStar LEDs to the latest version to ensure compatibility.

FAQs

Q: Can I control multiple DotStar strips with one Wing? A: Yes, you can control multiple strips by connecting their data and clock lines in parallel to the Wing's DI and CI pins, respectively.

Q: What is the maximum length of the LED strip I can control with the DotStar Wing? A: The maximum length depends on your power supply's capacity and the data signal integrity. For longer strips, power injection and signal amplification may be necessary.

Q: How do I change the brightness of the LEDs? A: You can use the setBrightness() function in the Adafruit_DotStar library to adjust the brightness of the entire strip.

Q: Can I use the DotStar Wing with a 3.3V logic microcontroller? A: Yes, the Wing is 5V logic tolerant, but for reliable operation, a level shifter is recommended when using a 3.3V logic microcontroller.