
How to Use GY-SHT3x I2C Sensor: Examples, Pinouts, and Specs
 Design with GY-SHT3x I2C Sensor in Cirkit Designer
Introduction
The GY-SHT3x is a digital temperature and humidity sensor module that communicates via the I2C protocol. It is designed for high accuracy and reliability, making it ideal for environmental monitoring applications. The sensor integrates Sensirion's SHT3x series, which provides precise measurements of temperature and relative humidity in a compact form factor.
Explore Projects Built with GY-SHT3x I2C Sensor
 Open Project in Cirkit Designer
 Open Project in Cirkit Designer
 Open Project in Cirkit Designer
 Open Project in Cirkit Designer
Explore Projects Built with GY-SHT3x I2C Sensor
Open Project in Cirkit DesignerOpen Project in Cirkit DesignerOpen Project in Cirkit DesignerOpen Project in Cirkit DesignerCommon Applications and Use Cases
- Weather stations and environmental monitoring systems
- HVAC (Heating, Ventilation, and Air Conditioning) control
- Industrial process monitoring
- IoT (Internet of Things) devices
- Agricultural and greenhouse monitoring
Technical Specifications
The GY-SHT3x sensor module is based on the SHT3x series and offers the following key specifications:
| Parameter | Value |
|---|---|
| Supply Voltage (VDD) | 2.4V to 5.5V |
| Typical Operating Voltage | 3.3V |
| Current Consumption | 0.15 mA (measuring) / 0.001 mA (idle) |
| Temperature Range | -40°C to +125°C |
| Temperature Accuracy | ±0.3°C (typical) |
| Humidity Range | 0% to 100% RH |
| Humidity Accuracy | ±2% RH (typical) |
| Communication Protocol | I2C |
| I2C Address | 0x44 (default) or 0x45 (configurable) |
| Dimensions | 15mm x 10mm x 2mm |
Pin Configuration and Descriptions
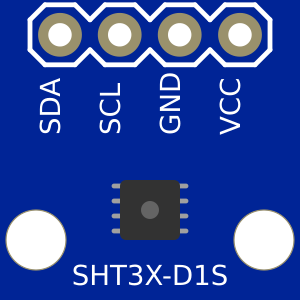
The GY-SHT3x module typically has four pins. The table below describes each pin:
| Pin | Name | Description |
|---|---|---|
| 1 | VCC | Power supply input (2.4V to 5.5V) |
| 2 | GND | Ground connection |
| 3 | SDA | I2C data line |
| 4 | SCL | I2C clock line |
Usage Instructions
How to Use the GY-SHT3x in a Circuit
- Power the Sensor: Connect the VCC pin to a 3.3V or 5V power source and the GND pin to ground.
- Connect I2C Lines:
- Connect the SDA pin to the I2C data line of your microcontroller.
- Connect the SCL pin to the I2C clock line of your microcontroller.
- Pull-Up Resistors: Ensure that the SDA and SCL lines have pull-up resistors (typically 4.7kΩ to 10kΩ) if they are not already present on the module.
- Address Selection: The default I2C address is 0x44. If you need to use 0x45, consult the datasheet for instructions on address configuration.
Important Considerations and Best Practices
- Avoid exposing the sensor to extreme conditions (e.g., condensation, dust) to maintain accuracy.
- Use decoupling capacitors (e.g., 0.1µF) near the VCC pin to stabilize the power supply.
- Keep I2C lines as short as possible to reduce noise and ensure reliable communication.
- If using multiple I2C devices, ensure each device has a unique address.
Example Code for Arduino UNO
Below is an example of how to interface the GY-SHT3x sensor with an Arduino UNO using the Wire library:
#include <Wire.h>

// I2C address of the GY-SHT3x sensor
#define SHT3X_ADDRESS 0x44

void setup() {
  Wire.begin(); // Initialize I2C communication
  Serial.begin(9600); // Start serial communication for debugging

  // Send a soft reset command to the sensor
  Wire.beginTransmission(SHT3X_ADDRESS);
  Wire.write(0x30); // MSB of the soft reset command
  Wire.write(0xA2); // LSB of the soft reset command
  Wire.endTransmission();
  delay(10); // Wait for the sensor to reset
}

void loop() {
  // Send measurement command (high repeatability, no clock stretching)
  Wire.beginTransmission(SHT3X_ADDRESS);
  Wire.write(0x24); // MSB of the measurement command
  Wire.write(0x00); // LSB of the measurement command
  Wire.endTransmission();
  delay(15); // Wait for measurement to complete

  // Request 6 bytes of data (temperature and humidity)
  Wire.requestFrom(SHT3X_ADDRESS, 6);
  if (Wire.available() == 6) {
    uint16_t tempRaw = (Wire.read() << 8) | Wire.read(); // Raw temperature
    Wire.read(); // CRC byte (ignored in this example)
    uint16_t humRaw = (Wire.read() << 8) | Wire.read(); // Raw humidity
    Wire.read(); // CRC byte (ignored in this example)

    // Convert raw values to temperature and humidity
    float temperature = -45 + 175 * ((float)tempRaw / 65535.0);
    float humidity = 100 * ((float)humRaw / 65535.0);

    // Print results to the serial monitor
    Serial.print("Temperature: ");
    Serial.print(temperature);
    Serial.println(" °C");
    Serial.print("Humidity: ");
    Serial.print(humidity);
    Serial.println(" %RH");
  }

  delay(1000); // Wait 1 second before the next measurement
}
Troubleshooting and FAQs
Common Issues and Solutions
No Data from the Sensor:
- Ensure the sensor is powered correctly (check VCC and GND connections).
- Verify the I2C address (default is 0x44) and ensure no address conflicts.
- Check for proper pull-up resistors on the SDA and SCL lines.
Inaccurate Readings:
- Ensure the sensor is not exposed to condensation or contaminants.
- Verify that the power supply is stable and within the specified range.
I2C Communication Errors:
- Check the wiring and ensure SDA and SCL lines are not swapped.
- Reduce the I2C clock speed if using long wires or in a noisy environment.
FAQs
Q: Can I use the GY-SHT3x with a 5V microcontroller?
A: Yes, the sensor supports a supply voltage of up to 5.5V and is compatible with 5V logic levels.
Q: How do I change the I2C address?
A: The I2C address can be changed to 0x45 by configuring the ADDR pin or using specific commands. Refer to the datasheet for details.
Q: What is the typical response time of the sensor?
A: The sensor has a response time of approximately 8 seconds for humidity and less than 1 second for temperature.