Cirkit Designer Logo
Cirkit Designer
Your all-in-one circuit design IDE
Home / 
Component Documentation

How to Use greyboard: Examples, Pinouts, and Specs

Image of greyboard
Cirkit Designer LogoDesign with greyboard in Cirkit Designer

Introduction

A greyboard, manufactured by Greycode (Part ID: Greycode), is a type of cardboard commonly used in electronics for prototyping circuits. It provides a sturdy, non-conductive base for mounting components, making it ideal for DIY projects, educational purposes, and temporary circuit setups. Greyboards are lightweight, cost-effective, and easy to cut or shape, making them a popular choice for hobbyists and students.

Explore Projects Built with greyboard

Use Cirkit Designer to design, explore, and prototype these projects online. Some projects support real-time simulation. Click "Open Project" to start designing instantly!
Interactive Touch and Motion Sensor System with Bela Board and OLED Display
Image of GIZMO Teaset: A project utilizing greyboard in a practical application
This circuit integrates a Bela Board with various sensors and actuators, including a TRILL CRAFT touch sensor, an ADXXL335 accelerometer, a vibration motor, and a loudspeaker. The Bela Board processes input from the touch sensor and accelerometer, and controls the vibration motor and loudspeaker, while an OLED display provides visual feedback.
Cirkit Designer LogoOpen Project in Cirkit Designer
Arduino UNO Controlled LED Matrix and LCD Interface with Joystick Interaction
Image of Digital Game Circuit: A project utilizing greyboard in a practical application
This circuit features an Arduino UNO microcontroller interfaced with an 8x8 LED matrix, an LCD screen, and a KY-023 Dual Axis Joystick Module. The Arduino controls the LED matrix via digital pins D10-D12 and powers the matrix, LCD, and joystick module from its 5V output. The joystick's analog outputs are connected to the Arduino's analog inputs A0 and A1 for position sensing, while the LCD is controlled through digital pins D2-D6 and D13 for display purposes.
Cirkit Designer LogoOpen Project in Cirkit Designer
Raspberry Pi Zero W-Based Handheld Gaming Console with LCD Display
Image of pigame: A project utilizing greyboard in a practical application
This circuit integrates a Raspberry Pi Zero W with an LCD TFT screen and two custom PiGrrl Zero gamepad PCBs. The Raspberry Pi provides power to the LCD screen and communicates with it via GPIO pins for control signals and SPI for data transfer. The gamepad PCBs are connected to the Raspberry Pi's GPIO pins, allowing for user input to be processed by the Raspberry Pi for gaming or other interactive applications.
Cirkit Designer LogoOpen Project in Cirkit Designer
Battery-Powered Sumo Robot with IR Sensors and DC Motors
Image of MASSIVE SUMO AUTO BOARD: A project utilizing greyboard in a practical application
This circuit is designed for a robotic system, featuring a Massive Sumo Board as the central controller. It integrates multiple FS-80NK diffuse IR sensors and IR line sensors for obstacle detection and line following, respectively, and controls two GM25 DC motors via MD13s motor drivers for movement. Power is supplied by an 11.1V LiPo battery.
Cirkit Designer LogoOpen Project in Cirkit Designer

Explore Projects Built with greyboard

Use Cirkit Designer to design, explore, and prototype these projects online. Some projects support real-time simulation. Click "Open Project" to start designing instantly!
Image of GIZMO Teaset: A project utilizing greyboard in a practical application
Interactive Touch and Motion Sensor System with Bela Board and OLED Display
This circuit integrates a Bela Board with various sensors and actuators, including a TRILL CRAFT touch sensor, an ADXXL335 accelerometer, a vibration motor, and a loudspeaker. The Bela Board processes input from the touch sensor and accelerometer, and controls the vibration motor and loudspeaker, while an OLED display provides visual feedback.
Cirkit Designer LogoOpen Project in Cirkit Designer
Image of Digital Game Circuit: A project utilizing greyboard in a practical application
Arduino UNO Controlled LED Matrix and LCD Interface with Joystick Interaction
This circuit features an Arduino UNO microcontroller interfaced with an 8x8 LED matrix, an LCD screen, and a KY-023 Dual Axis Joystick Module. The Arduino controls the LED matrix via digital pins D10-D12 and powers the matrix, LCD, and joystick module from its 5V output. The joystick's analog outputs are connected to the Arduino's analog inputs A0 and A1 for position sensing, while the LCD is controlled through digital pins D2-D6 and D13 for display purposes.
Cirkit Designer LogoOpen Project in Cirkit Designer
Image of pigame: A project utilizing greyboard in a practical application
Raspberry Pi Zero W-Based Handheld Gaming Console with LCD Display
This circuit integrates a Raspberry Pi Zero W with an LCD TFT screen and two custom PiGrrl Zero gamepad PCBs. The Raspberry Pi provides power to the LCD screen and communicates with it via GPIO pins for control signals and SPI for data transfer. The gamepad PCBs are connected to the Raspberry Pi's GPIO pins, allowing for user input to be processed by the Raspberry Pi for gaming or other interactive applications.
Cirkit Designer LogoOpen Project in Cirkit Designer
Image of MASSIVE SUMO AUTO BOARD: A project utilizing greyboard in a practical application
Battery-Powered Sumo Robot with IR Sensors and DC Motors
This circuit is designed for a robotic system, featuring a Massive Sumo Board as the central controller. It integrates multiple FS-80NK diffuse IR sensors and IR line sensors for obstacle detection and line following, respectively, and controls two GM25 DC motors via MD13s motor drivers for movement. Power is supplied by an 11.1V LiPo battery.
Cirkit Designer LogoOpen Project in Cirkit Designer

Common Applications and Use Cases

  • Prototyping simple electronic circuits
  • Educational demonstrations and workshops
  • DIY electronics projects
  • Temporary mounting of components for testing
  • Creating custom enclosures or supports for small devices

Technical Specifications

While greyboards are not electronic components themselves, their physical properties are important for their use in electronics. Below are the key specifications:

Property Specification
Material Compressed cardboard (non-conductive)
Thickness 1.5 mm to 3 mm (varies by model)
Dimensions Typically 300 mm x 300 mm (customizable)
Weight ~0.5 kg/m²
Surface Finish Matte
Temperature Tolerance Up to 80°C (short-term exposure)
Electrical Conductivity Non-conductive

Pin Configuration and Descriptions

As a non-electronic component, the greyboard does not have pins or electrical connections. However, it serves as a physical base for mounting components such as resistors, capacitors, and ICs.

Usage Instructions

How to Use the Greyboard in a Circuit

  1. Prepare the Greyboard: Cut the greyboard to the desired size using a utility knife or scissors. Ensure the edges are smooth to avoid damage to components.
  2. Plan the Layout: Sketch the circuit layout on the greyboard using a pencil or marker. This helps in organizing components and wires.
  3. Mount Components:
    • Use adhesive (e.g., double-sided tape or glue) to secure components to the greyboard.
    • Alternatively, use small screws or zip ties for heavier components.
  4. Connect the Circuit: Use jumper wires, breadboards, or soldered connections to complete the circuit. Ensure wires are properly insulated to prevent short circuits.
  5. Test the Circuit: Once the components are mounted and connected, test the circuit functionality. Make adjustments as needed.

Important Considerations and Best Practices

  • Avoid Overheating: Do not solder directly onto the greyboard, as it is not heat-resistant and may deform or catch fire.
  • Use Insulation: Ensure all exposed wires are insulated to prevent accidental short circuits.
  • Secure Components: Use appropriate adhesives or fasteners to prevent components from shifting during use.
  • Environmental Conditions: Keep the greyboard away from moisture, as it can weaken the material and compromise its structural integrity.

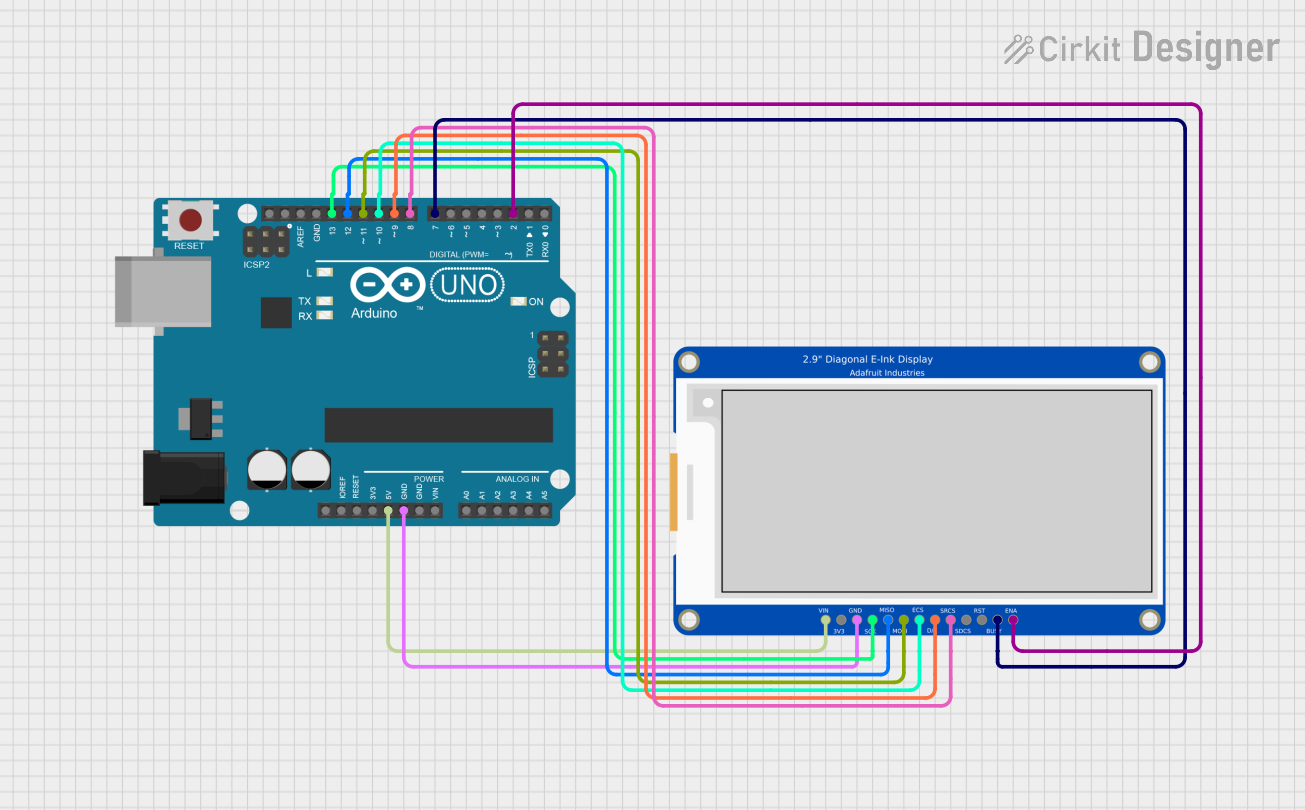
Example: Using Greyboard with an Arduino UNO

Greyboards are often used as a base for Arduino projects. Below is an example of how to mount an Arduino UNO and connect an LED circuit:

  1. Mount the Arduino UNO on the greyboard using screws or adhesive.
  2. Connect an LED to pin 13 of the Arduino using a 220-ohm resistor.
  3. Use jumper wires to complete the circuit.

Sample Arduino Code

// This code blinks an LED connected to pin 13 of the Arduino UNO.
// Ensure the LED's longer leg (anode) is connected to pin 13, and the shorter
// leg (cathode) is connected to GND through a 220-ohm resistor.

void setup() {
  pinMode(13, OUTPUT); // Set pin 13 as an output pin
}

void loop() {
  digitalWrite(13, HIGH); // Turn the LED on
  delay(1000);            // Wait for 1 second
  digitalWrite(13, LOW);  // Turn the LED off
  delay(1000);            // Wait for 1 second
}

Troubleshooting and FAQs

Common Issues Users Might Face

  1. Components Falling Off:

    • Cause: Insufficient adhesive or improper mounting.
    • Solution: Use stronger adhesive or mechanical fasteners like screws or zip ties.
  2. Circuit Malfunction:

    • Cause: Loose connections or short circuits.
    • Solution: Double-check all connections and ensure wires are properly insulated.
  3. Greyboard Warping:

    • Cause: Exposure to moisture or excessive heat.
    • Solution: Store the greyboard in a dry, cool environment and avoid soldering directly on it.
  4. Difficulty Cutting the Greyboard:

    • Cause: Using dull tools or improper technique.
    • Solution: Use a sharp utility knife and a straight edge for clean cuts.

FAQs

Q: Can I reuse a greyboard for multiple projects?
A: Yes, as long as the greyboard is not damaged or warped, it can be reused. Remove old components carefully to avoid tearing the surface.

Q: Is the greyboard safe for high-voltage circuits?
A: Greyboards are non-conductive but not designed for high-voltage applications. Use caution and ensure proper insulation.

Q: Can I paint or decorate the greyboard?
A: Yes, you can paint or decorate the greyboard to enhance its appearance. Use non-conductive paints to avoid affecting the circuit.

Q: How do I clean a greyboard?
A: Use a dry cloth or a soft brush to remove dust. Avoid using water or cleaning solutions, as they can damage the material.