Cirkit Designer
Your all-in-one circuit design IDE
Home /
Component Documentation
How to Use PAM8403 with volume control: Examples, Pinouts, and Specs
Introduction
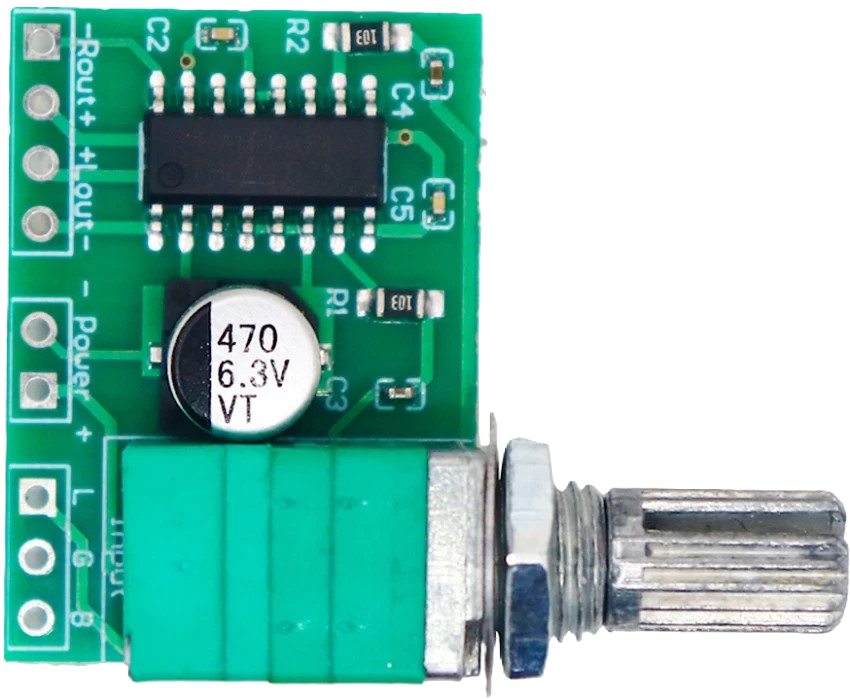
The PAM8403 is a low distortion, low noise audio amplifier module with built-in volume control, capable of delivering 3W output per channel. It is designed for driving small speakers in portable audio applications. This module is ideal for projects requiring a compact, efficient, and high-quality audio amplification solution.
Explore Projects Built with PAM8403 with volume control
PAM8403 Amplifier with 3.5mm Audio Jack for Mono Speaker Output

This circuit is a mono audio amplifier system. It uses a PAM8403 amplifier IC to amplify the audio signal received from a 3.5mm audio jack and drives a speaker. The audio signal from the left channel (L) of the audio jack is amplified and output through the speaker, while the right channel (R) is connected but not utilized in this mono setup.
PAM8403 Amplified Piezo Speaker Array with ATTiny Control

This circuit is an audio amplification system with multiple piezo speakers driven by a PAM8403 amplifier IC. It features an ATtiny microcontroller for potential audio control, powered by a 5V battery with capacitors for stabilization and a trimmer potentiometer for input level adjustment.
Bluetooth Audio Receiver with Battery-Powered Amplifier and Loudspeakers

This circuit is a Bluetooth-enabled audio system powered by a rechargeable 18650 Li-ion battery. It includes a TP4056 module for battery charging and protection, a PAM8403 amplifier with volume control to drive two loudspeakers, and a Bluetooth audio receiver to wirelessly receive audio signals.
Arduino Nano Controlled PAM8403 Audio Amplifier with Voice Synthesis

This circuit is designed to drive a loudspeaker using an Arduino Nano and a PAM8403 audio amplifier. The Arduino Nano is programmed to generate voice signals using the Talkie library, which are then fed into the PAM8403 amplifier's right channel input. A resistor is connected to the ground and input pins of the PAM8403, likely for noise reduction or signal conditioning.
Explore Projects Built with PAM8403 with volume control
PAM8403 Amplifier with 3.5mm Audio Jack for Mono Speaker Output
This circuit is a mono audio amplifier system. It uses a PAM8403 amplifier IC to amplify the audio signal received from a 3.5mm audio jack and drives a speaker. The audio signal from the left channel (L) of the audio jack is amplified and output through the speaker, while the right channel (R) is connected but not utilized in this mono setup.
PAM8403 Amplified Piezo Speaker Array with ATTiny Control
This circuit is an audio amplification system with multiple piezo speakers driven by a PAM8403 amplifier IC. It features an ATtiny microcontroller for potential audio control, powered by a 5V battery with capacitors for stabilization and a trimmer potentiometer for input level adjustment.
Bluetooth Audio Receiver with Battery-Powered Amplifier and Loudspeakers
This circuit is a Bluetooth-enabled audio system powered by a rechargeable 18650 Li-ion battery. It includes a TP4056 module for battery charging and protection, a PAM8403 amplifier with volume control to drive two loudspeakers, and a Bluetooth audio receiver to wirelessly receive audio signals.
Arduino Nano Controlled PAM8403 Audio Amplifier with Voice Synthesis
This circuit is designed to drive a loudspeaker using an Arduino Nano and a PAM8403 audio amplifier. The Arduino Nano is programmed to generate voice signals using the Talkie library, which are then fed into the PAM8403 amplifier's right channel input. A resistor is connected to the ground and input pins of the PAM8403, likely for noise reduction or signal conditioning.
Common Applications and Use Cases
- Portable speakers
- DIY audio projects
- Battery-powered audio devices
- Audio enhancement for small electronic devices
- Educational projects and prototyping
Technical Specifications
Key Technical Details
| Parameter | Value |
|---|---|
| Manufacturer | kit |
| Part ID | pam |
| Output Power | 3W per channel |
| Operating Voltage | 2.5V to 5.5V |
| Efficiency | Up to 90% |
| Total Harmonic Distortion (THD) | < 0.1% |
| Signal-to-Noise Ratio (SNR) | 90dB |
| Channel Separation | 85dB |
| Volume Control | Built-in potentiometer |
Pin Configuration and Descriptions
| Pin Number | Pin Name | Description |
|---|---|---|
| 1 | VCC | Power supply (2.5V to 5.5V) |
| 2 | GND | Ground |
| 3 | LOUT+ | Left channel positive output |
| 4 | LOUT- | Left channel negative output |
| 5 | ROUT+ | Right channel positive output |
| 6 | ROUT- | Right channel negative output |
| 7 | LIN | Left channel input |
| 8 | RIN | Right channel input |
| 9 | GND | Ground |
| 10 | VCC | Power supply (2.5V to 5.5V) |
Usage Instructions
How to Use the Component in a Circuit
- Power Supply: Connect the VCC pin to a power supply ranging from 2.5V to 5.5V. Connect the GND pin to the ground of the power supply.
- Audio Input: Connect the audio source to the LIN and RIN pins for the left and right channels, respectively.
- Audio Output: Connect the LOUT+ and LOUT- pins to the left speaker, and the ROUT+ and ROUT- pins to the right speaker.
- Volume Control: Adjust the built-in potentiometer to control the volume.
Important Considerations and Best Practices
- Ensure the power supply voltage does not exceed 5.5V to avoid damaging the module.
- Use appropriate heat sinks if the module is operating at high power levels for extended periods.
- Keep the input signal within the recommended range to prevent distortion.
- Properly ground the module to minimize noise and interference.
Troubleshooting and FAQs
Common Issues and Solutions
No Sound Output
- Solution: Check the power supply connections and ensure the voltage is within the specified range. Verify that the audio input is correctly connected and that the volume control is not set to the minimum.
Distorted Sound
- Solution: Ensure the input signal is not too high. Check for proper grounding and minimize interference from other electronic components.
Overheating
- Solution: Use a heat sink to dissipate heat. Ensure the module is not operating beyond its power rating.
FAQs
Q1: Can I use the PAM8403 with an Arduino UNO?
- A1: Yes, you can use the PAM8403 with an Arduino UNO. Connect the audio output from the Arduino to the LIN and RIN pins of the PAM8403.
Q2: What type of speakers can I use with the PAM8403?
- A2: The PAM8403 is suitable for driving small speakers with an impedance of 4 to 8 ohms.
Q3: How do I adjust the volume?
- A3: The PAM8403 has a built-in potentiometer for volume control. Rotate the potentiometer to adjust the volume.
Example Code for Arduino UNO
/*
 * Example code to use PAM8403 with Arduino UNO
 * This code generates a simple tone on the PAM8403 module.
 */

const int speakerPin = 9; // PWM pin connected to PAM8403 input

void setup() {
  pinMode(speakerPin, OUTPUT);
}

void loop() {
  // Generate a 1kHz tone
  tone(speakerPin, 1000);
  delay(1000); // Play tone for 1 second
  noTone(speakerPin);
  delay(1000); // Pause for 1 second
}
This documentation provides a comprehensive guide to using the PAM8403 with volume control. Whether you are a beginner or an experienced user, this information will help you effectively integrate the PAM8403 into your audio projects.