Cirkit Designer Logo
Cirkit Designer
Your all-in-one circuit design IDE
Home / 
Component Documentation

How to Use SparkFun Pro nRF52840 Mini - Bluetooth Development Board: Examples, Pinouts, and Specs

Image of SparkFun Pro nRF52840 Mini - Bluetooth Development Board
Cirkit Designer LogoDesign with SparkFun Pro nRF52840 Mini - Bluetooth Development Board in Cirkit Designer

Introduction

The SparkFun Pro nRF52840 Mini is a versatile and powerful Bluetooth development board that harnesses the capabilities of the Nordic Semiconductor nRF52840 SoC (System on Chip). This compact board is designed for low-power wireless applications and is ideal for Internet of Things (IoT) projects, wearable devices, and complex Bluetooth 5, NFC, and other RF applications. Its rich set of I/O options and the ability to run a variety of protocols make it a great choice for both hobbyists and professionals looking to develop advanced wireless projects.

Explore Projects Built with SparkFun Pro nRF52840 Mini - Bluetooth Development Board

Use Cirkit Designer to design, explore, and prototype these projects online. Some projects support real-time simulation. Click "Open Project" to start designing instantly!
Arduino Pro Mini-Based Bluetooth and Camera-Controlled Motor System
Image of HAND GESTURE CAR: A project utilizing SparkFun Pro nRF52840 Mini - Bluetooth Development Board in a practical application
This circuit is a remote-controlled robotic system featuring an Arduino Pro Mini, a TB6612FNG motor driver, and an NRF24L01 wireless module. The Arduino controls four DC motors via the motor driver and communicates wirelessly using the NRF24L01 module, while an OV7670 camera module and an HC-05 Bluetooth module provide additional functionality.
Cirkit Designer LogoOpen Project in Cirkit Designer
Battery-Powered MP3 Player with Seeed Studio nRF52840 and OLED Display
Image of MP3 player: A project utilizing SparkFun Pro nRF52840 Mini - Bluetooth Development Board in a practical application
This circuit is an MP3 player system controlled by a Seeed Studio nRF52840 microcontroller. It includes a DFPlayer MINI for audio playback, a 0.96" OLED display for visual feedback, and multiple pushbuttons for user interaction. The system is powered by a 3.7V LiPo battery and outputs audio through a 3.5mm audio jack.
Cirkit Designer LogoOpen Project in Cirkit Designer
Battery-Powered Heart Rate Monitor using Seeed Studio nRF52840 and MAX30102
Image of Senior Design-Circuitry: A project utilizing SparkFun Pro nRF52840 Mini - Bluetooth Development Board in a practical application
This circuit integrates a Seeed Studio nRF52840 microcontroller with a MAX30102 sensor module. The microcontroller powers the sensor and communicates with it via I2C protocol, enabling functionalities such as heart rate and SpO2 monitoring.
Cirkit Designer LogoOpen Project in Cirkit Designer
Arduino Pro Mini Based GPS and Temperature Tracking System with NRF24L01 Wireless Communication
Image of Copy of slave node: A project utilizing SparkFun Pro nRF52840 Mini - Bluetooth Development Board in a practical application
This circuit features an Arduino Pro Mini as the central microcontroller, interfaced with a GPS NEO 6M module for location tracking, an ADXL345 accelerometer for motion sensing, a DS18B20 temperature sensor for environmental monitoring, and an NRF24L01 module for wireless communication. The circuit is powered by an 18650 Li-Ion battery through a voltage regulator, ensuring stable power supply to the components. A pushbutton is included for user input, and resistors are used for pull-up/down configurations and current limiting purposes.
Cirkit Designer LogoOpen Project in Cirkit Designer

Explore Projects Built with SparkFun Pro nRF52840 Mini - Bluetooth Development Board

Use Cirkit Designer to design, explore, and prototype these projects online. Some projects support real-time simulation. Click "Open Project" to start designing instantly!
Image of HAND GESTURE CAR: A project utilizing SparkFun Pro nRF52840 Mini - Bluetooth Development Board in a practical application
Arduino Pro Mini-Based Bluetooth and Camera-Controlled Motor System
This circuit is a remote-controlled robotic system featuring an Arduino Pro Mini, a TB6612FNG motor driver, and an NRF24L01 wireless module. The Arduino controls four DC motors via the motor driver and communicates wirelessly using the NRF24L01 module, while an OV7670 camera module and an HC-05 Bluetooth module provide additional functionality.
Cirkit Designer LogoOpen Project in Cirkit Designer
Image of MP3 player: A project utilizing SparkFun Pro nRF52840 Mini - Bluetooth Development Board in a practical application
Battery-Powered MP3 Player with Seeed Studio nRF52840 and OLED Display
This circuit is an MP3 player system controlled by a Seeed Studio nRF52840 microcontroller. It includes a DFPlayer MINI for audio playback, a 0.96" OLED display for visual feedback, and multiple pushbuttons for user interaction. The system is powered by a 3.7V LiPo battery and outputs audio through a 3.5mm audio jack.
Cirkit Designer LogoOpen Project in Cirkit Designer
Image of Senior Design-Circuitry: A project utilizing SparkFun Pro nRF52840 Mini - Bluetooth Development Board in a practical application
Battery-Powered Heart Rate Monitor using Seeed Studio nRF52840 and MAX30102
This circuit integrates a Seeed Studio nRF52840 microcontroller with a MAX30102 sensor module. The microcontroller powers the sensor and communicates with it via I2C protocol, enabling functionalities such as heart rate and SpO2 monitoring.
Cirkit Designer LogoOpen Project in Cirkit Designer
Image of Copy of slave node: A project utilizing SparkFun Pro nRF52840 Mini - Bluetooth Development Board in a practical application
Arduino Pro Mini Based GPS and Temperature Tracking System with NRF24L01 Wireless Communication
This circuit features an Arduino Pro Mini as the central microcontroller, interfaced with a GPS NEO 6M module for location tracking, an ADXL345 accelerometer for motion sensing, a DS18B20 temperature sensor for environmental monitoring, and an NRF24L01 module for wireless communication. The circuit is powered by an 18650 Li-Ion battery through a voltage regulator, ensuring stable power supply to the components. A pushbutton is included for user input, and resistors are used for pull-up/down configurations and current limiting purposes.
Cirkit Designer LogoOpen Project in Cirkit Designer

Technical Specifications

Key Technical Details

  • Microcontroller: Nordic Semiconductor nRF52840 SoC
  • Operating Voltage: 1.7V - 5.5V
  • I/O Pins: 21 GPIOs
  • Analog Inputs: 6 (14-bit ADC)
  • PWM Outputs: All GPIOs support PWM
  • UART Ports: 1
  • I2C Ports: 1
  • SPI Ports: 1
  • Flash Memory: 1MB
  • RAM: 256KB
  • Bluetooth Version: Bluetooth 5
  • NFC-A Tag: Yes

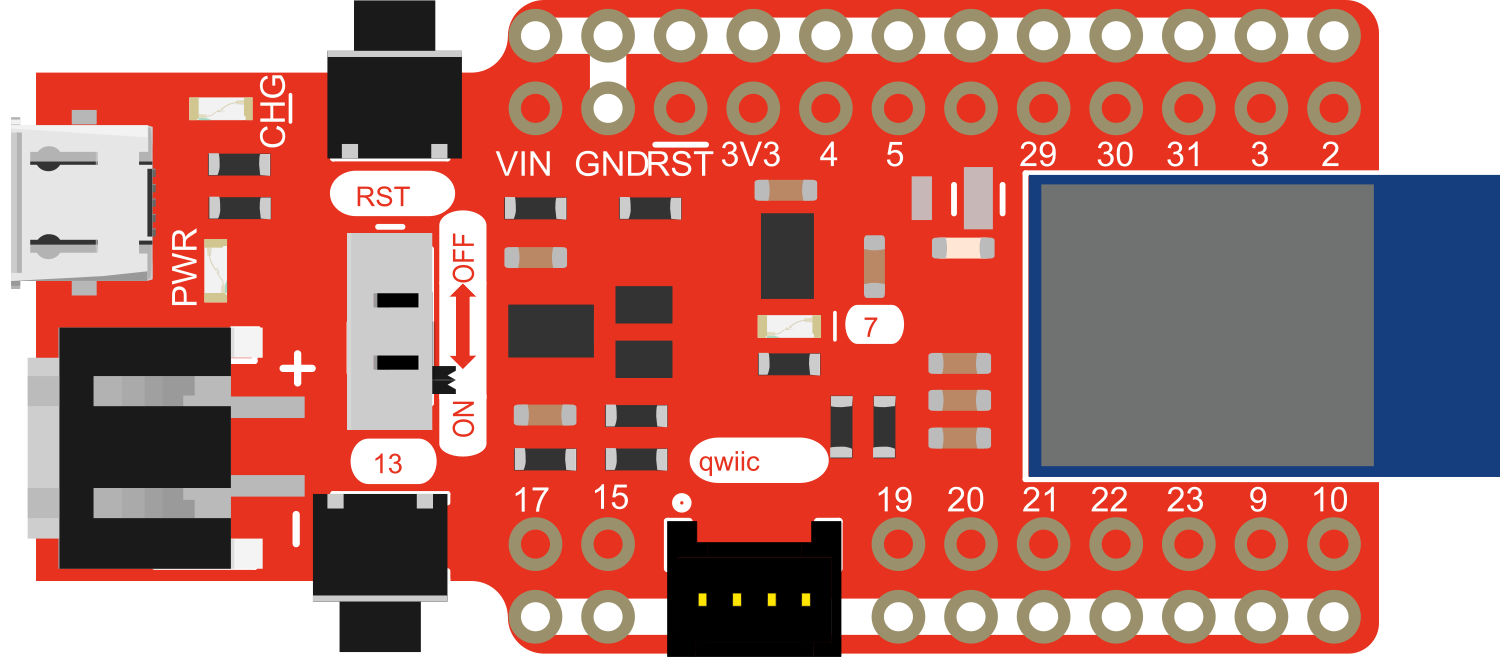
Pin Configuration and Descriptions

Pin Number Function Description
1 VDD Power Supply (1.7V - 5.5V)
2-7 GPIO General Purpose I/O Pins
8 AREF Analog Reference Voltage for ADC
9-14 Analog Inputs Analog to Digital Converter Inputs
15 RESET Reset Pin
16-21 GPIO General Purpose I/O Pins
22 GND Ground
23 3.3V Regulated 3.3V Output
24 SWDIO Serial Wire Debug I/O
25 SWDCLK Serial Wire Debug Clock
26 NFC1 NFC Antenna 1
27 NFC2 NFC Antenna 2

Usage Instructions

Integrating with a Circuit

To use the SparkFun Pro nRF52840 Mini in a circuit:

  1. Powering the Board: Connect a power supply within the range of 1.7V to 5.5V to the VDD pin. Ensure that the power supply is stable and clean to avoid damaging the board.
  2. Connecting I/O Pins: Utilize the GPIO pins for interfacing with sensors, actuators, or other peripherals. Remember to configure the pin modes in your code accordingly.
  3. Analog Inputs: Connect analog sensors to the analog input pins if you need to read analog voltages. The ADC on the nRF52840 is 14-bit, offering high-resolution measurements.
  4. Communication Interfaces: Use the UART, I2C, and SPI ports for communication with other microcontrollers, modules, or peripherals.
  5. NFC Functionality: To use NFC, connect an NFC antenna to NFC1 and NFC2 pins and ensure your code is set up for NFC communication.

Best Practices

  • Always disconnect the board from the power source before making or altering connections.
  • Use a current limiting resistor with LEDs and other components that require one.
  • Avoid electrostatic discharge by grounding yourself before handling the board.
  • Ensure firmware and libraries are up to date for the best compatibility and performance.

Example Code for Arduino UNO

Here is a simple example of how to blink an LED using the SparkFun Pro nRF52840 Mini with an Arduino UNO:

// Define the LED pin
const int LED_PIN = 7; // Use a GPIO pin that is available on your board

// This function runs once when you turn your board on
void setup() {
  // Initialize the LED pin as an output
  pinMode(LED_PIN, OUTPUT);
}

// The loop function runs over and over again forever
void loop() {
  digitalWrite(LED_PIN, HIGH);   // Turn the LED on
  delay(1000);                   // Wait for a second
  digitalWrite(LED_PIN, LOW);    // Turn the LED off
  delay(1000);                   // Wait for a second
}

Remember to select the appropriate board and port in your Arduino IDE before uploading the code.

Troubleshooting and FAQs

Common Issues

  • Board not recognized by computer: Ensure the USB cable is properly connected and the board is powered. Try a different USB port or cable if necessary.
  • Unable to upload sketches: Check that the correct board and port are selected in the Arduino IDE. Also, ensure that the bootloader is functioning correctly.
  • Intermittent operation or resets: This could be due to an inadequate power supply. Make sure the power source can provide sufficient current for the board and any connected peripherals.

FAQs

Q: Can the board be powered by a battery? A: Yes, the board can be powered by a battery within the voltage range of 1.7V to 5.5V.

Q: Does the board have onboard debugging? A: Yes, the board supports Serial Wire Debug (SWD) through the SWDIO and SWDCLK pins.

Q: Can I use the Arduino IDE to program the SparkFun Pro nRF52840 Mini? A: Yes, you can use the Arduino IDE with the appropriate board package installed for the nRF52840.

Q: How do I update the firmware on the board? A: Firmware updates can be done through the USB interface using the Nordic tools or via the Arduino IDE with a compatible bootloader.

For further assistance, consult the SparkFun Pro nRF52840 Mini's online community and resources or contact SparkFun's technical support.