How to Use 3S LiPo 11.1V 2250mAh: Examples, Pinouts, and Specs
Introduction
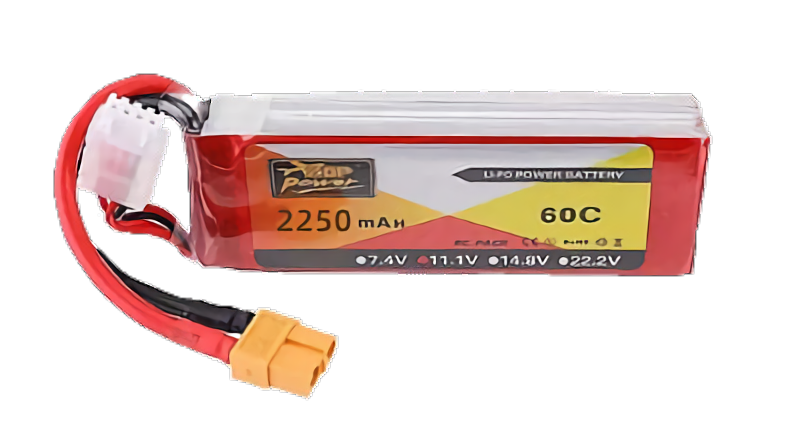
The ZOP Power 3S LiPo 11.1V 2250mAh is a 3-cell lithium polymer (LiPo) battery designed for applications requiring high energy density and lightweight power sources. With a nominal voltage of 11.1V and a capacity of 2250mAh, this battery is ideal for powering remote-controlled (RC) vehicles, drones, and other portable electronic devices. Its compact size and high discharge rate make it a popular choice for hobbyists and professionals alike.
Explore Projects Built with 3S LiPo 11.1V 2250mAh


Explore Projects Built with 3S LiPo 11.1V 2250mAh
Common Applications
- RC cars, boats, and airplanes
- Drones and quadcopters
- Robotics and DIY electronics projects
- Portable power systems for small devices
Technical Specifications
The following table outlines the key technical details of the ZOP Power 3S LiPo 11.1V 2250mAh battery:
| Specification | Value |
|---|---|
| Nominal Voltage | 11.1V |
| Capacity | 2250mAh |
| Cell Configuration | 3S (3 cells in series) |
| Maximum Discharge Rate | 35C |
| Maximum Charge Voltage | 12.6V |
| Minimum Discharge Voltage | 9.0V |
| Connector Type | XT60 (or as specified) |
| Balance Connector Type | JST-XH |
| Dimensions | ~105mm x 35mm x 25mm |
| Weight | ~190g |
Pin Configuration
The battery has two main connectors:
- Power Connector (XT60): Supplies power to the load.
- Balance Connector (JST-XH): Used for balancing the cells during charging.
| Pin | Connector Type | Description |
|---|---|---|
| 1 | JST-XH Pin 1 | Cell 1 positive terminal |
| 2 | JST-XH Pin 2 | Cell 1 negative / Cell 2 positive |
| 3 | JST-XH Pin 3 | Cell 2 negative / Cell 3 positive |
| 4 | JST-XH Pin 4 | Cell 3 negative terminal |
Usage Instructions
How to Use the Battery in a Circuit
- Connect the Power Connector: Attach the XT60 connector to the input of your device or electronic speed controller (ESC). Ensure the polarity matches (yellow XT60 connectors are keyed to prevent reverse polarity).
- Balance Charging: Always use a LiPo-compatible balance charger to charge the battery. Connect the JST-XH balance connector to the charger to ensure all cells are charged evenly.
- Voltage Monitoring: Use a LiPo voltage alarm or monitor to prevent over-discharging. The voltage of each cell should not drop below 3.0V (total pack voltage should not go below 9.0V).
Important Considerations and Best Practices
- Charging: Always charge the battery using a LiPo-compatible balance charger. Set the charger to 3S (11.1V) and a current of 2.25A (1C rate) for safe charging.
- Storage: Store the battery at a voltage of 3.7V–3.8V per cell (11.1V–11.4V for the pack) to prolong its lifespan.
- Handling: Avoid puncturing, crushing, or exposing the battery to high temperatures. Do not short-circuit the terminals.
- Discharge Limits: Do not exceed the maximum discharge rate (35C). For a 2250mAh battery, this equates to a maximum current of 78.75A.
Example: Using the Battery with an Arduino UNO
To power an Arduino UNO with this battery, you can use a DC-DC step-down converter to regulate the voltage to 5V. Below is an example circuit and code:
Circuit Setup
- Connect the XT60 power connector to the input of a DC-DC step-down converter.
- Adjust the converter output to 5V using a multimeter.
- Connect the converter output to the Arduino UNO's VIN and GND pins.
Arduino Code Example
// Example code to read a sensor and print data to the Serial Monitor
// Ensure the Arduino is powered via the 5V output of the step-down converter

const int sensorPin = A0; // Analog pin connected to the sensor
int sensorValue = 0;      // Variable to store the sensor reading

void setup() {
  Serial.begin(9600); // Initialize serial communication at 9600 baud
}

void loop() {
  sensorValue = analogRead(sensorPin); // Read the sensor value
  Serial.print("Sensor Value: ");
  Serial.println(sensorValue); // Print the sensor value to the Serial Monitor
  delay(1000); // Wait for 1 second before the next reading
}
Troubleshooting and FAQs
Common Issues and Solutions
Battery Not Charging
- Cause: Incorrect charger settings or damaged balance connector.
- Solution: Verify the charger is set to 3S (11.1V) and the correct current. Inspect the balance connector for damage.
Battery Swelling
- Cause: Overcharging, over-discharging, or physical damage.
- Solution: Stop using the battery immediately. Dispose of it safely following local regulations.
Device Shuts Down Prematurely
- Cause: Low voltage cutoff triggered by the ESC or device.
- Solution: Check the battery voltage. Recharge if below 11.1V. Use a voltage alarm to monitor the battery during use.
Uneven Cell Voltages
- Cause: Imbalanced charging or aging cells.
- Solution: Use a balance charger to equalize the cell voltages.
FAQs
Q: Can I use this battery for a 12V device?
A: Yes, but only if the device can tolerate a voltage range of 9.0V–12.6V. Otherwise, use a DC-DC converter to regulate the voltage.
Q: How long will the battery last on a single charge?
A: The runtime depends on the load. For example, at a 10A load, the battery will last approximately 13.5 minutes (2250mAh ÷ 10A × 60 minutes).
Q: Is it safe to charge the battery unattended?
A: No, always monitor the battery during charging to prevent accidents.
Q: Can I connect multiple batteries in series or parallel?
A: Yes, but ensure the batteries are identical in voltage, capacity, and charge state. Use proper connectors and balancing techniques.
By following these guidelines, you can safely and effectively use the ZOP Power 3S LiPo 11.1V 2250mAh battery in your projects.