Cirkit Designer Logo
Cirkit Designer
Your all-in-one circuit design IDE
Home / 
Component Documentation

How to Use Adafruit MPR121 Gator: Examples, Pinouts, and Specs

Image of Adafruit MPR121 Gator
Cirkit Designer LogoDesign with Adafruit MPR121 Gator in Cirkit Designer

Introduction

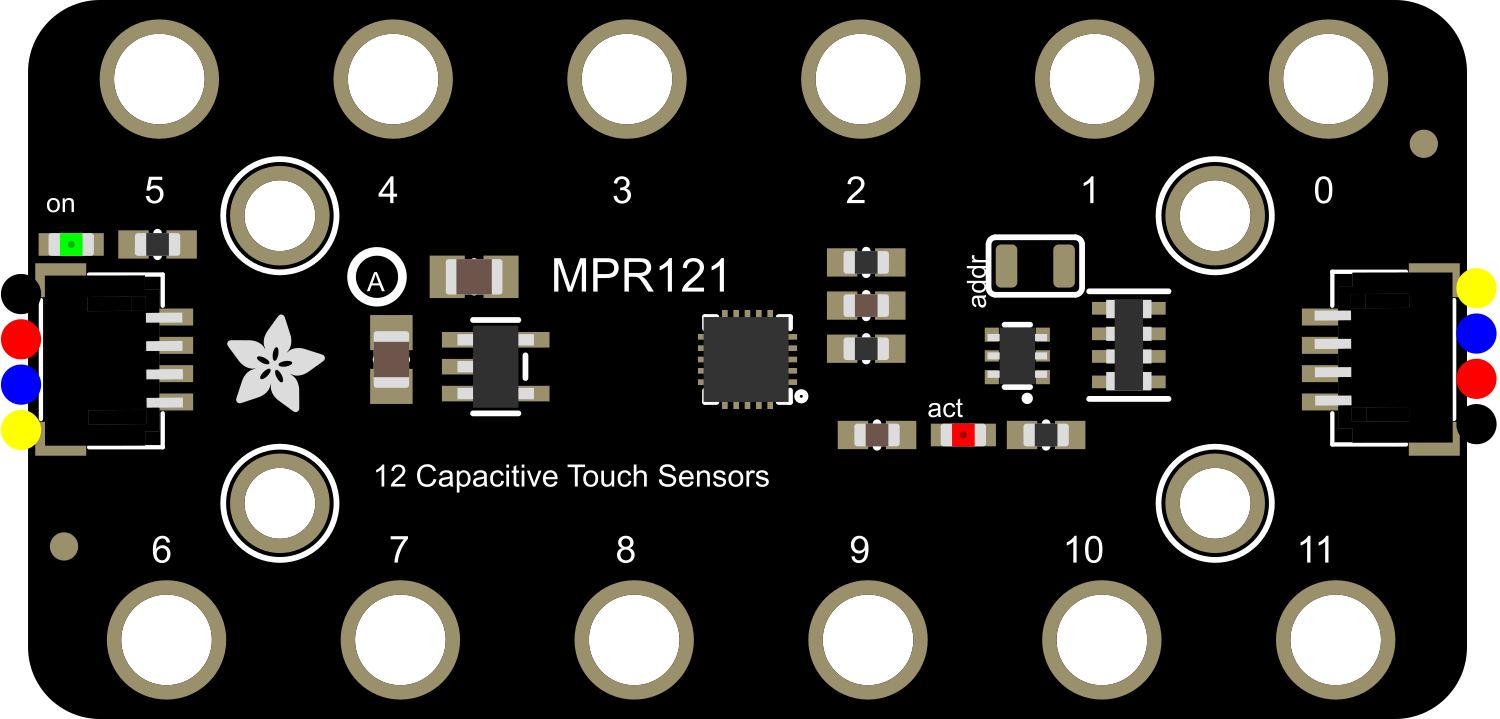
The Adafruit MPR121 Gator is a capacitive touch sensor breakout board that provides an easy way to add touch input to your projects. It is based on the MPR121 chip, which is capable of detecting up to 12 individual touch points. This component is commonly used in interactive projects, touch interfaces, and can be easily interfaced with microcontrollers such as the Arduino UNO.

Explore Projects Built with Adafruit MPR121 Gator

Use Cirkit Designer to design, explore, and prototype these projects online. Some projects support real-time simulation. Click "Open Project" to start designing instantly!
Touch-Sensitive Interface with Adafruit MPR121 and Feather 32u4 Bluefruit
Image of MPR121: A project utilizing Adafruit MPR121 Gator in a practical application
This circuit integrates an Adafruit MPR121 capacitive touch sensor with an Adafruit Feather 32u4 Bluefruit microcontroller. The MPR121 is powered by the Feather and communicates via I2C (SCL and SDA) to detect touch inputs, which can be processed or transmitted wirelessly by the Feather.
Cirkit Designer LogoOpen Project in Cirkit Designer
Adafruit Feather 32u4 Bluefruit with MPR121 Capacitive Touch Sensor Interface
Image of ALi WTSE: A project utilizing Adafruit MPR121 Gator in a practical application
This circuit integrates an Adafruit MPR121 capacitive touch sensor with an Adafruit Feather 32u4 Bluefruit microcontroller. The MPR121 is powered by the 3.3V supply from the Feather and communicates with the microcontroller via I2C, with SCL connected to pin 3 and SDA connected to pin 2 of the Feather. This setup allows the Feather to detect touch inputs from the MPR121 for further processing or wireless communication.
Cirkit Designer LogoOpen Project in Cirkit Designer
Arduino-Controlled Soil Moisture Sensing with Automated Water Pump
Image of Watering Plant: A project utilizing Adafruit MPR121 Gator in a practical application
This circuit is an automated plant watering system. An Arduino UNO reads soil moisture levels from a SparkFun gator:soil sensor and controls a water pump through a 12V relay based on the moisture data. The entire system is powered by a 12V power supply, with the Arduino regulating the relay and sensor.
Cirkit Designer LogoOpen Project in Cirkit Designer
Arduino-Controlled Automated Irrigation System
Image of Copy of wat: A project utilizing Adafruit MPR121 Gator in a practical application
This circuit is designed to monitor soil moisture levels using multiple SparkFun gator:soil sensors and control water pumps based on the moisture readings. An Arduino UNO reads the analog moisture levels from the sensors and activates corresponding channels on a 4-channel relay module to turn on or off the water pumps. The system aims to automate the watering process for up to four different soil areas, ensuring optimal moisture levels are maintained.
Cirkit Designer LogoOpen Project in Cirkit Designer

Explore Projects Built with Adafruit MPR121 Gator

Use Cirkit Designer to design, explore, and prototype these projects online. Some projects support real-time simulation. Click "Open Project" to start designing instantly!
Image of MPR121: A project utilizing Adafruit MPR121 Gator in a practical application
Touch-Sensitive Interface with Adafruit MPR121 and Feather 32u4 Bluefruit
This circuit integrates an Adafruit MPR121 capacitive touch sensor with an Adafruit Feather 32u4 Bluefruit microcontroller. The MPR121 is powered by the Feather and communicates via I2C (SCL and SDA) to detect touch inputs, which can be processed or transmitted wirelessly by the Feather.
Cirkit Designer LogoOpen Project in Cirkit Designer
Image of ALi WTSE: A project utilizing Adafruit MPR121 Gator in a practical application
Adafruit Feather 32u4 Bluefruit with MPR121 Capacitive Touch Sensor Interface
This circuit integrates an Adafruit MPR121 capacitive touch sensor with an Adafruit Feather 32u4 Bluefruit microcontroller. The MPR121 is powered by the 3.3V supply from the Feather and communicates with the microcontroller via I2C, with SCL connected to pin 3 and SDA connected to pin 2 of the Feather. This setup allows the Feather to detect touch inputs from the MPR121 for further processing or wireless communication.
Cirkit Designer LogoOpen Project in Cirkit Designer
Image of Watering Plant: A project utilizing Adafruit MPR121 Gator in a practical application
Arduino-Controlled Soil Moisture Sensing with Automated Water Pump
This circuit is an automated plant watering system. An Arduino UNO reads soil moisture levels from a SparkFun gator:soil sensor and controls a water pump through a 12V relay based on the moisture data. The entire system is powered by a 12V power supply, with the Arduino regulating the relay and sensor.
Cirkit Designer LogoOpen Project in Cirkit Designer
Image of Copy of wat: A project utilizing Adafruit MPR121 Gator in a practical application
Arduino-Controlled Automated Irrigation System
This circuit is designed to monitor soil moisture levels using multiple SparkFun gator:soil sensors and control water pumps based on the moisture readings. An Arduino UNO reads the analog moisture levels from the sensors and activates corresponding channels on a 4-channel relay module to turn on or off the water pumps. The system aims to automate the watering process for up to four different soil areas, ensuring optimal moisture levels are maintained.
Cirkit Designer LogoOpen Project in Cirkit Designer

Common Applications and Use Cases

  • Interactive art installations
  • Custom computer peripherals
  • Touch-based control panels
  • DIY musical instruments
  • Prototyping user interfaces

Technical Specifications

Key Technical Details

  • Operating Voltage: 2.5V to 3.6V
  • Supply Current: 29uA (run mode), 3uA (sleep mode)
  • Touch Points: 12 electrodes/capacitive sensing inputs
  • Communication: I2C interface
  • Response Time: < 30ms
  • Sensitivity: Adjustable with internal registers

Pin Configuration and Descriptions

Pin Number Name Description
1 VIN Power supply input (2.5V to 3.6V)
2 3Vo 3.3V output from the onboard regulator
3 GND Ground connection
4 SDA I2C data line
5 SCL I2C clock line
6-17 0-11 Capacitive touch sensor inputs

Usage Instructions

How to Use the Component in a Circuit

  1. Connect the VIN pin to a 2.5V to 3.6V power supply.
  2. Connect the GND pin to the ground of your power supply.
  3. Connect the SDA and SCL pins to the I2C data and clock lines on your microcontroller.
  4. Connect the touch sensor inputs (0-11) to the conductive objects or areas you wish to use as touch inputs.

Important Considerations and Best Practices

  • Ensure that the power supply voltage does not exceed 3.6V.
  • Use pull-up resistors on the I2C lines if your microcontroller does not have them built-in.
  • Keep the touch sensor inputs away from conductive surfaces that may interfere with touch detection.
  • Calibrate the sensitivity of the touch sensors according to your application's needs.

Example Code for Arduino UNO

#include <Wire.h>
#include <Adafruit_MPR121.h>

// Create an MPR121 instance
Adafruit_MPR121 cap = Adafruit_MPR121();

void setup() {
  Serial.begin(9600);
  Wire.begin();

  // Initialize communication with MPR121
  if (!cap.begin(0x5A)) {
    Serial.println("MPR121 not found");
    while (1);
  }
  Serial.println("MPR121 found!");
}

void loop() {
  // Read the touched status
  uint16_t touched = cap.touched();

  for (uint8_t i = 0; i < 12; i++) {
    // Check if each sensor is touched
    if (touched & (1 << i)) {
      Serial.print("Sensor ");
      Serial.print(i);
      Serial.println(" is touched");
    }
  }

  // Small delay to avoid flooding the serial output
  delay(100);
}

Troubleshooting and FAQs

Common Issues Users Might Face

  • Sensor not responding: Ensure that the I2C connections are correct and that the correct I2C address is used in the code.
  • Inaccurate touch detection: Calibrate the sensitivity settings for the environment and ensure there is no electrical noise affecting the sensors.
  • No power to the board: Check the power supply connections and ensure that the voltage is within the specified range.

Solutions and Tips for Troubleshooting

  • Double-check wiring, especially the I2C lines and power connections.
  • Use the I2C scanner sketch to confirm the device's address on the I2C bus.
  • Avoid placing the touch sensors near metal surfaces or electronic components that may introduce noise.
  • Adjust the threshold and debounce settings in the MPR121 library to improve touch detection.

FAQs

Q: Can I use the MPR121 Gator with a 5V microcontroller? A: Yes, but ensure that the MPR121 Gator is powered with a voltage between 2.5V and 3.6V. Use level shifters if necessary for the I2C lines.

Q: How can I extend the touch sensors? A: You can attach conductive materials (e.g., copper tape, conductive thread) to the sensor inputs to create larger touch areas.

Q: What is the maximum distance for the touch sensors? A: The distance depends on the material and size of the touch area, as well as the sensor's calibration. Typically, it works best with direct contact or very close proximity.