Cirkit Designer Logo
Cirkit Designer
Your all-in-one circuit design IDE
Home / 
Component Documentation

How to Use Seven Segment Display (TM1637) (Wokwi Compatible): Examples, Pinouts, and Specs

Image of Seven Segment Display (TM1637) (Wokwi Compatible)
Cirkit Designer LogoDesign with Seven Segment Display (TM1637) (Wokwi Compatible) in Cirkit Designer

Introduction

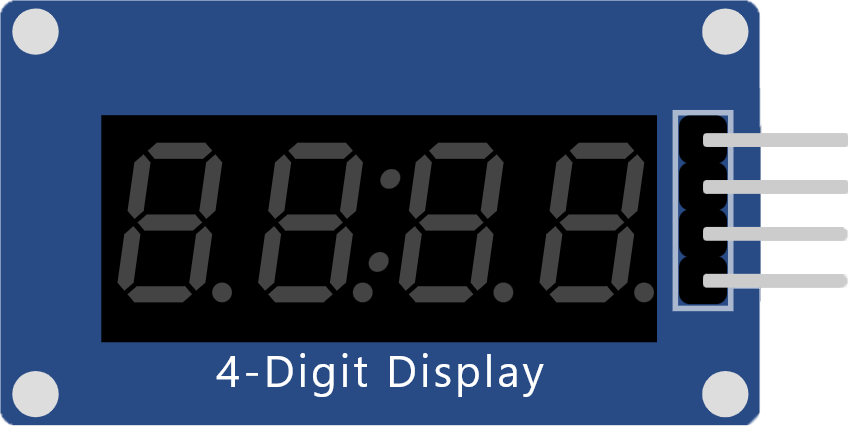
The Seven Segment Display module with a TM1637 driver is a popular electronic component used for displaying numerical information. It consists of seven LEDs (light-emitting diodes) arranged in a figure-eight pattern, with an additional LED for the decimal point, allowing for the display of numbers and some letters. The TM1637 driver IC simplifies the process of controlling the display through a two-wire interface, which is compatible with microcontrollers like Arduino. This module is widely used in digital clocks, electronic meters, and other devices that require a simple numeric display.

Explore Projects Built with Seven Segment Display (TM1637) (Wokwi Compatible)

Use Cirkit Designer to design, explore, and prototype these projects online. Some projects support real-time simulation. Click "Open Project" to start designing instantly!
Arduino Nano 33 BLE Battery-Powered Display Interface
Image of senior design 1: A project utilizing Seven Segment Display (TM1637) (Wokwi Compatible) in a practical application
This circuit features a Nano 33 BLE microcontroller interfaced with a TM1637 4-digit 7-segment display for information output, powered by a 3.7V battery managed by a TP4056 charging module. The microcontroller communicates with the display to present data, while the TP4056 ensures the battery is charged safely and provides power to the system.
Cirkit Designer LogoOpen Project in Cirkit Designer
Arduino Nano-Based Pushbutton-Controlled Seven Segment Display
Image of dice: A project utilizing Seven Segment Display (TM1637) (Wokwi Compatible) in a practical application
This circuit features an Arduino Nano microcontroller interfaced with a seven-segment display and a pushbutton. The Arduino controls the segments of the display to show numbers or characters, while the pushbutton can be used to trigger actions or change the display content.
Cirkit Designer LogoOpen Project in Cirkit Designer
Arduino Nano and TM1637 Real-Time Clock Display
Image of test: A project utilizing Seven Segment Display (TM1637) (Wokwi Compatible) in a practical application
This circuit uses an Arduino Nano to control a TM1637 4-digit 7-segment display module, displaying the current time. The Arduino reads the time from an RTC (Real-Time Clock) module and updates the display every second.
Cirkit Designer LogoOpen Project in Cirkit Designer
Arduino UNO Controlled Seven-Segment Display Counter
Image of Arduino Uno - Seven Segment Display (Sim-C): A project utilizing Seven Segment Display (TM1637) (Wokwi Compatible) in a practical application
This circuit uses an Arduino UNO to control a seven-segment display, displaying digits from 0 to 9 with a one-second delay between each digit. The Arduino drives the segments of the common anode display by setting the corresponding pins to LOW, as defined in the provided sketch code.
Cirkit Designer LogoOpen Project in Cirkit Designer

Explore Projects Built with Seven Segment Display (TM1637) (Wokwi Compatible)

Use Cirkit Designer to design, explore, and prototype these projects online. Some projects support real-time simulation. Click "Open Project" to start designing instantly!
Image of senior design 1: A project utilizing Seven Segment Display (TM1637) (Wokwi Compatible) in a practical application
Arduino Nano 33 BLE Battery-Powered Display Interface
This circuit features a Nano 33 BLE microcontroller interfaced with a TM1637 4-digit 7-segment display for information output, powered by a 3.7V battery managed by a TP4056 charging module. The microcontroller communicates with the display to present data, while the TP4056 ensures the battery is charged safely and provides power to the system.
Cirkit Designer LogoOpen Project in Cirkit Designer
Image of dice: A project utilizing Seven Segment Display (TM1637) (Wokwi Compatible) in a practical application
Arduino Nano-Based Pushbutton-Controlled Seven Segment Display
This circuit features an Arduino Nano microcontroller interfaced with a seven-segment display and a pushbutton. The Arduino controls the segments of the display to show numbers or characters, while the pushbutton can be used to trigger actions or change the display content.
Cirkit Designer LogoOpen Project in Cirkit Designer
Image of test: A project utilizing Seven Segment Display (TM1637) (Wokwi Compatible) in a practical application
Arduino Nano and TM1637 Real-Time Clock Display
This circuit uses an Arduino Nano to control a TM1637 4-digit 7-segment display module, displaying the current time. The Arduino reads the time from an RTC (Real-Time Clock) module and updates the display every second.
Cirkit Designer LogoOpen Project in Cirkit Designer
Image of Arduino Uno - Seven Segment Display (Sim-C): A project utilizing Seven Segment Display (TM1637) (Wokwi Compatible) in a practical application
Arduino UNO Controlled Seven-Segment Display Counter
This circuit uses an Arduino UNO to control a seven-segment display, displaying digits from 0 to 9 with a one-second delay between each digit. The Arduino drives the segments of the common anode display by setting the corresponding pins to LOW, as defined in the provided sketch code.
Cirkit Designer LogoOpen Project in Cirkit Designer

Common Applications and Use Cases

  • Digital clocks and timers
  • Electronic counters
  • Temperature displays
  • Calculators
  • User interfaces for various electronic devices

Technical Specifications

Key Technical Details

  • Operating Voltage: 3.3V to 5.5V
  • Max Forward Current: 20mA per segment
  • Display Color: Typically red, but other colors are available
  • Number of Digits: 4 (commonly)
  • Communication: Two-wire serial interface (CLK and DIO)

Pin Configuration and Descriptions

Pin Number Name Description
1 VCC Power supply (3.3V to 5.5V)
2 GND Ground connection
3 CLK Clock pin for serial communication
4 DIO Data input/output pin for serial communication

Usage Instructions

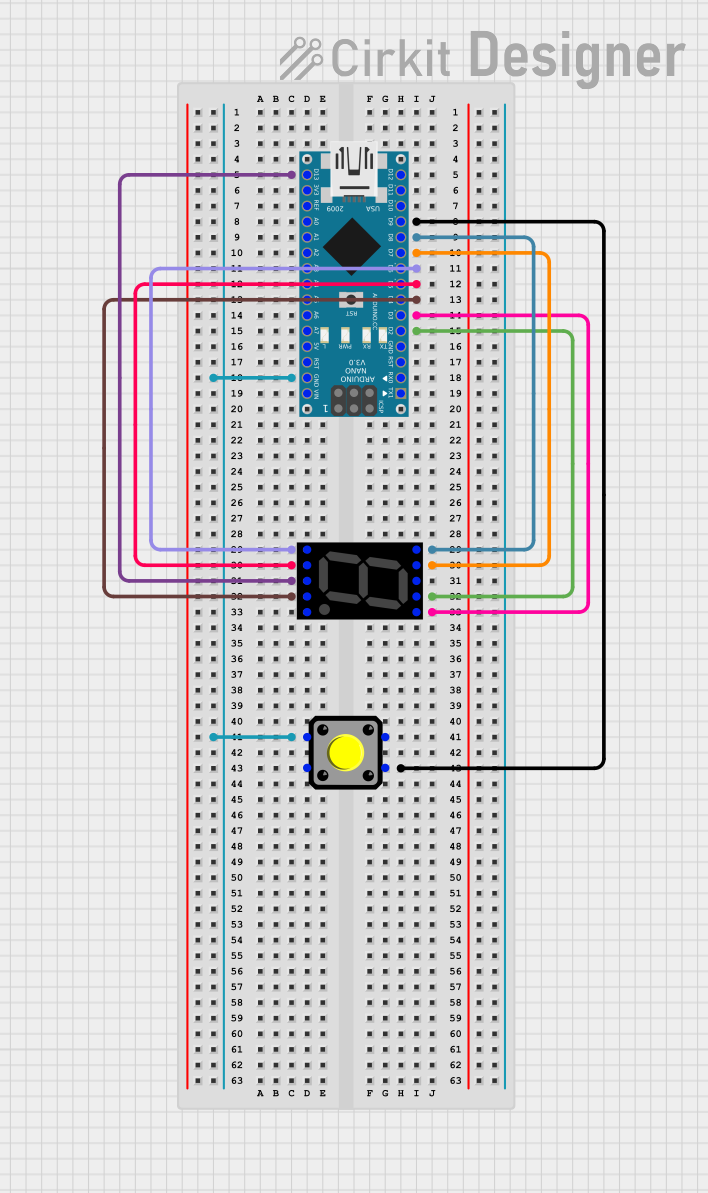
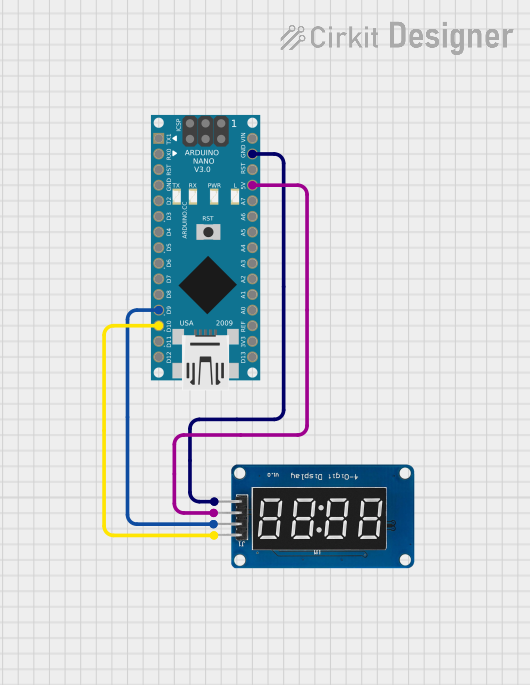
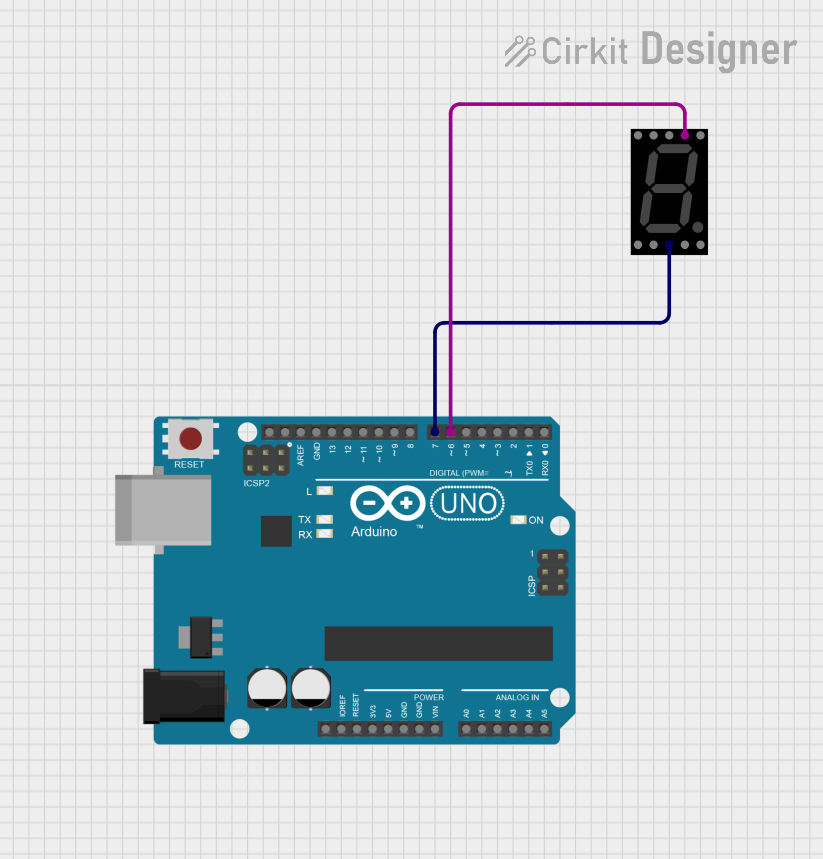
Connecting to an Arduino UNO

  1. Connect the VCC pin of the TM1637 display module to the 5V pin on the Arduino UNO.
  2. Connect the GND pin to one of the GND pins on the Arduino UNO.
  3. Connect the CLK pin to a digital I/O pin on the Arduino UNO (e.g., D2).
  4. Connect the DIO pin to another digital I/O pin on the Arduino UNO (e.g., D3).

Programming the Display

To control the TM1637 display with an Arduino, you will need to include a library that supports the TM1637, such as the "TM1637Display" library. Below is a sample code snippet that initializes the display and shows a number:

#include <TM1637Display.h>

// Define the connections pins
#define CLK 2
#define DIO 3

// Create a TM1637Display object
TM1637Display display(CLK, DIO);

void setup() {
  display.setBrightness(0x0f); // Set the display to maximum brightness
}

void loop() {
  display.showNumberDec(1234); // Display the number 1234
  delay(2000); // Wait for 2 seconds
}

Important Considerations and Best Practices

  • Always ensure that the power supply voltage matches the operating voltage of the TM1637 module to prevent damage.
  • Limit the brightness to reduce power consumption if the application allows.
  • Use current-limiting resistors if you are building a custom seven-segment display with discrete LEDs.

Troubleshooting and FAQs

Common Issues

  • Display not lighting up: Check the wiring, especially the VCC and GND connections. Ensure that the TM1637 library is correctly included and initialized in your code.
  • Garbled or incorrect display: Verify that the CLK and DIO pins are correctly defined and connected. Also, check for correct data being sent to the display.

Solutions and Tips for Troubleshooting

  • Double-check the connections and pin definitions in your code.
  • Make sure the Arduino library for the TM1637 is installed and properly included in your sketch.
  • Test the display with a simple example to ensure it is functioning correctly before integrating it into a complex project.

FAQs

Q: Can I display letters on the TM1637 module? A: Yes, the TM1637 can display a limited number of letters and characters that can be formed using the seven-segment pattern.

Q: How do I control the brightness of the display? A: The brightness can be controlled using the setBrightness() function provided by the TM1637 library.

Q: Is it possible to use more than one TM1637 display with an Arduino? A: Yes, you can control multiple displays by using separate CLK and DIO pins for each module and creating multiple instances of the TM1637Display object.

This documentation provides a comprehensive guide to using the Seven Segment Display (TM1637) module. For further assistance or advanced usage, refer to the TM1637 library documentation and the datasheet of the TM1637 driver IC.