How to Use I2C DISPLAY: Examples, Pinouts, and Specs
Introduction
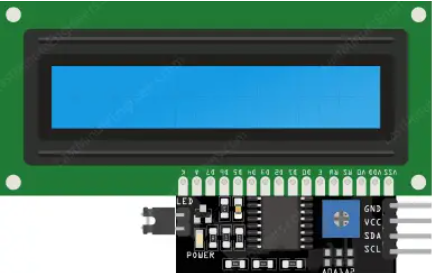
The I2C Display Module is a versatile and user-friendly display that communicates using the I2C protocol. This allows for easy connection and control with minimal wiring, making it an ideal choice for a wide range of applications. Commonly used in projects involving microcontrollers like the Arduino UNO, the I2C Display Module is perfect for displaying text, numbers, and simple graphics.
Explore Projects Built with I2C DISPLAY


Explore Projects Built with I2C DISPLAY
Common Applications and Use Cases
- DIY Electronics Projects: Displaying sensor data, time, and other information.
- Prototyping: Quick and easy way to add a display to prototypes.
- Educational Projects: Teaching and learning about I2C communication and display control.
- Embedded Systems: Integrating a display into embedded systems for user interfaces.
Technical Specifications
Key Technical Details
- Operating Voltage: 3.3V to 5V
- Current Consumption: Typically 20mA
- Communication Protocol: I2C
- I2C Address: Typically 0x27 or 0x3F (configurable)
- Display Size: Varies (commonly 16x2 or 20x4 characters)
- Backlight: LED backlight with adjustable brightness
Pin Configuration and Descriptions
| Pin | Name | Description |
|---|---|---|
| 1 | GND | Ground |
| 2 | VCC | Power Supply (3.3V to 5V) |
| 3 | SDA | Serial Data Line (I2C Data) |
| 4 | SCL | Serial Clock Line (I2C Clock) |
Usage Instructions
How to Use the Component in a Circuit
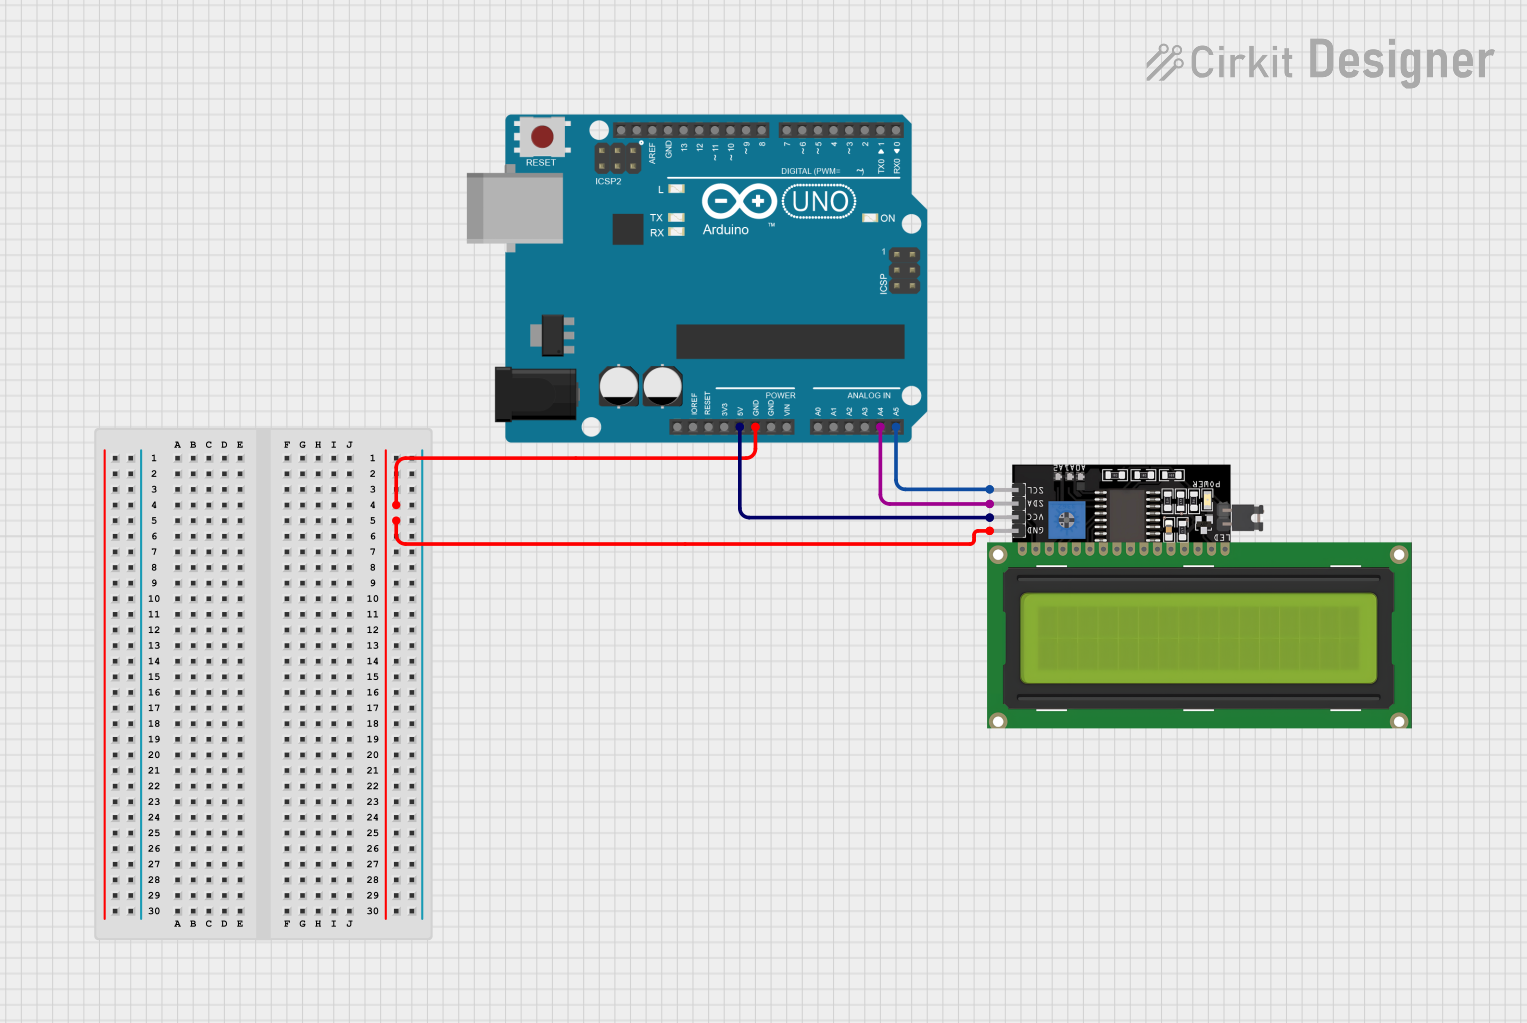
Wiring the I2C Display Module:
- Connect the GND pin of the display to the GND pin of the Arduino.
- Connect the VCC pin of the display to the 5V pin of the Arduino.
- Connect the SDA pin of the display to the A4 pin of the Arduino (for Arduino UNO).
- Connect the SCL pin of the display to the A5 pin of the Arduino (for Arduino UNO).
Installing the Required Library:
- Open the Arduino IDE.
- Go to Sketch > Include Library > Manage Libraries...
- Search for "LiquidCrystal I2C" and install the library by Frank de Brabander.
Example Code:
#include <Wire.h>
#include <LiquidCrystal_I2C.h>

// Set the LCD address to 0x27 for a 16 chars and 2 line display
LiquidCrystal_I2C lcd(0x27, 16, 2);

void setup() {
  lcd.begin(); // Initialize the LCD
  lcd.backlight(); // Turn on the backlight
  lcd.setCursor(0, 0); // Set cursor to first column, first row
  lcd.print("Hello, World!"); // Print message
}

void loop() {
  // Nothing to do here
}
Important Considerations and Best Practices
- I2C Address: Ensure the I2C address of the display matches the address specified in the code. If the display does not work, try changing the address to 0x3F.
- Power Supply: Ensure the display is powered with the correct voltage (3.3V to 5V). Incorrect voltage can damage the display.
- Pull-up Resistors: Some I2C modules have built-in pull-up resistors. If your display does not work, you may need to add external pull-up resistors (4.7kΩ to 10kΩ) between the SDA/SCL lines and VCC.
Troubleshooting and FAQs
Common Issues and Solutions
Display Not Working:
- Check Wiring: Ensure all connections are secure and correct.
- I2C Address: Verify the I2C address in the code matches the display's address.
- Power Supply: Ensure the display is receiving the correct voltage.
Garbage Characters on Display:
- Initialization: Ensure the display is properly initialized in the code.
- I2C Communication: Check for any issues with the I2C communication lines (SDA and SCL).
Backlight Not Turning On:
- Backlight Control: Ensure the backlight is turned on in the code using
lcd.backlight(). - Power Supply: Verify the display is receiving the correct voltage.
- Backlight Control: Ensure the backlight is turned on in the code using
FAQs
Q: How do I change the I2C address of the display? A: The I2C address can often be changed by soldering or desoldering jumpers on the back of the display module. Refer to the module's datasheet for specific instructions.
Q: Can I use the I2C Display Module with other microcontrollers? A: Yes, the I2C Display Module can be used with other microcontrollers that support I2C communication, such as the ESP8266, ESP32, and Raspberry Pi.
Q: How do I adjust the brightness of the backlight? A: The brightness of the backlight can be adjusted using a potentiometer on the back of the display module or through software control if supported by the module.
By following this documentation, you should be able to successfully integrate and use the I2C Display Module in your projects. Happy tinkering!