How to Use SimpleFOCShield2.0.4: Examples, Pinouts, and Specs
Introduction
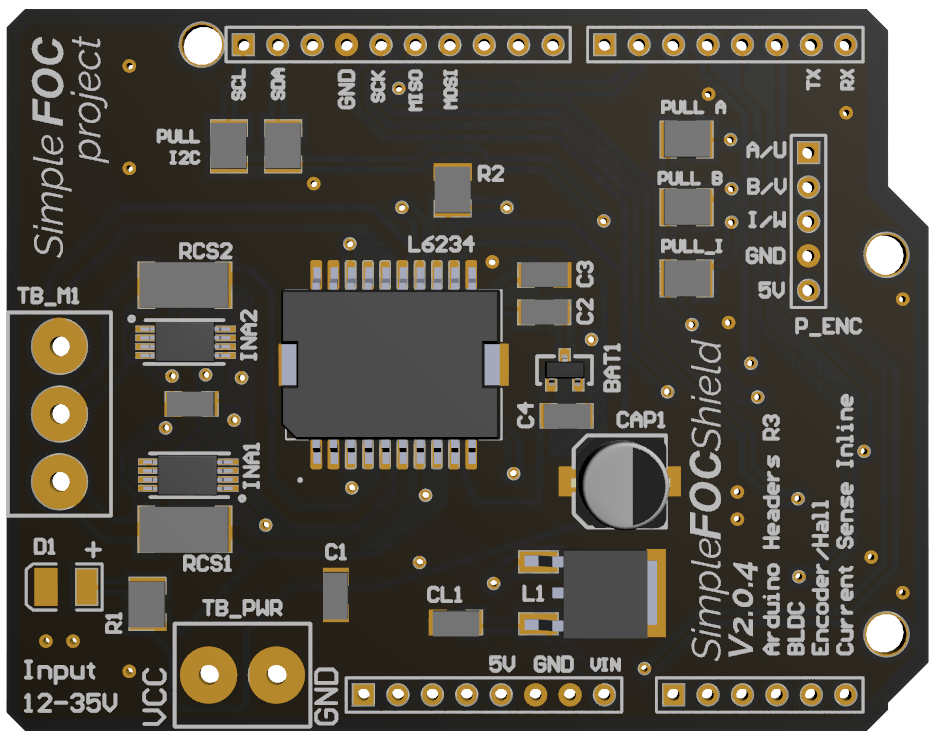
The SimpleFOCShield2.0.4 is a versatile motor control shield designed by SimpleFOC for driving brushless DC (BLDC) motors using advanced Field Oriented Control (FOC) techniques. This shield is compatible with a wide range of microcontrollers, including Arduino boards, and provides an efficient and user-friendly solution for precise motor control. It features integrated power management, robust protection mechanisms, and flexible configuration options, making it ideal for robotics, automation, and other motion control applications.
Explore Projects Built with SimpleFOCShield2.0.4


Explore Projects Built with SimpleFOCShield2.0.4
Common Applications and Use Cases
- Robotics and autonomous vehicles
- CNC machines and 3D printers
- Gimbals and camera stabilization systems
- Industrial automation and conveyor systems
- Educational and research projects involving motor control
Technical Specifications
Key Technical Details
| Parameter | Value |
|---|---|
| Manufacturer | SimpleFOC |
| Part ID | BLDC_driver |
| Input Voltage Range | 12V to 24V |
| Maximum Continuous Current | 10A per phase |
| Motor Type Supported | Brushless DC (BLDC) motors |
| Control Method | Field Oriented Control (FOC) |
| Microcontroller Support | Arduino, STM32, ESP32, and others |
| Communication Interfaces | PWM, I2C, SPI, UART |
| Dimensions | 68mm x 53mm |
| Weight | 30g |
Pin Configuration and Descriptions
The SimpleFOCShield2.0.4 has a straightforward pin layout for easy integration with microcontrollers. Below is the pin configuration:
| Pin Name | Description |
|---|---|
| VIN | Power input for the shield (12V to 24V). |
| GND | Ground connection. |
| M1_A, M1_B, M1_C | Motor 1 phase connections (A, B, C). |
| M2_A, M2_B, M2_C | Motor 2 phase connections (A, B, C). |
| EN1, EN2 | Enable pins for Motor 1 and Motor 2. |
| DIR1, DIR2 | Direction control pins for Motor 1 and Motor 2. |
| PWM1, PWM2 | PWM input pins for speed control of Motor 1 and Motor 2. |
| SCL, SDA | I2C communication pins (clock and data). |
| TX, RX | UART communication pins (transmit and receive). |
| SPI (MISO, MOSI, SCK, CS) | SPI communication pins for advanced control and configuration. |
Usage Instructions
How to Use the Component in a Circuit
- Power Supply: Connect a DC power source (12V to 24V) to the VIN and GND pins. Ensure the power supply can handle the current requirements of your motor.
- Motor Connection: Connect the three motor phases (A, B, C) to the corresponding M1_A, M1_B, M1_C (or M2_A, M2_B, M2_C) pins.
- Microcontroller Connection:
- Connect the PWM, DIR, and EN pins to the appropriate GPIO pins on your microcontroller.
- For advanced control, connect the I2C, UART, or SPI pins as needed.
- Programming: Use the SimpleFOC library to configure and control the motor. Install the library in your Arduino IDE or other supported development environments.
Important Considerations and Best Practices
- Heat Management: The shield can handle up to 10A per phase, but prolonged high-current operation may require additional cooling (e.g., a heatsink or fan).
- Motor Compatibility: Ensure the motor's voltage and current ratings are within the shield's specifications.
- Power Supply: Use a stable and adequately rated power supply to avoid voltage drops or damage to the shield.
- Wiring: Keep motor and power wires as short as possible to minimize noise and interference.
- Library Configuration: Use the SimpleFOC library to set up parameters such as motor type, pole pairs, and control mode.
Example Code for Arduino UNO
Below is an example of how to control a BLDC motor using the SimpleFOCShield2.0.4 and the SimpleFOC library:
#include <SimpleFOC.h>

// Define motor and driver objects
BLDCMotor motor = BLDCMotor(7); // Motor with 7 pole pairs
BLDCDriver3PWM driver = BLDCDriver3PWM(9, 10, 11); // PWM pins for motor phases

void setup() {
  // Initialize driver
  driver.voltage_power_supply = 12; // Set power supply voltage
  driver.init();
  motor.linkDriver(&driver);

  // Configure motor
  motor.controller = ControlType::velocity; // Velocity control mode
  motor.voltage_limit = 6; // Limit motor voltage
  motor.velocity_limit = 20; // Limit motor speed (rad/s)
  motor.init();

  // Start monitoring
  Serial.begin(115200);
  Serial.println("Motor ready!");
}

void loop() {
  // Set motor velocity (e.g., 10 rad/s)
  motor.move(10);
}
Notes:
- Replace the pin numbers in the code with the actual pins connected to your shield.
- Adjust the motor parameters (e.g., pole pairs, voltage limit) based on your specific motor.
Troubleshooting and FAQs
Common Issues and Solutions
Motor Not Spinning:
- Check the power supply voltage and current ratings.
- Verify motor connections (A, B, C phases) and ensure they are secure.
- Ensure the enable pin (EN1 or EN2) is set HIGH.
Overheating:
- Reduce the motor's voltage or current limit in the software.
- Add a heatsink or fan to the shield for better cooling.
Erratic Motor Behavior:
- Verify the motor parameters (e.g., pole pairs) in the code.
- Check for loose or noisy connections in the wiring.
Communication Issues:
- Ensure the correct communication protocol (I2C, UART, SPI) is selected and configured.
- Double-check the wiring and pin assignments for the communication interface.
FAQs
Q: Can I use this shield with a stepper motor?
A: No, the SimpleFOCShield2.0.4 is specifically designed for BLDC motors. For stepper motors, consider using a dedicated stepper motor driver.
Q: What is the maximum motor speed supported?
A: The maximum speed depends on the motor's specifications and the control parameters. Ensure the motor's velocity limit is set appropriately in the software.
Q: Can I use a 5V power supply?
A: No, the shield requires a power supply in the range of 12V to 24V.
Q: Is the shield compatible with Raspberry Pi?
A: Yes, the shield can be used with Raspberry Pi via PWM or communication interfaces like I2C, SPI, or UART. However, additional configuration may be required.