
How to Use SparkFun Si4735 AM & FM Receiver Shield: Examples, Pinouts, and Specs
 Design with SparkFun Si4735 AM & FM Receiver Shield in Cirkit Designer
Introduction
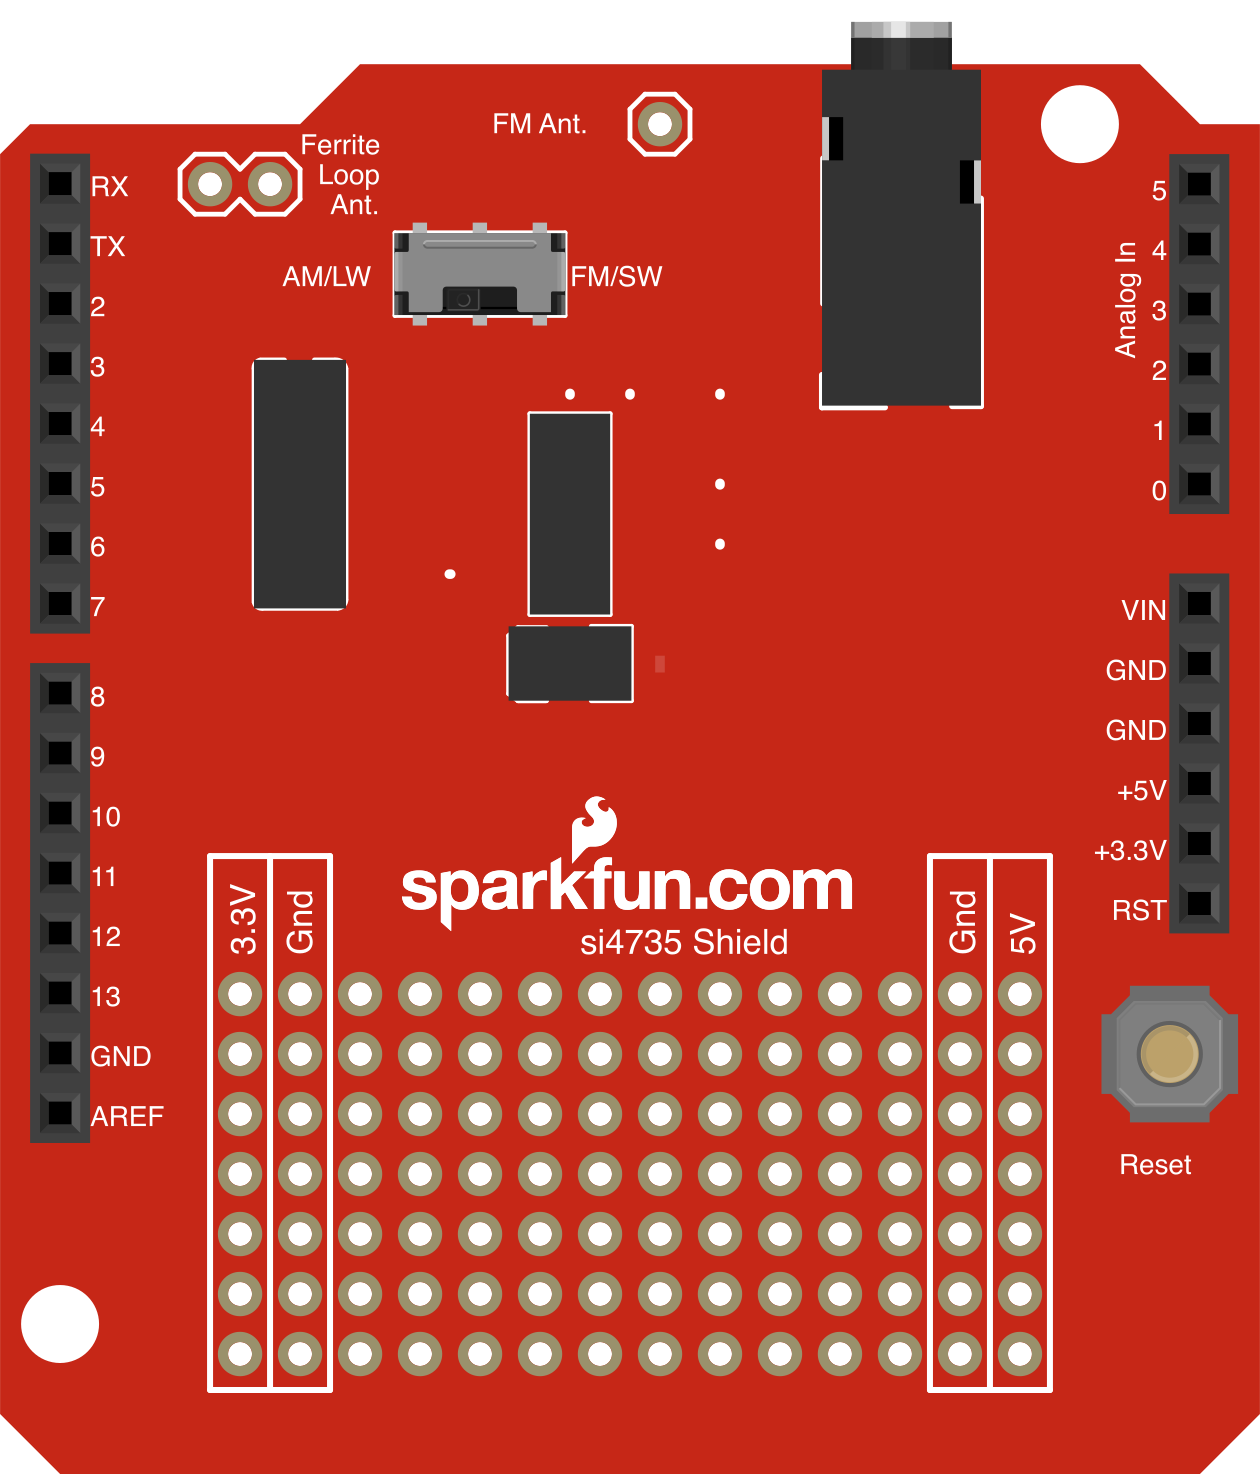
The SparkFun Si4735 AM & FM Receiver Shield (Manufacturer Part ID: DEV-10342) is a compact and versatile radio receiver shield designed for AM and FM radio reception. Built around the Silicon Labs Si4735 chip, this shield delivers high-quality audio output and is optimized for seamless integration with microcontrollers, such as the Arduino platform. It is ideal for projects requiring radio functionality, such as custom audio systems, educational tools, and hobbyist radio applications.
Explore Projects Built with SparkFun Si4735 AM & FM Receiver Shield
 Open Project in Cirkit Designer
 Open Project in Cirkit Designer
 Open Project in Cirkit Designer
 Open Project in Cirkit Designer
Explore Projects Built with SparkFun Si4735 AM & FM Receiver Shield
Open Project in Cirkit DesignerOpen Project in Cirkit DesignerOpen Project in Cirkit DesignerOpen Project in Cirkit DesignerCommon Applications and Use Cases
- AM/FM radio receivers for DIY audio projects
- Educational tools for learning about radio communication
- Internet of Things (IoT) devices with radio functionality
- Custom audio systems and portable radios
- Prototyping and experimentation with radio signals
Technical Specifications
The SparkFun Si4735 AM & FM Receiver Shield is designed to provide reliable and high-quality radio reception. Below are the key technical details:
Key Technical Details
- Chipset: Silicon Labs Si4735
- Input Voltage: 3.3V or 5V (via Arduino headers)
- Output: Stereo audio output via 3.5mm headphone jack
- Frequency Range:
- FM: 64–108 MHz
- AM: 520–1710 kHz
- Interface: I²C communication protocol
- Power Consumption: Low power consumption for portable applications
- Antenna: External antenna connection for improved reception
- Dimensions: Standard Arduino shield form factor
Pin Configuration and Descriptions
The SparkFun Si4735 AM & FM Receiver Shield connects to an Arduino or similar microcontroller via its headers. Below is the pin configuration:
| Pin | Name | Description |
|---|---|---|
| A4 | SDA | I²C data line for communication with the Si4735 chip. |
| A5 | SCL | I²C clock line for communication with the Si4735 chip. |
| D2 | RST | Reset pin for the Si4735 chip. |
| D3 | INT | Interrupt pin for handling events from the Si4735 chip. |
| GND | Ground | Common ground connection. |
| VIN | Power Input | Supplies power to the shield (3.3V or 5V). |
| Audio | Audio Output | 3.5mm stereo headphone jack for audio output. |
| Antenna | Antenna Input | External antenna connection for improved AM/FM signal reception. |
Usage Instructions
The SparkFun Si4735 AM & FM Receiver Shield is easy to use with an Arduino or similar microcontroller. Follow the steps below to integrate and use the shield in your project.
Step 1: Hardware Setup
- Attach the Shield: Plug the SparkFun Si4735 Shield onto your Arduino board, ensuring proper alignment of the headers.
- Connect an Antenna: Attach an external antenna to the antenna input for better signal reception.
- Power the Shield: Power the Arduino board via USB or an external power source. The shield will draw power from the Arduino.
Step 2: Software Setup
- Install the Library: Download and install the
SparkFun Si4735library from the Arduino Library Manager or the SparkFun GitHub repository. - Load Example Code: Open the Arduino IDE, navigate to
File > Examples > SparkFun Si4735 > Example1_FMRadioto load a sample sketch.
Step 3: Example Code
Below is an example sketch to tune into an FM radio station:
#include <Wire.h>
#include <SparkFunSi4735.h>

// Create an instance of the Si4735 class
Si4735 radio;

void setup() {
  Serial.begin(9600); // Initialize serial communication for debugging
  Wire.begin();       // Initialize I²C communication

  // Initialize the Si4735 radio
  if (!radio.begin()) {
    Serial.println("Si4735 initialization failed!");
    while (1); // Halt if initialization fails
  }

  Serial.println("Si4735 initialized successfully!");

  // Set the radio to FM mode
  radio.setMode(FM);
  Serial.println("Radio set to FM mode.");

  // Tune to a specific FM frequency (e.g., 101.1 MHz)
  radio.setFrequency(10110); // Frequency in kHz
  Serial.println("Tuned to 101.1 MHz.");
}

void loop() {
  // Print the current signal strength
  int signalStrength = radio.getSignalStrength();
  Serial.print("Signal Strength: ");
  Serial.println(signalStrength);

  delay(1000); // Wait for 1 second before updating
}
Step 4: Testing
- Upload the example code to your Arduino board.
- Open the Serial Monitor to view debug messages and signal strength.
- Connect headphones or speakers to the 3.5mm audio jack to listen to the tuned FM station.
Important Considerations and Best Practices
- Antenna Placement: Ensure the antenna is properly connected and positioned for optimal signal reception.
- Power Supply: Use a stable power source to avoid noise or interference in the audio output.
- Audio Output: Use high-quality headphones or speakers for the best audio experience.
- Frequency Range: Verify that the desired frequency is within the supported range of the Si4735 chip.
Troubleshooting and FAQs
Common Issues and Solutions
No Audio Output:
- Ensure the headphones or speakers are properly connected to the 3.5mm jack.
- Verify that the shield is powered and the Arduino is running the correct code.
Poor Signal Reception:
- Check the antenna connection and placement.
- Move the setup away from sources of interference, such as Wi-Fi routers or other electronic devices.
Si4735 Initialization Fails:
- Ensure the shield is properly seated on the Arduino headers.
- Verify the I²C connections (SDA and SCL) and ensure no pins are damaged.
Incorrect Frequency Tuning:
- Double-check the frequency value in the code. Remember to specify the frequency in kHz.
FAQs
Q: Can I use this shield with a 3.3V microcontroller?
A: Yes, the shield is compatible with both 3.3V and 5V microcontrollers. Ensure the voltage matches the microcontroller's logic level.
Q: Does the shield support AM radio?
A: Yes, the Si4735 chip supports both AM and FM radio. You can switch modes using the setMode() function in the library.
Q: Can I use this shield with microcontrollers other than Arduino?
A: Yes, as long as the microcontroller supports I²C communication, you can use this shield. However, you may need to adapt the library or write custom code.
Q: How do I improve audio quality?
A: Use a high-quality antenna, ensure a stable power supply, and minimize interference from nearby electronic devices.
By following this documentation, you can effectively integrate and use the SparkFun Si4735 AM & FM Receiver Shield in your projects.