Cirkit Designer Logo
Cirkit Designer
Your all-in-one circuit design IDE
Home / 
Component Documentation

How to Use LCD Display 16x2: Examples, Pinouts, and Specs

Image of LCD Display 16x2
Cirkit Designer LogoDesign with LCD Display 16x2 in Cirkit Designer

Introduction

The LCD Display 16x2 is a versatile and widely-used liquid crystal display that provides a simple means of displaying text and numbers. It consists of 16 columns and 2 rows, allowing for the display of up to 32 characters. This component is commonly used in electronic projects such as user interfaces, counters, digital clocks, sensors output display, and many other applications where a simple, clear output is needed.

Explore Projects Built with LCD Display 16x2

Use Cirkit Designer to design, explore, and prototype these projects online. Some projects support real-time simulation. Click "Open Project" to start designing instantly!
Arduino UNO and 16x2 I2C LCD Display Interface for Data Visualization
Image of lcd: A project utilizing LCD Display 16x2 in a practical application
This circuit consists of an Arduino UNO microcontroller connected to a 16x2 I2C LCD display. The Arduino UNO provides power and I2C communication to the LCD, allowing it to display information controlled by the Arduino.
Cirkit Designer LogoOpen Project in Cirkit Designer
Arduino UNO Controlled LCD Display with Adjustable Contrast
Image of Liquid Crystal Displays (LCD) with Arduino: A project utilizing LCD Display 16x2 in a practical application
This circuit features an Arduino UNO connected to a 16x2 LCD display for text output. The Arduino controls the display via digital pins D2 to D5 for data transmission and pins D11 and D12 for enable and register select signals. A trimmer potentiometer adjusts the display contrast, and a resistor provides current limiting for the LCD backlight.
Cirkit Designer LogoOpen Project in Cirkit Designer
Arduino Leonardo Controlled LCD Display with I2C Interface
Image of ert: A project utilizing LCD Display 16x2 in a practical application
This circuit connects an Arduino Leonardo microcontroller to a 16x2 LCD display via an LCM1602 IIC interface module, enabling the display of text on the LCD. The Arduino is programmed to display the messages 'TEST LCD i2C' and 'KelasRobot.com' on the LCD. The IIC module facilitates communication between the Arduino and the LCD using the I2C protocol, simplifying the wiring and pin usage.
Cirkit Designer LogoOpen Project in Cirkit Designer
Arduino UNO and 16x2 I2C LCD Display Interface for Real-Time Data Visualization
Image of lcd: A project utilizing LCD Display 16x2 in a practical application
This circuit consists of an Arduino UNO microcontroller connected to a 16x2 I2C LCD display. The Arduino provides power and ground to the LCD, and communicates with it via the I2C protocol using the SDA and SCL pins. The setup is designed to display information on the LCD, controlled by the Arduino.
Cirkit Designer LogoOpen Project in Cirkit Designer

Explore Projects Built with LCD Display 16x2

Use Cirkit Designer to design, explore, and prototype these projects online. Some projects support real-time simulation. Click "Open Project" to start designing instantly!
Image of lcd: A project utilizing LCD Display 16x2 in a practical application
Arduino UNO and 16x2 I2C LCD Display Interface for Data Visualization
This circuit consists of an Arduino UNO microcontroller connected to a 16x2 I2C LCD display. The Arduino UNO provides power and I2C communication to the LCD, allowing it to display information controlled by the Arduino.
Cirkit Designer LogoOpen Project in Cirkit Designer
Image of Liquid Crystal Displays (LCD) with Arduino: A project utilizing LCD Display 16x2 in a practical application
Arduino UNO Controlled LCD Display with Adjustable Contrast
This circuit features an Arduino UNO connected to a 16x2 LCD display for text output. The Arduino controls the display via digital pins D2 to D5 for data transmission and pins D11 and D12 for enable and register select signals. A trimmer potentiometer adjusts the display contrast, and a resistor provides current limiting for the LCD backlight.
Cirkit Designer LogoOpen Project in Cirkit Designer
Image of ert: A project utilizing LCD Display 16x2 in a practical application
Arduino Leonardo Controlled LCD Display with I2C Interface
This circuit connects an Arduino Leonardo microcontroller to a 16x2 LCD display via an LCM1602 IIC interface module, enabling the display of text on the LCD. The Arduino is programmed to display the messages 'TEST LCD i2C' and 'KelasRobot.com' on the LCD. The IIC module facilitates communication between the Arduino and the LCD using the I2C protocol, simplifying the wiring and pin usage.
Cirkit Designer LogoOpen Project in Cirkit Designer
Image of lcd: A project utilizing LCD Display 16x2 in a practical application
Arduino UNO and 16x2 I2C LCD Display Interface for Real-Time Data Visualization
This circuit consists of an Arduino UNO microcontroller connected to a 16x2 I2C LCD display. The Arduino provides power and ground to the LCD, and communicates with it via the I2C protocol using the SDA and SCL pins. The setup is designed to display information on the LCD, controlled by the Arduino.
Cirkit Designer LogoOpen Project in Cirkit Designer

Technical Specifications

Key Technical Details

  • Display Type: Character LCD
  • Resolution: 16 characters x 2 lines
  • Character Size: 5 x 8 pixel matrix
  • Backlight: LED, typically blue or green
  • Operating Voltage: 4.7V to 5.3V
  • Module Dimensions: 80mm x 36mm x 12mm (approx.)
  • Viewing Area: 64.5mm x 16mm

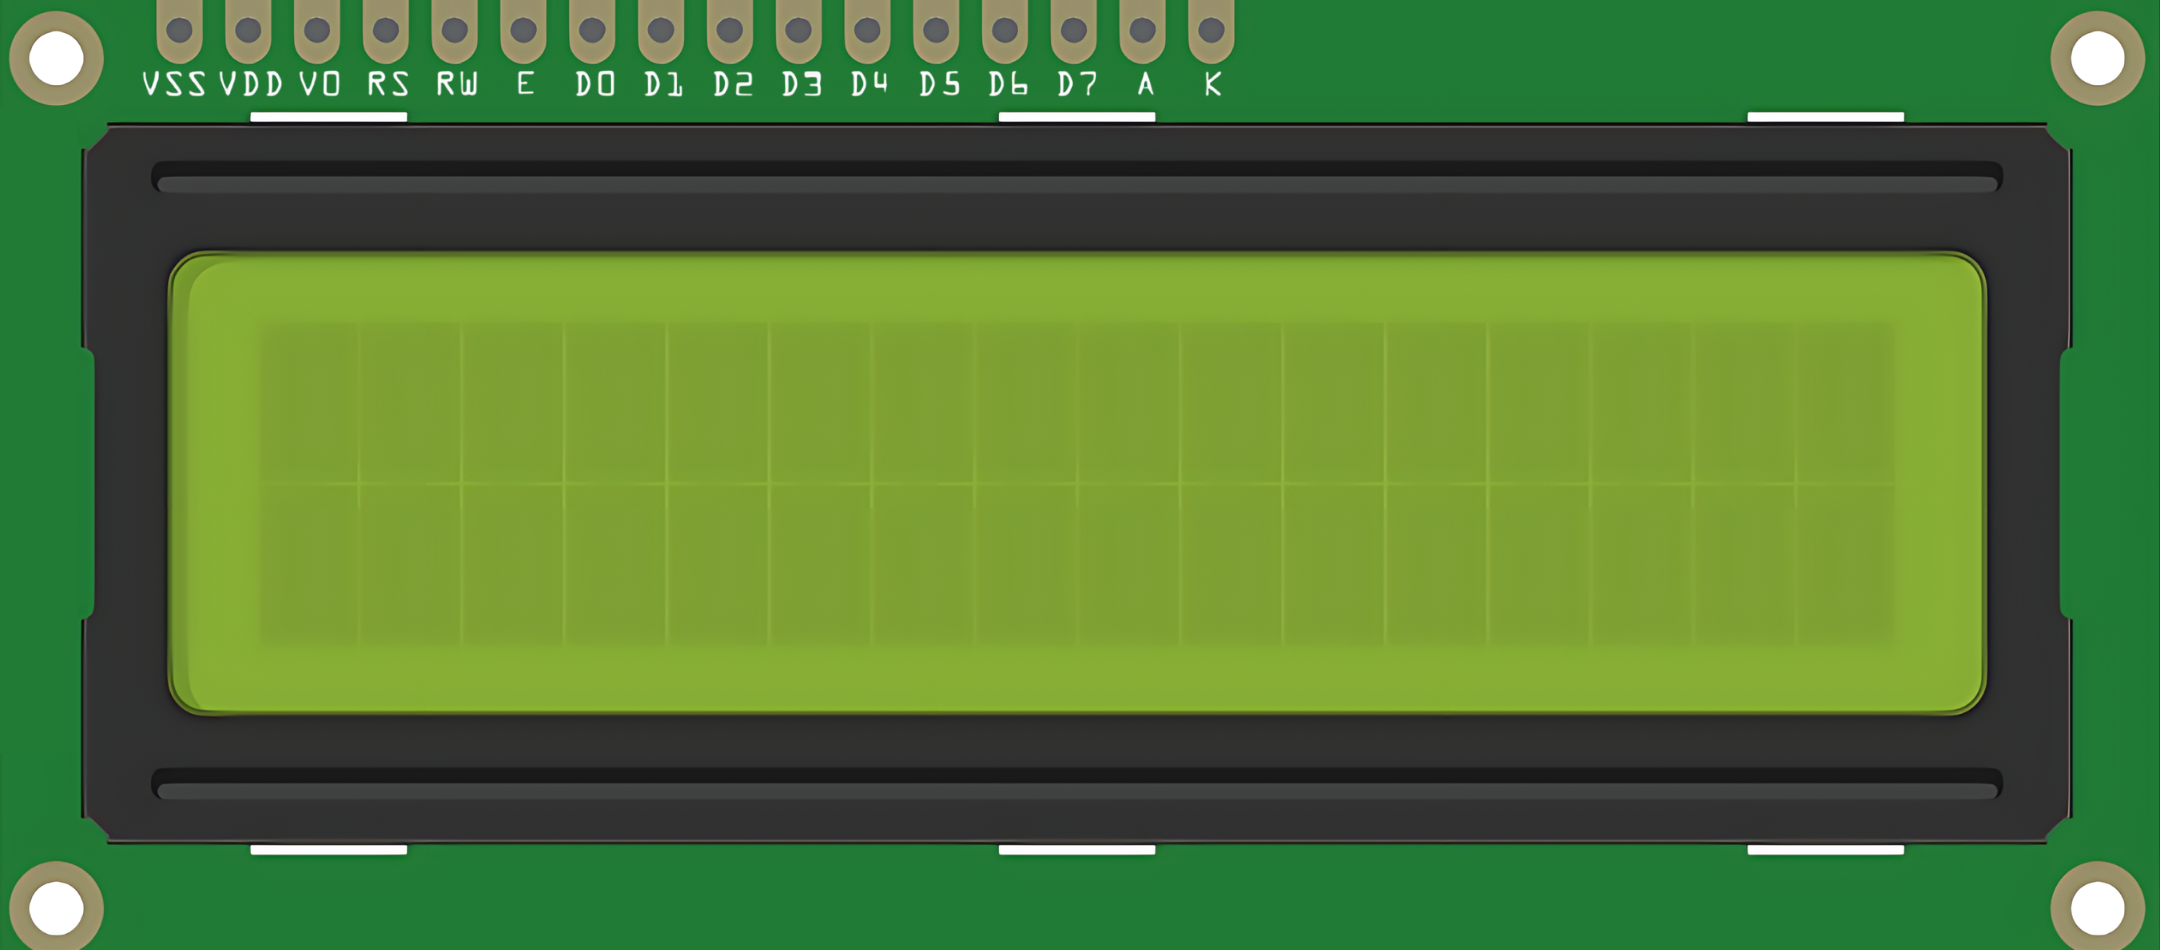
Pin Configuration and Descriptions

Pin Number Symbol Function
1 VSS Ground
2 VDD Supply voltage for logic
3 VO Contrast adjustment
4 RS Register select signal
5 R/W Read/Write signal
6 E Enable signal
7-14 D0-D7 Data bus lines (8-bit data)
15 A Anode for backlight (+5V)
16 K Cathode for backlight (GND)

Usage Instructions

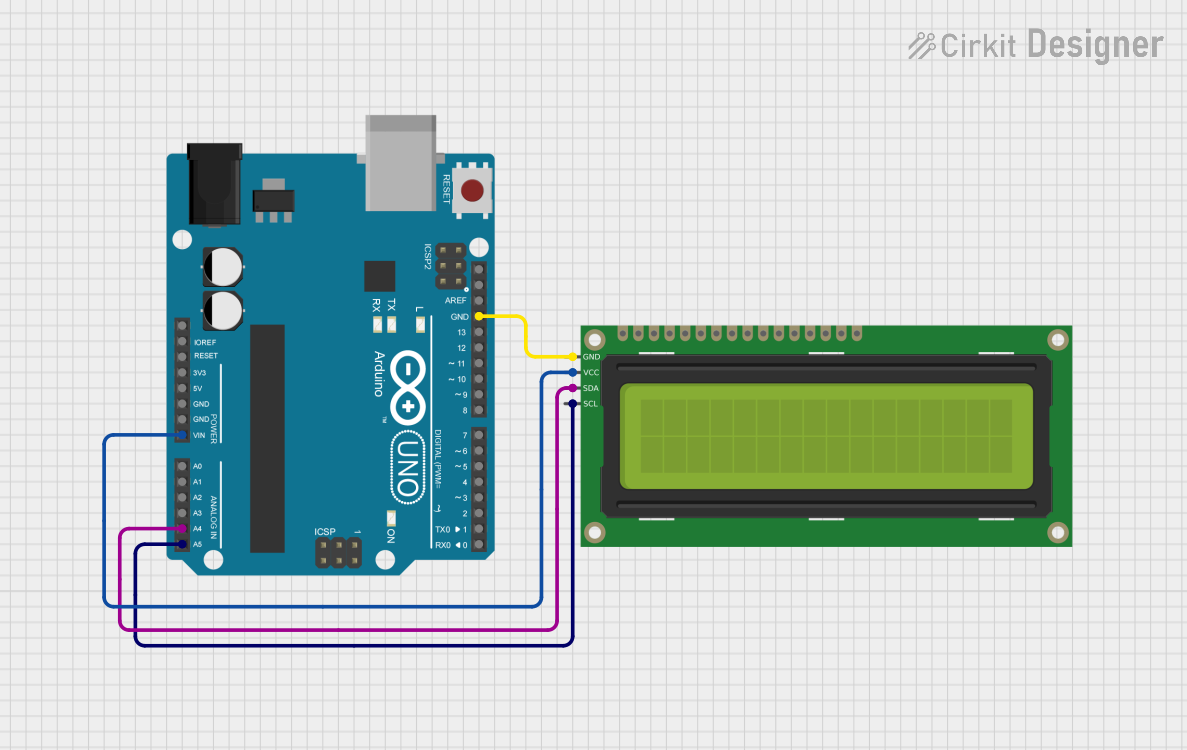
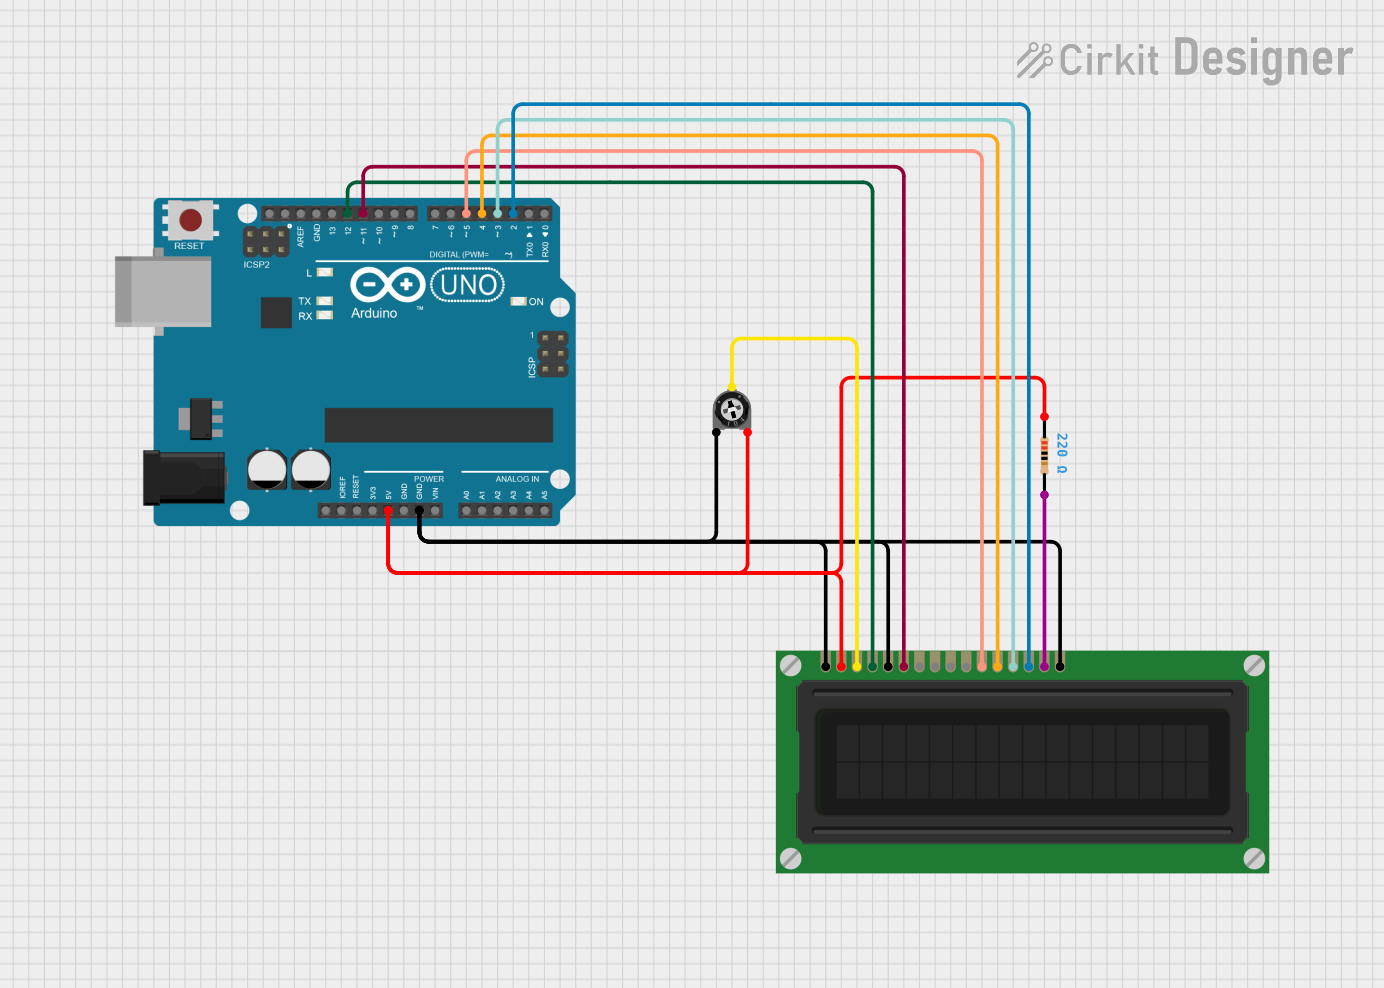
Connecting the LCD to a Circuit

  1. Power Connections: Connect pin 1 (VSS) to ground and pin 2 (VDD) to a 5V supply.
  2. Contrast Adjustment: Connect pin 3 (VO) to a potentiometer for contrast control.
  3. Data Interface: For 4-bit mode, connect pins 11 to 14 (D4 to D7). For 8-bit mode, connect pins 7 to 14 (D0 to D7).
  4. Control Pins: Connect pin 4 (RS) to determine the mode (instruction or character data), pin 5 (R/W) to select read or write mode, and pin 6 (E) to enable the data bus.
  5. Backlight: Connect pin 15 (A) to 5V and pin 16 (K) to ground for the backlight.

Important Considerations and Best Practices

  • Use a current-limiting resistor or a potentiometer with pin 3 (VO) for contrast adjustment.
  • Ensure that the power supply is stable and within the specified voltage range.
  • Utilize a 4-bit data interface to save I/O pins if limited by the microcontroller.
  • Avoid exposing the display to direct sunlight or high temperatures to prevent damage.

Example Code for Arduino UNO

#include <LiquidCrystal.h>

// Initialize the library with the numbers of the interface pins
LiquidCrystal lcd(12, 11, 5, 4, 3, 2);

void setup() {
  // Set up the LCD's number of columns and rows:
  lcd.begin(16, 2);
  // Print a message to the LCD.
  lcd.print("Hello, World!");
}

void loop() {
  // Set the cursor to column 0, line 1
  // (note: line 1 is the second row, since counting begins with 0):
  lcd.setCursor(0, 1);
  // Print the number of seconds since reset:
  lcd.print(millis() / 1000);
}

Troubleshooting and FAQs

Common Issues

  • Display is blank or characters are not visible: Adjust the contrast potentiometer connected to pin 3 (VO).
  • Garbled or incorrect characters: Check the data connections and ensure proper initialization in the code.
  • Backlight not working: Verify the connections to pins 15 (A) and 16 (K) and ensure they are correctly powered.

Solutions and Tips for Troubleshooting

  • Double-check all wiring against the pin configuration table.
  • Ensure that the Arduino library used for the LCD is correctly installed and included in the code.
  • Reset the power to the LCD module if it behaves unexpectedly.

FAQs

Q: Can I use the LCD with a 3.3V system? A: The LCD is typically designed for 5V operation. Using it with a 3.3V system may result in dim or invisible characters. A level shifter or a 3.3V compatible LCD should be used instead.

Q: How can I display custom characters? A: The LCD allows for the creation of custom characters. Refer to the createChar() function in the Arduino LiquidCrystal library for implementation.

Q: What is the lifespan of the LCD backlight? A: The lifespan of the LED backlight is typically around 50,000 hours, but it can vary based on usage and environmental conditions.