How to Use FeeTech URT-1: Examples, Pinouts, and Specs
Introduction
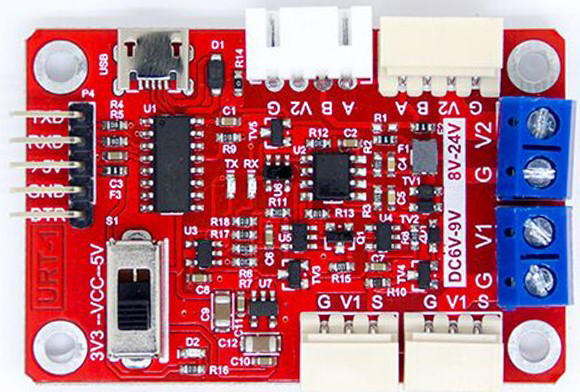
The FeeTech URT-1 is a versatile universal remote transmitter designed for controlling a variety of electronic devices. With its programmable buttons, users can customize functions to suit their specific needs, making it an ideal solution for managing multiple devices with a single remote. The URT-1 is compatible with a wide range of brands and models, ensuring broad usability across different systems.
Explore Projects Built with FeeTech URT-1


Explore Projects Built with FeeTech URT-1
Common Applications and Use Cases
- Controlling home entertainment systems (TVs, soundbars, DVD players, etc.)
- Managing smart home devices such as lights, fans, and air conditioners
- Simplifying control of office equipment like projectors and conference systems
- Replacing lost or damaged remote controls
Technical Specifications
The FeeTech URT-1 is designed to provide reliable performance and flexibility. Below are its key technical details:
| Specification | Details |
|---|---|
| Manufacturer | FeeTech |
| Part ID | URT-1 |
| Power Supply | 2 x AAA batteries (3V total) |
| Transmission Frequency | 38 kHz (Infrared) |
| Range | Up to 10 meters (line of sight) |
| Programmable Buttons | 8 buttons |
| Compatibility | Supports over 1,000 brands and models |
| Dimensions | 150mm x 50mm x 20mm |
| Weight | 80 grams (without batteries) |
Button Configuration
The URT-1 features 8 programmable buttons, which can be customized for different functions. Below is the button layout:
| Button | Default Function | Description |
|---|---|---|
| Power | Power On/Off | Turns the connected device on/off |
| Volume + | Increase Volume | Raises the volume level |
| Volume - | Decrease Volume | Lowers the volume level |
| Channel + | Next Channel | Switches to the next channel |
| Channel - | Previous Channel | Switches to the previous channel |
| Mute | Mute | Mutes the audio output |
| Custom 1 | Programmable | User-defined function |
| Custom 2 | Programmable | User-defined function |
Usage Instructions
How to Use the FeeTech URT-1 in a Circuit
The FeeTech URT-1 is a standalone device and does not require integration into a circuit. However, it can be used to control devices that are part of an electronic system. Follow these steps to set up and use the URT-1:
- Insert Batteries: Open the battery compartment on the back of the URT-1 and insert two AAA batteries, ensuring correct polarity.
- Select Device Mode: Use the mode selector button (if available) to choose the type of device you want to control (e.g., TV, DVD, etc.).
- Program Buttons:
- Hold down the "Program" button until the LED indicator lights up.
- Enter the code for your device (refer to the FeeTech URT-1 code list provided in the user manual).
- Press the "OK" button to save the code. The LED will blink to confirm successful programming.
- Test the Remote: Point the URT-1 at the device and press the buttons to ensure proper functionality.
- Customize Buttons (Optional): Use the programming mode to assign specific functions to the Custom 1 and Custom 2 buttons.
Important Considerations and Best Practices
- Ensure there is a clear line of sight between the URT-1 and the device being controlled.
- Replace the batteries when the LED indicator becomes dim or the remote's range decreases.
- Avoid exposing the URT-1 to extreme temperatures or moisture to prevent damage.
- Refer to the FeeTech URT-1 code list for compatibility with specific brands and models.
Arduino UNO Integration
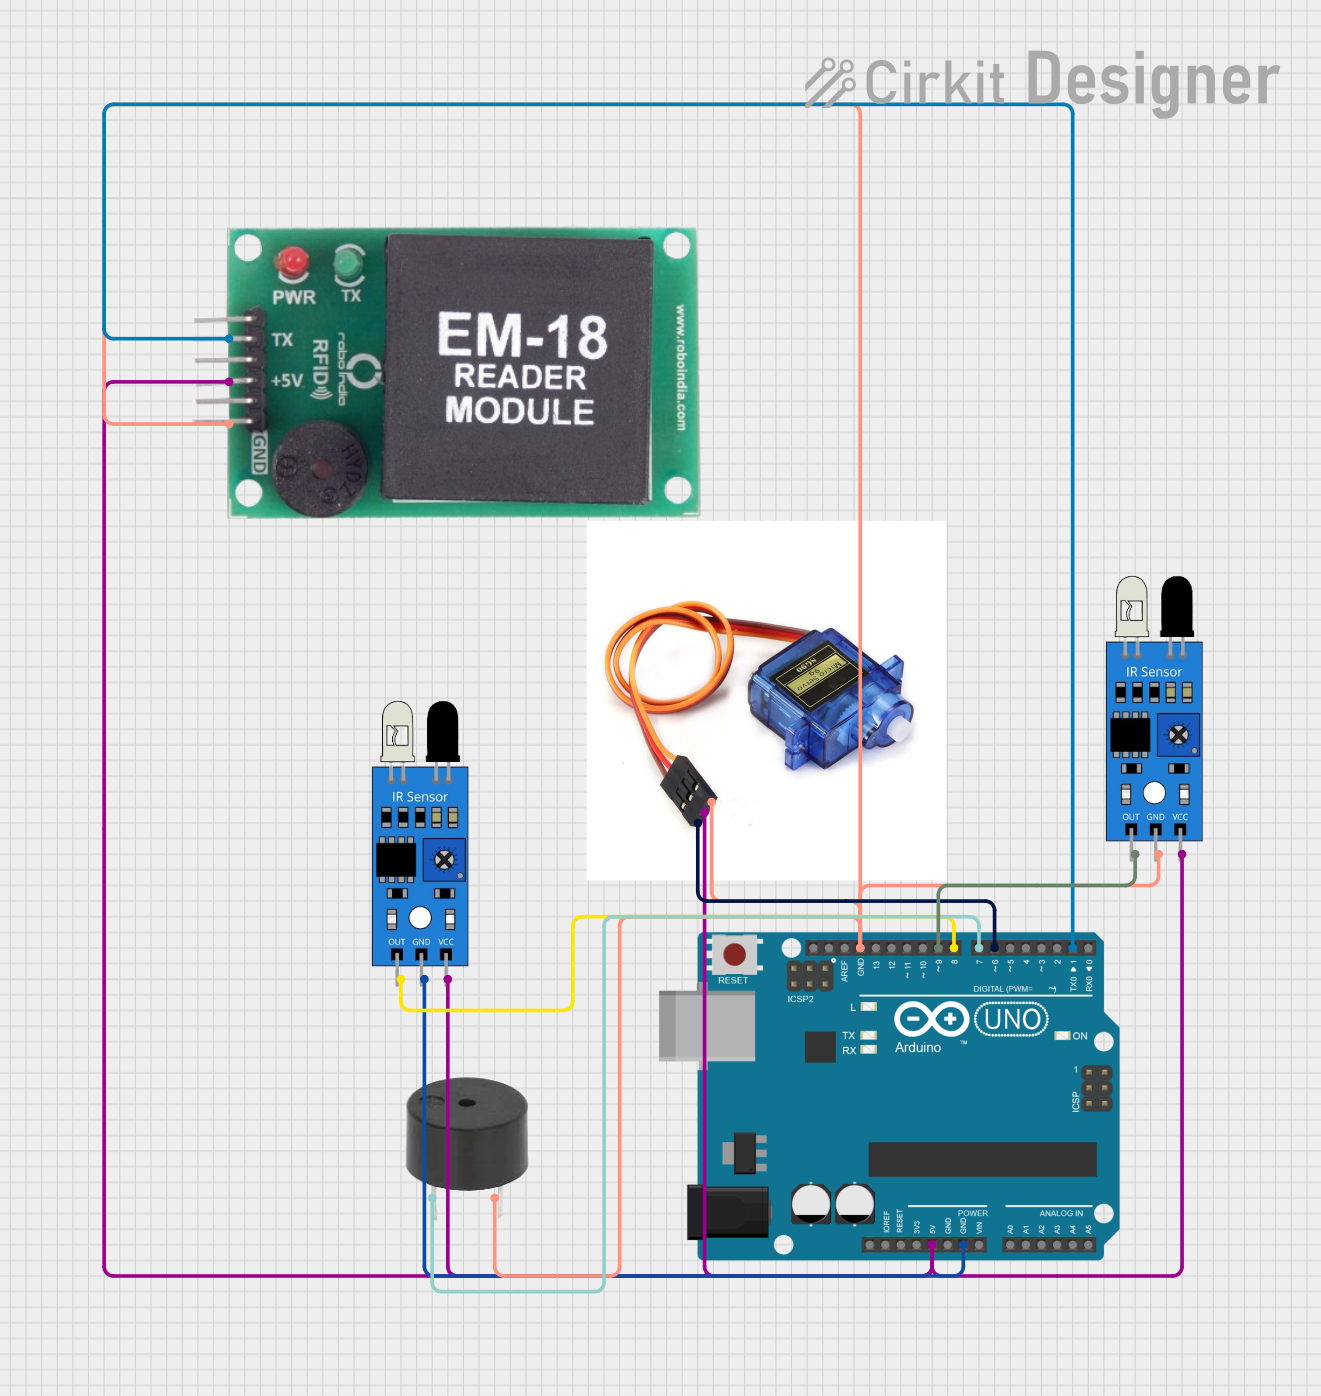
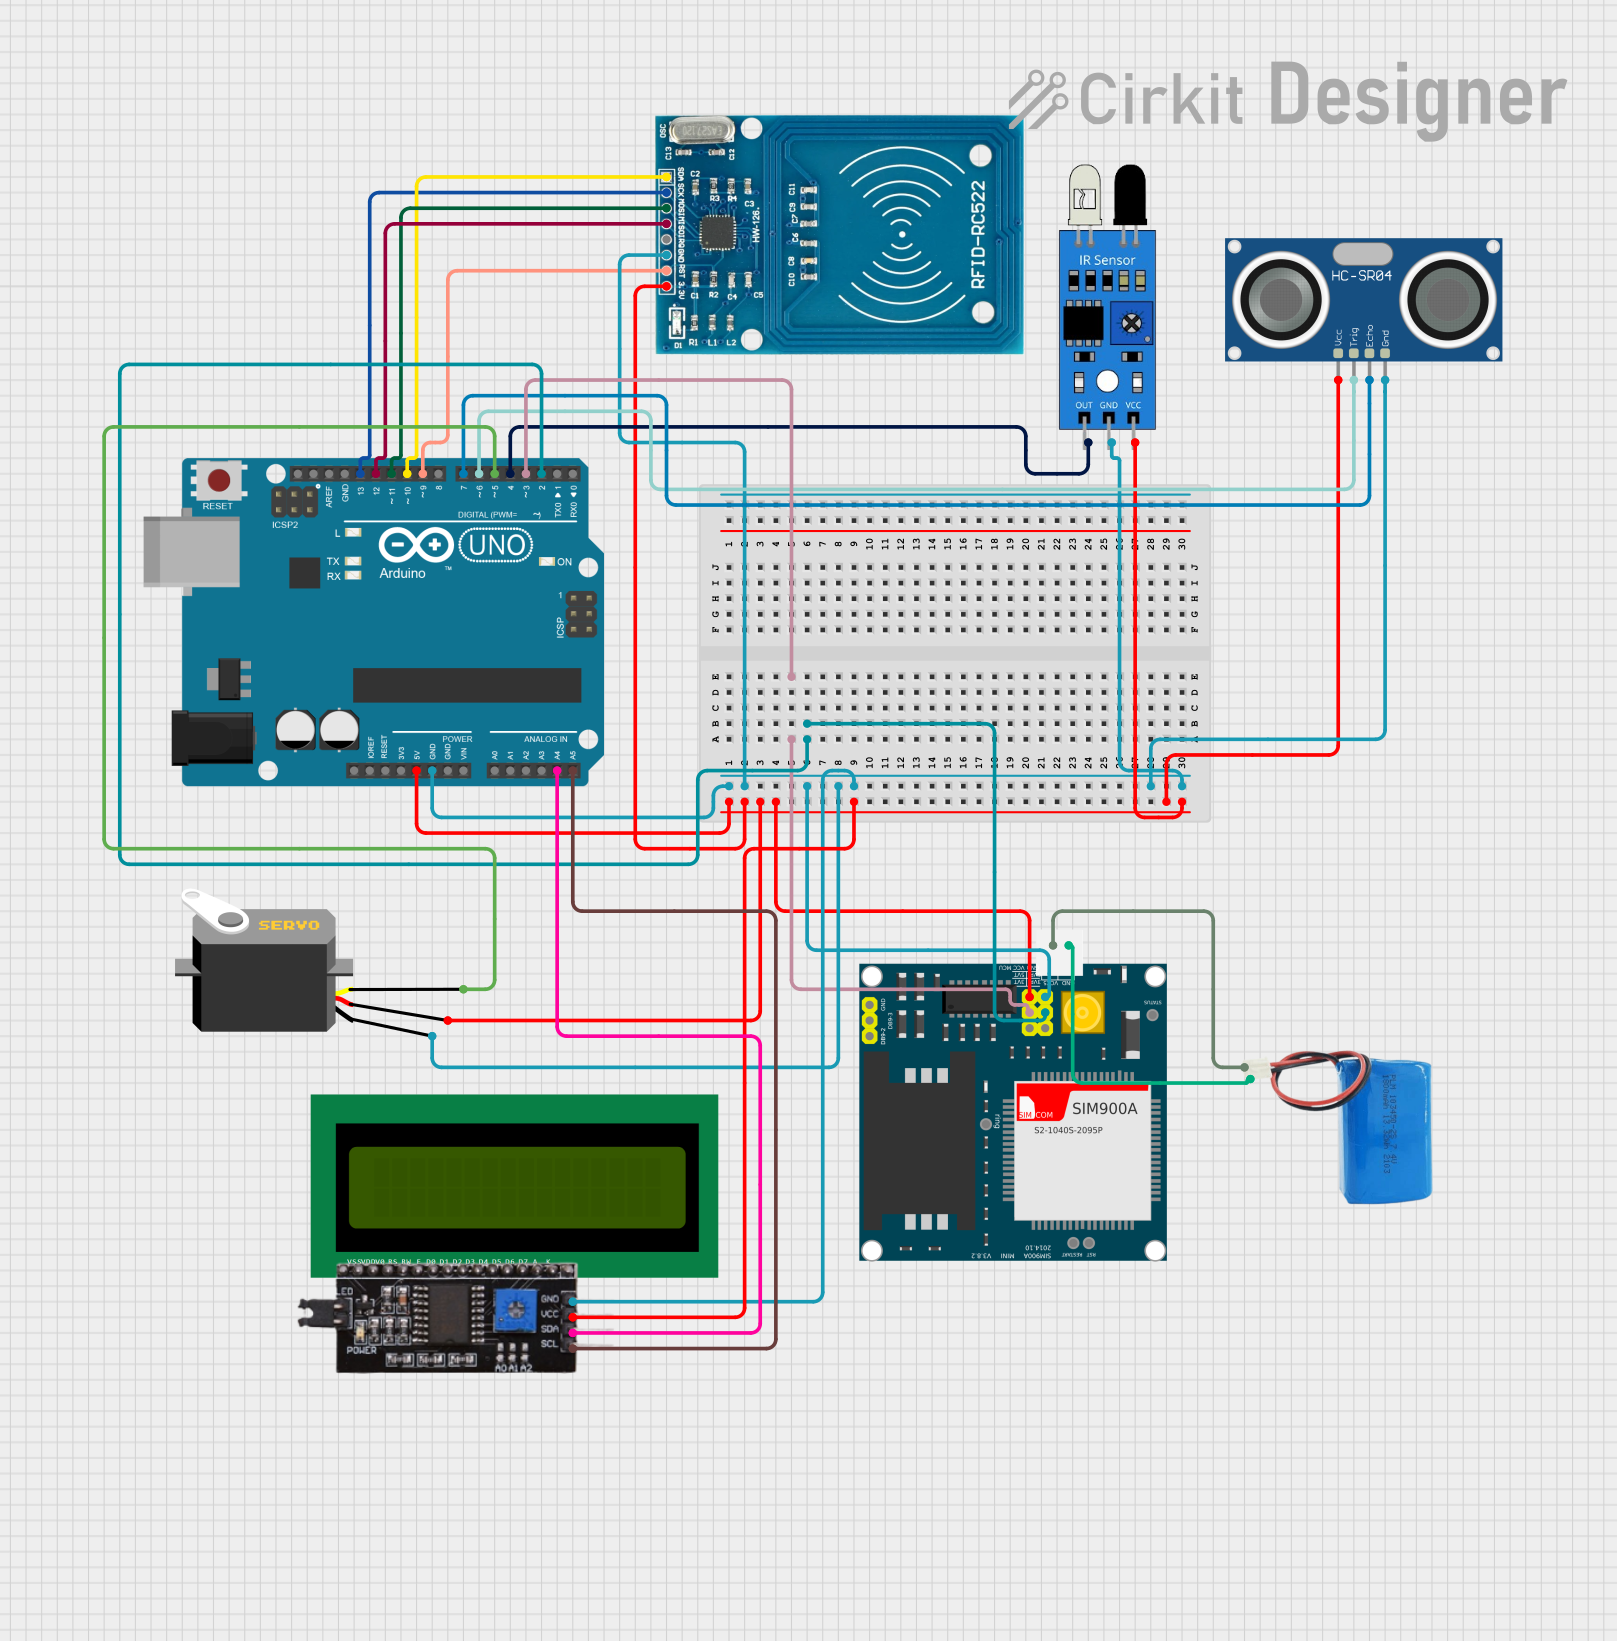
While the URT-1 is not directly designed for Arduino integration, it can be used in projects involving IR receivers. Below is an example of how to use an Arduino UNO to decode IR signals from the URT-1:
#include <IRremote.h> // Include the IRremote library

const int RECV_PIN = 11; // Define the pin connected to the IR receiver
IRrecv irrecv(RECV_PIN); // Create an IRrecv object
decode_results results;  // Create a variable to store decoded results

void setup() {
  Serial.begin(9600); // Initialize serial communication
  irrecv.enableIRIn(); // Start the IR receiver
  Serial.println("IR Receiver is ready to decode signals.");
}

void loop() {
  if (irrecv.decode(&results)) { // Check if a signal is received
    Serial.print("Received IR code: ");
    Serial.println(results.value, HEX); // Print the received code in HEX
    irrecv.resume(); // Prepare to receive the next signal
  }
}
Note: Use an IR receiver module (e.g., TSOP1738) connected to pin 11 of the Arduino UNO. The URT-1 can then be used to send IR signals, which the Arduino will decode and display in the Serial Monitor.
Troubleshooting and FAQs
Common Issues and Solutions
The URT-1 is not responding to button presses:
- Ensure the batteries are correctly installed and have sufficient charge.
- Check for obstructions between the URT-1 and the device being controlled.
The device does not respond to the URT-1:
- Verify that the correct code has been programmed for the device.
- Ensure the device is compatible with the URT-1 (refer to the compatibility list).
The range of the URT-1 is reduced:
- Replace the batteries with new ones.
- Clean the IR transmitter on the URT-1 and the receiver on the device.
Custom buttons are not working as expected:
- Reprogram the buttons following the instructions in the user manual.
- Test the programmed function to ensure it is supported by the device.
FAQs
Q: Can the URT-1 control multiple devices simultaneously?
A: Yes, the URT-1 can be programmed to control multiple devices, but you will need to switch between device modes to operate each one.
Q: How do I reset the URT-1 to factory settings?
A: Hold down the "Program" button for 10 seconds until the LED blinks rapidly. This will erase all programmed codes and restore default settings.
Q: Is the URT-1 compatible with smart TVs?
A: Yes, the URT-1 supports most smart TV brands. Refer to the compatibility list for specific models.
Q: Can I use rechargeable batteries with the URT-1?
A: Yes, rechargeable AAA batteries can be used, but ensure they provide a stable 1.5V output for optimal performance.