How to Use LoRa Aurora Cosmic v1: Examples, Pinouts, and Specs
Introduction
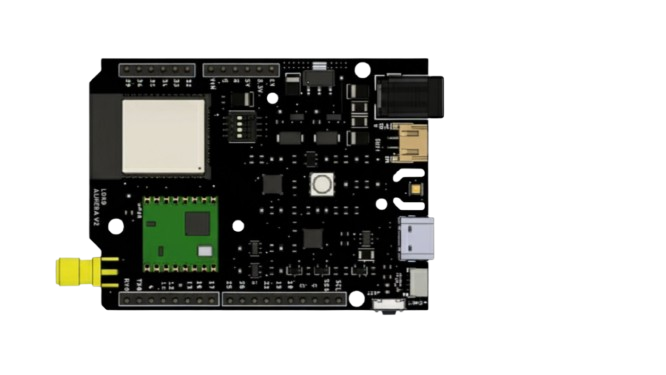
The LoRa Aurora Cosmic v1 is a compact, low-power LoRa (Long Range) module developed by Arduino, with the manufacturer part ID UNO. This module is specifically designed for IoT (Internet of Things) applications, offering advanced communication capabilities and optimized for long-distance data transmission. It is ideal for scenarios requiring low-power, long-range wireless communication, such as smart agriculture, environmental monitoring, and industrial IoT systems.
Explore Projects Built with LoRa Aurora Cosmic v1


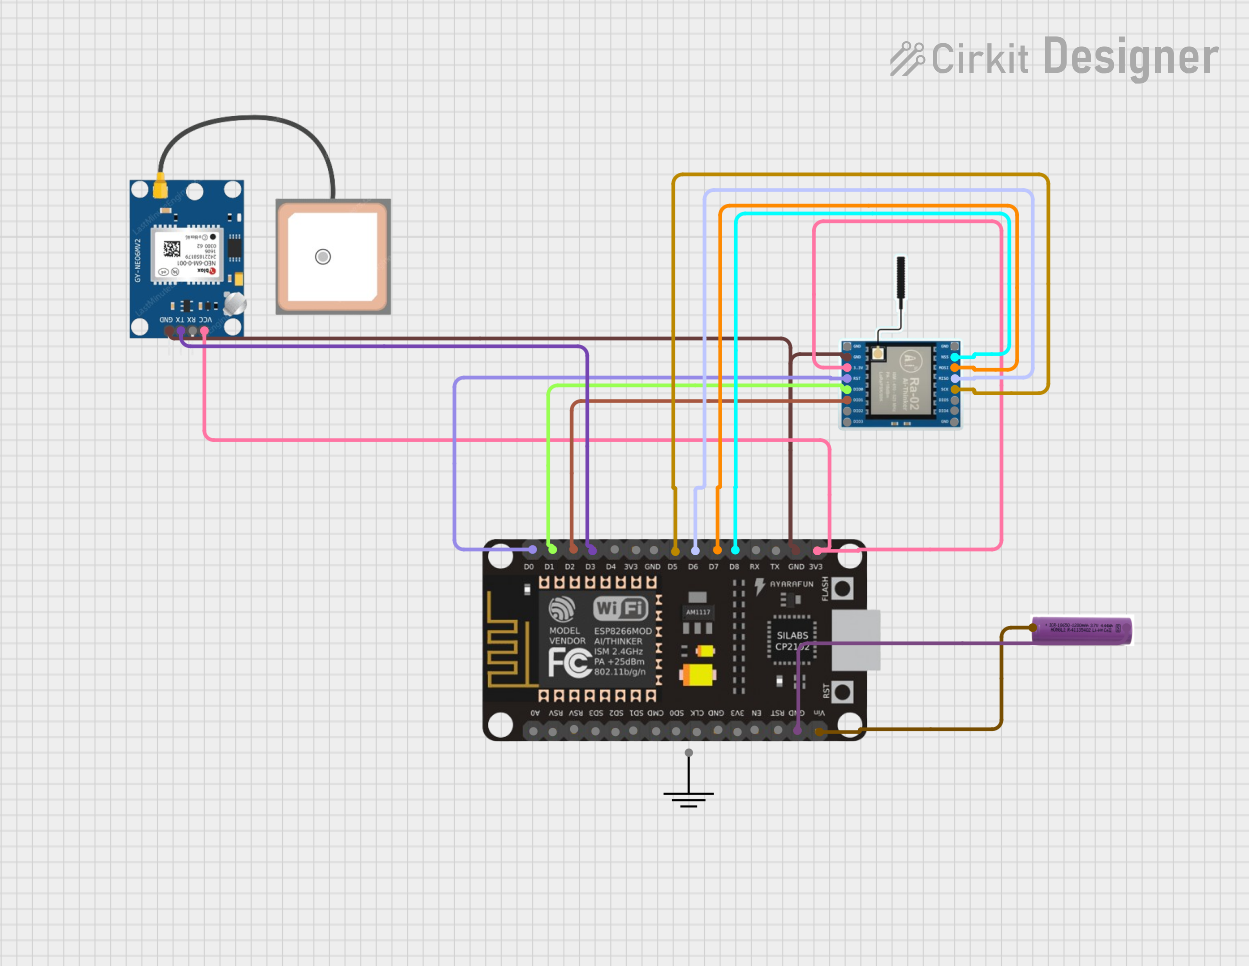
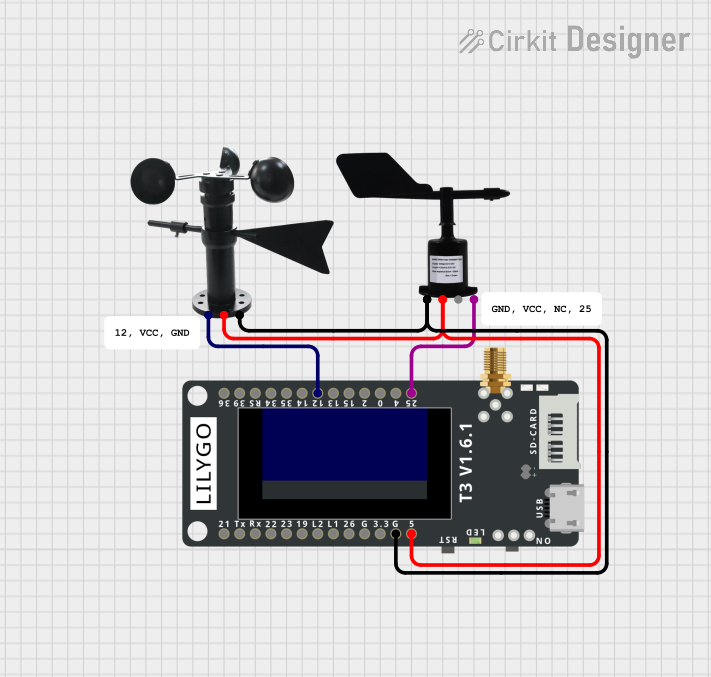
Explore Projects Built with LoRa Aurora Cosmic v1
Common Applications
- Smart Agriculture: Remote monitoring of soil moisture, temperature, and other environmental factors.
- Environmental Monitoring: Collecting data from sensors in remote or hard-to-reach locations.
- Industrial IoT: Wireless communication between machines and systems in large industrial setups.
- Smart Cities: Applications like parking management, waste management, and streetlight control.
- Asset Tracking: Monitoring the location and status of goods or equipment over long distances.
Technical Specifications
Key Technical Details
| Parameter | Value |
|---|---|
| Operating Voltage | 3.3V |
| Communication Protocol | LoRaWAN (Long Range Wide Area Network) |
| Frequency Bands | 868 MHz (EU) / 915 MHz (US) |
| Transmission Power | Up to 20 dBm |
| Sensitivity | -137 dBm |
| Data Rate | 0.3 kbps to 50 kbps |
| Current Consumption | 10 mA (active), <1 µA (sleep mode) |
| Operating Temperature | -40°C to 85°C |
| Dimensions | 25 mm x 20 mm x 3 mm |
Pin Configuration and Descriptions
The LoRa Aurora Cosmic v1 module has a total of 8 pins. Below is the pinout and description:
| Pin Number | Pin Name | Description |
|---|---|---|
| 1 | VCC | Power supply input (3.3V) |
| 2 | GND | Ground connection |
| 3 | RESET | Reset pin (active low) |
| 4 | TX | UART Transmit (data output) |
| 5 | RX | UART Receive (data input) |
| 6 | DIO0 | Digital I/O pin 0 (used for interrupt signaling) |
| 7 | DIO1 | Digital I/O pin 1 (optional, configurable) |
| 8 | ANT | Antenna connection for RF signal transmission |
Usage Instructions
How to Use the Component in a Circuit
- Power Supply: Connect the VCC pin to a 3.3V power source and the GND pin to ground.
- UART Communication: Connect the TX and RX pins to the corresponding UART pins on your microcontroller (e.g., Arduino UNO).
- Antenna: Attach a compatible LoRa antenna to the ANT pin for optimal signal transmission and reception.
- Reset: Use the RESET pin to initialize the module when needed.
- Interrupts: Use the DIO0 pin for interrupt signaling, which is often required for LoRaWAN communication.
Important Considerations and Best Practices
- Power Supply: Ensure a stable 3.3V power source to avoid damage to the module.
- Antenna Placement: Place the antenna in an open area, away from metal objects, to maximize signal range.
- Frequency Band: Verify that the frequency band (868 MHz or 915 MHz) complies with local regulations.
- Sleep Mode: Use the low-power sleep mode to conserve energy in battery-powered applications.
- UART Configuration: Set the UART baud rate to match the module's default (typically 9600 bps).
Example Code for Arduino UNO
Below is an example of how to interface the LoRa Aurora Cosmic v1 with an Arduino UNO for basic communication:
#include <SoftwareSerial.h>

// Define the RX and TX pins for SoftwareSerial
SoftwareSerial LoRaSerial(10, 11); // RX = Pin 10, TX = Pin 11

void setup() {
  // Initialize Serial Monitor for debugging
  Serial.begin(9600);
  while (!Serial);

  // Initialize LoRa module communication
  LoRaSerial.begin(9600);
  Serial.println("LoRa Aurora Cosmic v1 Initialized");
}

void loop() {
  // Send a test message to the LoRa module
  LoRaSerial.println("Hello, LoRa!");
  Serial.println("Message sent: Hello, LoRa!");

  // Check for incoming messages from the LoRa module
  if (LoRaSerial.available()) {
    String receivedMessage = LoRaSerial.readString();
    Serial.print("Message received: ");
    Serial.println(receivedMessage);
  }

  delay(2000); // Wait for 2 seconds before sending the next message
}
Troubleshooting and FAQs
Common Issues and Solutions
No Communication with the Module
- Cause: Incorrect UART connections or mismatched baud rate.
- Solution: Verify the TX and RX connections and ensure the baud rate is set to 9600 bps.
Poor Signal Range
- Cause: Improper antenna placement or interference.
- Solution: Ensure the antenna is properly connected and placed in an open area, away from obstructions.
High Power Consumption
- Cause: Module not entering sleep mode.
- Solution: Implement sleep mode in your code to reduce power consumption during idle periods.
Module Not Responding
- Cause: Module not properly reset or powered.
- Solution: Check the power supply and use the RESET pin to reinitialize the module.
FAQs
Q: Can I use the LoRa Aurora Cosmic v1 with a 5V microcontroller?
- A: No, the module operates at 3.3V. Use a level shifter to interface with 5V systems.
Q: What is the maximum range of the module?
- A: The range depends on environmental factors but can reach up to 10 km in open areas.
Q: Does the module support LoRaWAN?
- A: Yes, the module is compatible with LoRaWAN for long-range communication.
Q: How do I update the firmware?
- A: Firmware updates can be performed via the UART interface. Refer to the manufacturer's documentation for detailed instructions.
This concludes the documentation for the LoRa Aurora Cosmic v1 module. For further assistance, refer to Arduino's official support resources.