How to Use Seeding Heat Mat (18 W): Examples, Pinouts, and Specs
Introduction
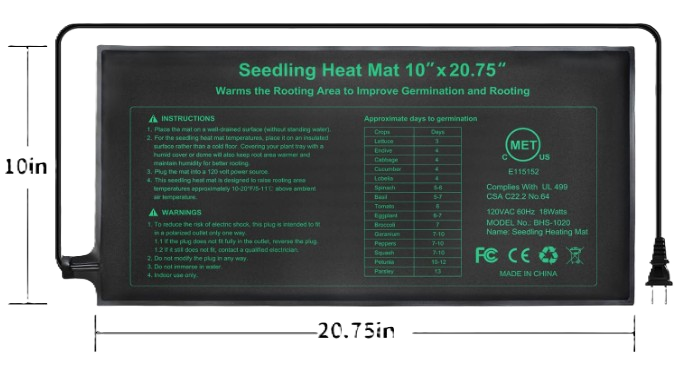
The Seeding Heat Mat (18 W) by HYDGOOHO is a specialized heating mat designed to provide consistent warmth to seedlings and plants. By maintaining an optimal soil temperature, it promotes faster germination and healthier plant growth. This energy-efficient mat operates at 18 watts, making it an excellent choice for indoor gardening, greenhouses, and hydroponic setups.
Explore Projects Built with Seeding Heat Mat (18 W)

Explore Projects Built with Seeding Heat Mat (18 W)
Common Applications and Use Cases
- Germinating seeds for vegetables, flowers, and herbs.
- Maintaining consistent soil temperatures for indoor plants.
- Supporting root development in hydroponic systems.
- Enhancing plant growth in greenhouses during colder months.
Technical Specifications
Below are the key technical details and pin configuration for the Seeding Heat Mat (18 W):
Key Technical Details
| Parameter | Specification |
|---|---|
| Power Rating | 18 W |
| Voltage | 120 V AC |
| Frequency | 60 Hz |
| Dimensions | 10" x 20.75" (25.4 cm x 52.7 cm) |
| Temperature Range | 68°F to 86°F (20°C to 30°C) |
| Material | Durable, waterproof PVC |
| Safety Certification | UL Listed |
Pin Configuration and Descriptions
The Seeding Heat Mat is equipped with a standard AC power plug. Below is the pin configuration:
| Pin Number | Description |
|---|---|
| Pin 1 | Live (Hot) - 120 V AC input |
| Pin 2 | Neutral |
| Pin 3 | Ground |
Usage Instructions
How to Use the Component in a Circuit
The Seeding Heat Mat is a standalone device that does not require integration into an electronic circuit. It is powered directly via a standard AC outlet. However, it can be paired with a thermostat controller for precise temperature regulation.
Steps for Use:
- Placement: Lay the heat mat on a flat, dry surface. Ensure it is not folded or creased.
- Tray Setup: Place a seedling tray or pots on top of the mat. Avoid direct contact between the mat and soil to prevent overheating.
- Power Connection: Plug the mat into a standard 120 V AC outlet.
- Optional Thermostat: For precise temperature control, connect the mat to a compatible thermostat controller. Insert the thermostat's temperature probe into the soil for accurate readings.
- Monitoring: Check the soil temperature periodically to ensure it remains within the desired range (68°F to 86°F).
Important Considerations and Best Practices
- Avoid Water Exposure: While the mat is waterproof, avoid submerging it in water or exposing the power connection to moisture.
- Do Not Overlap: Never overlap the mat with another heat mat, as this can cause overheating and damage.
- Use a Thermostat: For optimal results, pair the mat with a thermostat controller to maintain consistent soil temperatures.
- Ventilation: Ensure proper ventilation in the growing area to prevent excessive humidity buildup.
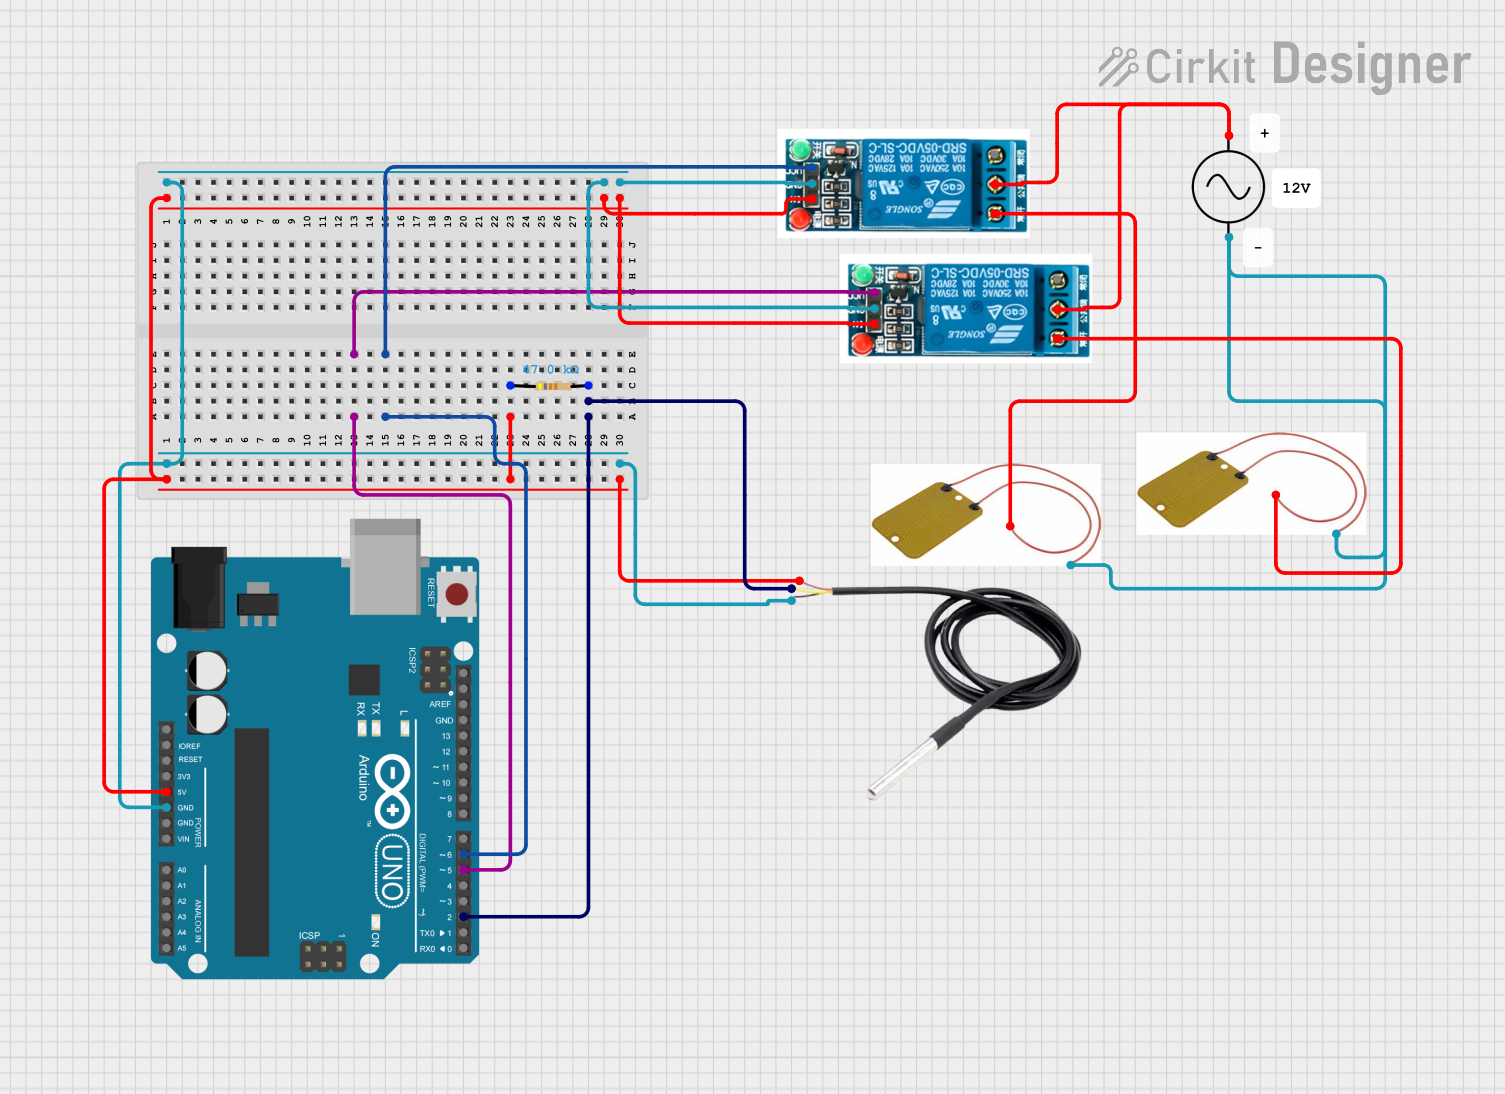
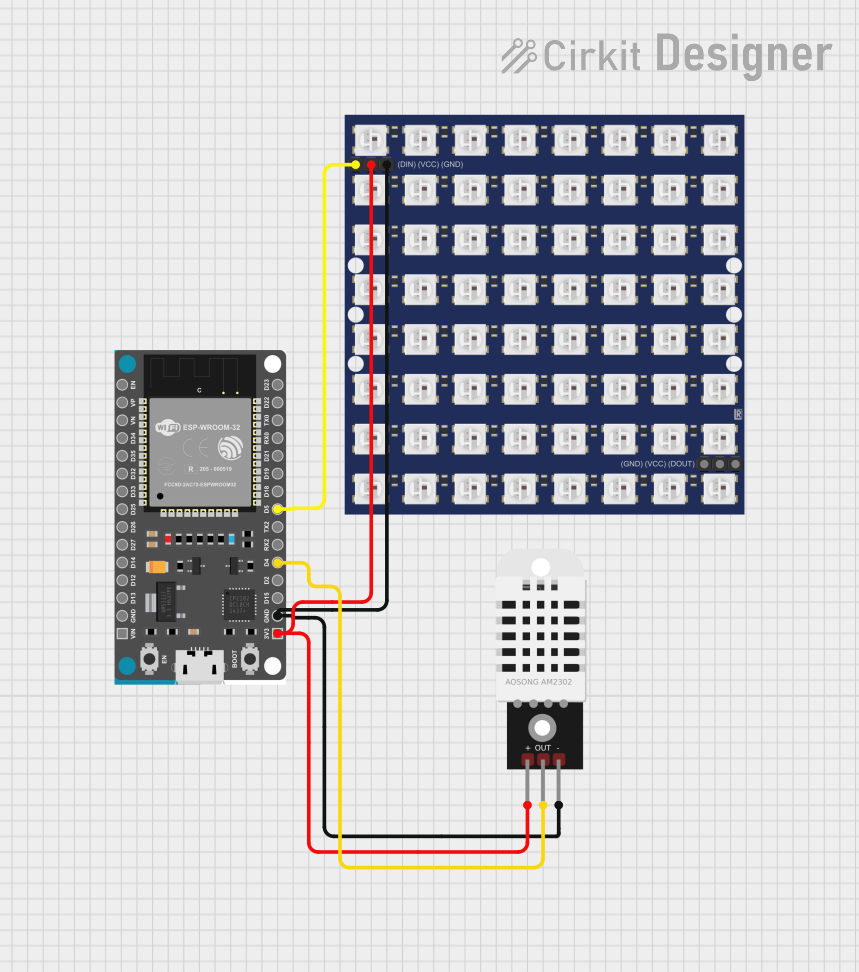
Arduino Integration (Optional)
While the Seeding Heat Mat is not directly controlled by an Arduino, you can use an Arduino to monitor and regulate the temperature using a relay module and a temperature sensor (e.g., DHT22). Below is an example code snippet for controlling the mat with an Arduino:
#include <DHT.h>

#define DHTPIN 2       // Pin connected to the DHT sensor
#define DHTTYPE DHT22  // DHT 22 (AM2302) sensor
#define RELAYPIN 8     // Pin connected to the relay module

DHT dht(DHTPIN, DHTTYPE);

void setup() {
  pinMode(RELAYPIN, OUTPUT);  // Set relay pin as output
  digitalWrite(RELAYPIN, LOW); // Ensure relay is off initially
  dht.begin();                // Initialize DHT sensor
  Serial.begin(9600);         // Start serial communication
}

void loop() {
  float temperature = dht.readTemperature(); // Read temperature in Celsius

  // Check if the reading is valid
  if (isnan(temperature)) {
    Serial.println("Failed to read from DHT sensor!");
    return;
  }

  Serial.print("Temperature: ");
  Serial.print(temperature);
  Serial.println(" °C");

  // Turn on the heat mat if temperature is below 20°C
  if (temperature < 20.0) {
    digitalWrite(RELAYPIN, HIGH); // Activate relay
    Serial.println("Heat mat ON");
  }
  // Turn off the heat mat if temperature is above 30°C
  else if (temperature > 30.0) {
    digitalWrite(RELAYPIN, LOW); // Deactivate relay
    Serial.println("Heat mat OFF");
  }

  delay(2000); // Wait 2 seconds before the next reading
}
Note: Ensure the relay module is rated for 120 V AC and can handle the 18 W load of the heat mat.
Troubleshooting and FAQs
Common Issues Users Might Face
Mat Not Heating:
- Cause: Faulty power connection or damaged mat.
- Solution: Check the power outlet and ensure the mat is plugged in securely. Inspect the mat for visible damage.
Uneven Heating:
- Cause: Improper placement or overlapping of the mat.
- Solution: Ensure the mat is laid flat on a dry surface and not overlapped with other mats.
Overheating:
- Cause: Lack of a thermostat controller.
- Solution: Use a thermostat controller to regulate the temperature and prevent overheating.
Mat Not Turning On with Arduino Setup:
- Cause: Incorrect wiring or relay module issue.
- Solution: Verify the relay connections and ensure the Arduino code is correctly uploaded.
Solutions and Tips for Troubleshooting
- Always test the mat in a controlled environment before using it with seedlings.
- Use a multimeter to check the continuity of the mat if it fails to heat.
- If using a thermostat, ensure the temperature probe is properly inserted into the soil for accurate readings.
By following this documentation, you can effectively use the Seeding Heat Mat (18 W) to enhance your gardening and plant propagation efforts.