How to Use 14-30R: Examples, Pinouts, and Specs
ELEGRP 30 Amp 125/250V NEMA 14-30R Flush Mount Power Outlet Documentation
1. Introduction
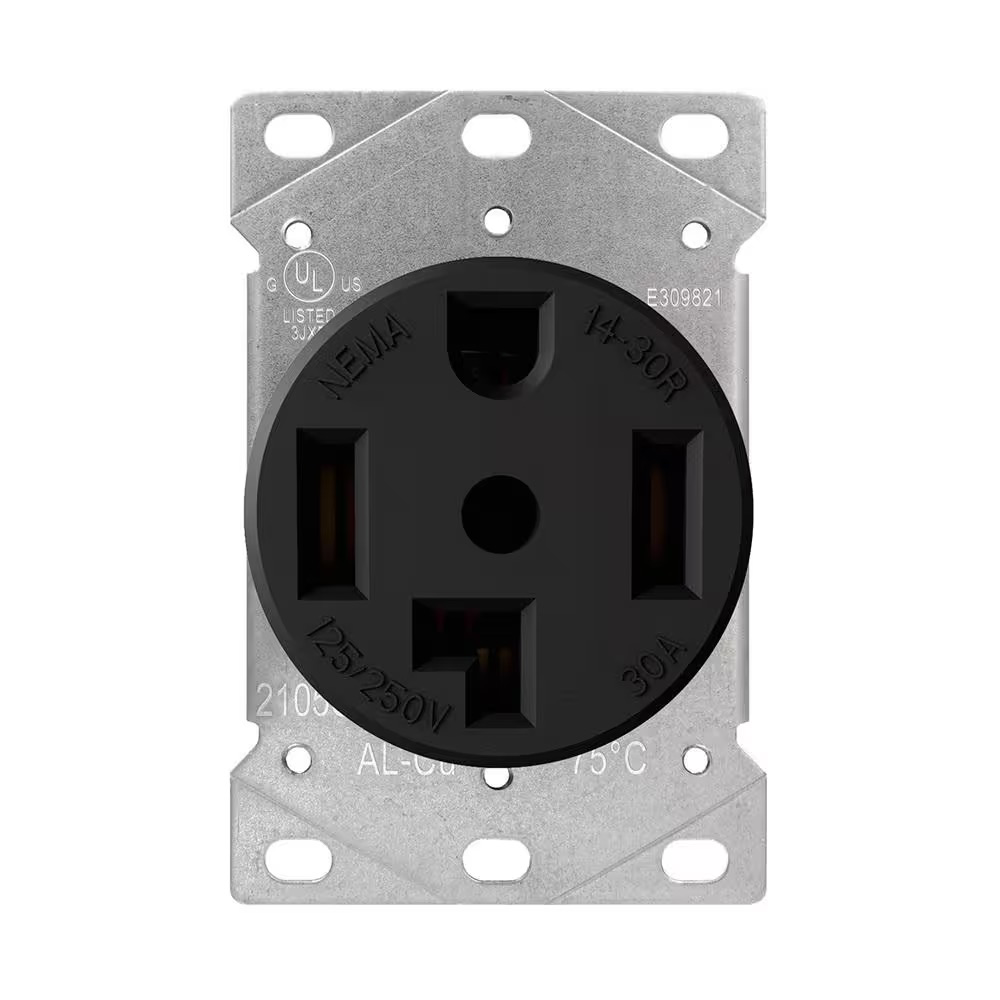
The ELEGRP 30 Amp 125/250V NEMA 14-30R Flush Mount Power Outlet is a heavy-duty receptacle designed for high-power 240V applications. It is part of the NEMA 14-30 series, which is widely used in residential, commercial, and industrial settings. This outlet is specifically designed to accommodate a 14-30P plug, making it ideal for powering electric dryers, ranges, and other high-power appliances.
The 14-30R receptacle features a four-prong configuration: two hot terminals, one neutral terminal, and one ground terminal. This design ensures safe and reliable power delivery while meeting modern electrical safety standards.
Common Applications
- Electric dryers
- Electric ranges
- EV (Electric Vehicle) chargers (with appropriate adapters)
- High-power tools and equipment
- Temporary power distribution in construction sites
2. Technical Specifications
The following table outlines the key technical specifications of the ELEGRP 14-30R receptacle:
| Parameter | Specification |
|---|---|
| Manufacturer | ELEGRP |
| Part ID | 30 Amp 125/250V, NEMA 14-30R |
| Voltage Rating | 125/250V AC |
| Current Rating | 30 Amps |
| Power Rating | Up to 7,500 Watts (at 250V) |
| Configuration | NEMA 14-30R (4-prong) |
| Mounting Style | Flush Mount |
| Material | High-impact thermoplastic |
| Certifications | UL Listed, RoHS Compliant |
| Operating Temperature | -40°C to 60°C (-40°F to 140°F) |
Pin Configuration and Descriptions
| Pin Name | Description | Function |
|---|---|---|
| X | Hot Terminal 1 | Supplies 120V AC |
| Y | Hot Terminal 2 | Supplies 120V AC (opposite phase) |
| N | Neutral Terminal | Returns current to the source |
| G | Ground Terminal | Provides safety grounding |
3. Usage Instructions
Wiring the 14-30R Receptacle
To safely install and use the ELEGRP 14-30R receptacle, follow these steps:
- Turn Off Power: Ensure the circuit breaker supplying power to the outlet is turned off.
- Prepare the Wiring:
- Use a 10-gauge, 4-conductor cable (10/3 with ground) for wiring.
- Strip the insulation from the wires to expose approximately 3/4 inch of copper.
- Connect the Wires:
- Connect the X terminal to one hot wire (black).
- Connect the Y terminal to the other hot wire (red).
- Connect the N terminal to the neutral wire (white).
- Connect the G terminal to the ground wire (bare or green).
- Secure the Receptacle:
- Mount the receptacle into the electrical box using the provided screws.
- Ensure all connections are tight and secure.
- Test the Installation:
- Turn the circuit breaker back on.
- Use a multimeter to verify the voltage between terminals:
- X to Y: ~240V
- X to N or Y to N: ~120V
- X or Y to G: ~120V
- Plug in the Appliance: Insert the 14-30P plug into the receptacle and ensure a snug fit.
Important Considerations
- Always follow local electrical codes and regulations when installing the receptacle.
- Use a properly rated circuit breaker (30A) for the circuit.
- Ensure the electrical box is large enough to accommodate the receptacle and wiring.
- If unsure about installation, consult a licensed electrician.
4. Troubleshooting and FAQs
Common Issues and Solutions
| Issue | Possible Cause | Solution |
|---|---|---|
| No power at the receptacle | Circuit breaker is off or tripped | Check and reset the breaker |
| Appliance does not power on | Loose or incorrect wiring | Verify wiring connections |
| Voltage readings are incorrect | Miswired terminals | Recheck terminal connections |
| Sparks or burning smell during use | Faulty wiring or damaged receptacle | Turn off power and replace receptacle |
| Plug does not fit securely | Worn or damaged receptacle | Replace the receptacle |
Frequently Asked Questions
Can I use this receptacle for a 120V appliance?
- No, the 14-30R is designed for 240V applications. Using it for 120V appliances may cause damage.
Is this receptacle compatible with older 3-prong plugs?
- No, the 14-30R is a 4-prong receptacle. For older 3-prong plugs, you will need an adapter or a different receptacle.
Can I install this receptacle outdoors?
- The 14-30R is not weatherproof. If outdoor installation is required, use a weatherproof enclosure.
What type of wire should I use for installation?
- Use a 10-gauge, 4-conductor cable (10/3 with ground) for safe operation.
Can I use this receptacle for an EV charger?
- Yes, with an appropriate adapter or EVSE (Electric Vehicle Supply Equipment) that supports NEMA 14-30.
5. Additional Notes
- Always prioritize safety when working with electrical components. If you are not confident in your ability to install the receptacle, hire a licensed electrician.
- Regularly inspect the receptacle for signs of wear or damage, and replace it if necessary.
- Keep the receptacle clean and free of debris to ensure proper operation.
This documentation provides a comprehensive guide to the ELEGRP 30 Amp 125/250V NEMA 14-30R Flush Mount Power Outlet. By following the instructions and best practices outlined above, you can ensure safe and reliable operation of this high-quality receptacle.
Explore Projects Built with 14-30R


Explore Projects Built with 14-30R