How to Use DWIN HMI 7 INCH DISPLAY: Examples, Pinouts, and Specs
Introduction
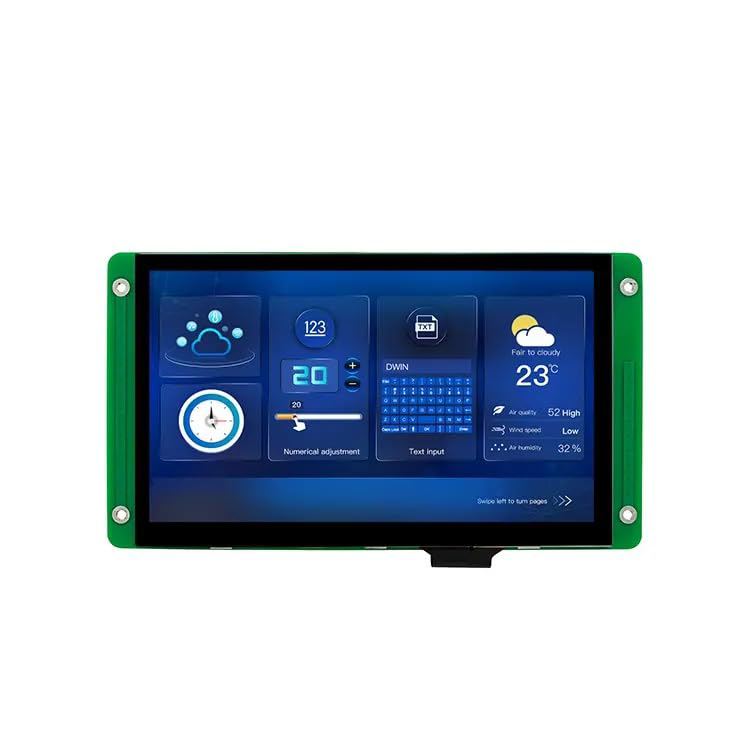
The DWIN HMI 7-inch Display is a versatile Human-Machine Interface (HMI) component designed to provide an intuitive graphical interface for electronic systems. Featuring a 7-inch touchscreen, this display allows users to interact with devices through customizable screens, making it ideal for a wide range of applications. Its robust design and user-friendly development tools make it a popular choice for industrial automation, home automation, medical devices, and consumer electronics.
Explore Projects Built with DWIN HMI 7 INCH DISPLAY


Explore Projects Built with DWIN HMI 7 INCH DISPLAY
Common Applications and Use Cases
- Industrial control panels and automation systems
- Smart home devices and appliances
- Medical equipment interfaces
- Automotive dashboards and infotainment systems
- Consumer electronics with touch-based controls
Technical Specifications
The DWIN HMI 7-inch Display offers a combination of high performance and flexibility. Below are its key technical details:
General Specifications
| Parameter | Specification |
|---|---|
| Display Size | 7 inches |
| Resolution | 800 x 480 pixels (WVGA) |
| Touchscreen Type | Resistive or Capacitive (model-specific) |
| Operating Voltage | 5V DC |
| Communication Interface | UART (TTL/RS232), SPI (model-specific) |
| Flash Memory | Up to 16MB (expandable via SD card) |
| Operating Temperature | -20°C to 70°C |
| Backlight | LED, adjustable brightness |
Pin Configuration and Descriptions
The DWIN HMI 7-inch Display typically uses a 2x5 pin header for communication and power. Below is the pinout:
| Pin Number | Pin Name | Description |
|---|---|---|
| 1 | VCC | Power supply input (5V DC) |
| 2 | GND | Ground |
| 3 | TXD | UART Transmit Data |
| 4 | RXD | UART Receive Data |
| 5 | RTS | UART Request to Send (optional) |
| 6 | CTS | UART Clear to Send (optional) |
| 7 | SD_CLK | SD card clock signal (if applicable) |
| 8 | SD_CMD | SD card command signal |
| 9 | SD_D0 | SD card data line 0 |
| 10 | RESET | Hardware reset input |
Usage Instructions
How to Use the Component in a Circuit
- Power Supply: Connect the
VCCpin to a stable 5V DC power source and theGNDpin to ground. - Communication: Use the
TXDandRXDpins to establish UART communication with a microcontroller or PC. Ensure the baud rate matches the display's configuration (default is typically 115200 bps). - Touchscreen Interface: Configure the graphical interface using DWIN's DGUS software. Upload the GUI files to the display via an SD card or UART.
- Reset: Use the
RESETpin to perform a hardware reset if needed.
Important Considerations and Best Practices
- Voltage Levels: Ensure the UART voltage levels are compatible with the display (typically 3.3V or 5V).
- SD Card Usage: Format the SD card to FAT32 before uploading GUI files.
- Baud Rate Configuration: Verify the baud rate settings in both the display and the microcontroller to avoid communication errors.
- Touch Calibration: If using a resistive touchscreen, calibrate it using the built-in calibration tool.
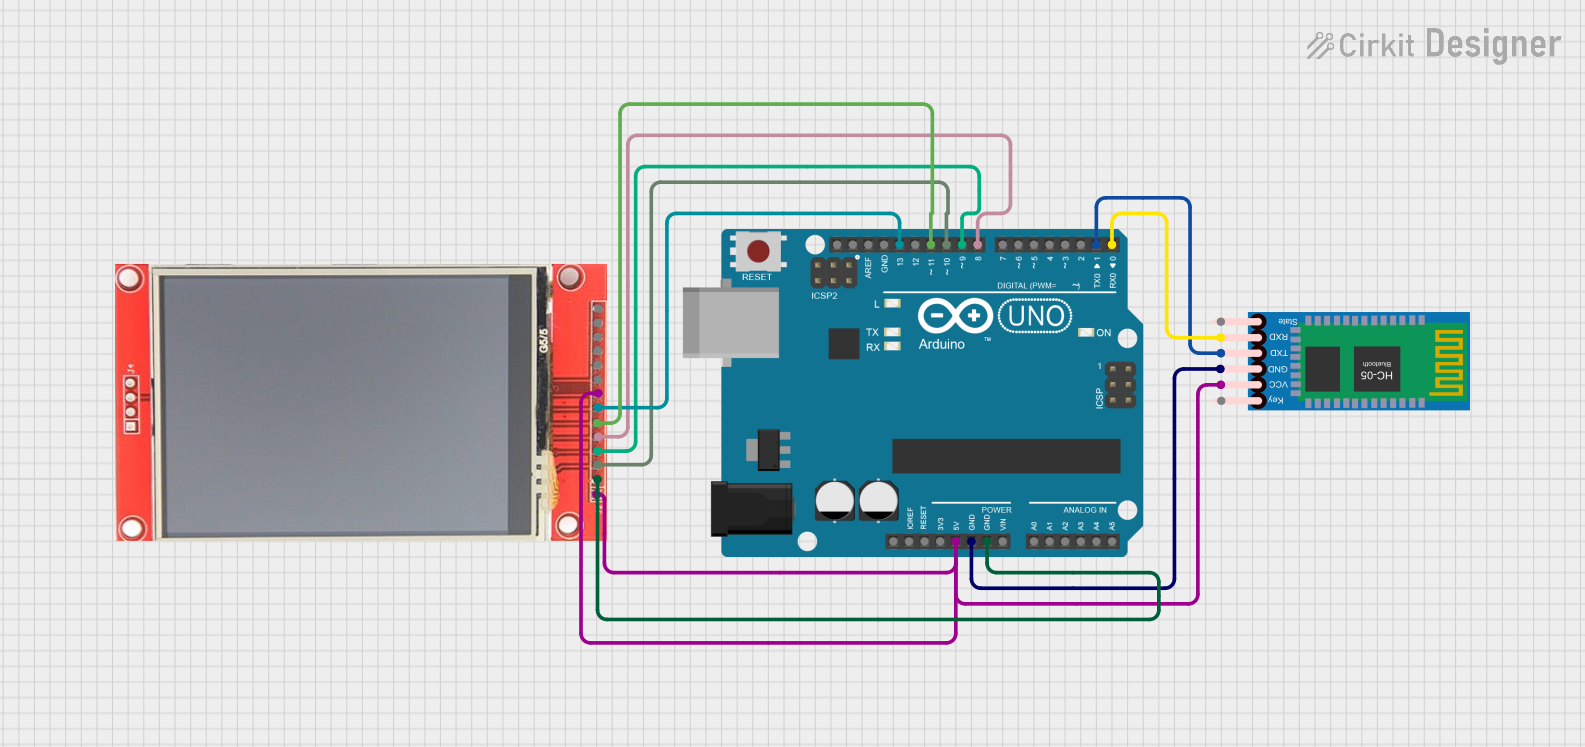
Example: Connecting to an Arduino UNO
Below is an example of how to connect and communicate with the DWIN HMI 7-inch Display using an Arduino UNO:
Wiring
| DWIN HMI Pin | Arduino UNO Pin |
|---|---|
| VCC | 5V |
| GND | GND |
| TXD | RX (Pin 0) |
| RXD | TX (Pin 1) |
Code Example
// Example code to send data to the DWIN HMI 7-inch Display
// Ensure the baud rate matches the display's configuration (default: 115200)

void setup() {
  Serial.begin(115200); // Initialize UART communication at 115200 baud
  delay(1000); // Wait for the display to initialize

  // Send a sample command to the display
  // Replace with actual commands based on your GUI configuration
  Serial.write(0x5A); // Start byte
  Serial.write(0xA5); // Start byte
  Serial.write(0x07); // Data length
  Serial.write(0x82); // Command type
  Serial.write(0x00); // Data (example)
  Serial.write(0x01); // Data (example)
  Serial.write(0x00); // Data (example)
  Serial.write(0x00); // Data (example)
  Serial.write(0xFF); // End byte
}

void loop() {
  // Add code to handle user input or update the display
}
Troubleshooting and FAQs
Common Issues and Solutions
No Display Output:
- Verify the power supply voltage and connections.
- Check if the GUI files are correctly uploaded to the SD card.
- Ensure the backlight is functioning.
Communication Errors:
- Confirm the UART baud rate matches between the display and the microcontroller.
- Check the TXD and RXD connections for proper orientation.
Touchscreen Not Responding:
- For resistive touchscreens, perform a calibration using the built-in tool.
- Ensure the touchscreen cable is securely connected.
SD Card Not Recognized:
- Format the SD card to FAT32 and ensure it is inserted correctly.
- Use a compatible SD card (typically up to 32GB).
FAQs
Q: Can I use the display with a Raspberry Pi?
- A: Yes, the display can communicate with a Raspberry Pi via UART or SPI, depending on the model.
Q: How do I update the firmware?
- A: Firmware updates can be performed using an SD card. Follow the instructions provided by DWIN for your specific model.
Q: Is the display waterproof?
- A: No, the display is not waterproof. Use it in environments within the specified operating temperature and humidity range.
This documentation provides a comprehensive guide to using the DWIN HMI 7-inch Display effectively. For further assistance, refer to the official DWIN user manual or contact their support team.