How to Use Pro Micro 5V Clone: Examples, Pinouts, and Specs
Introduction
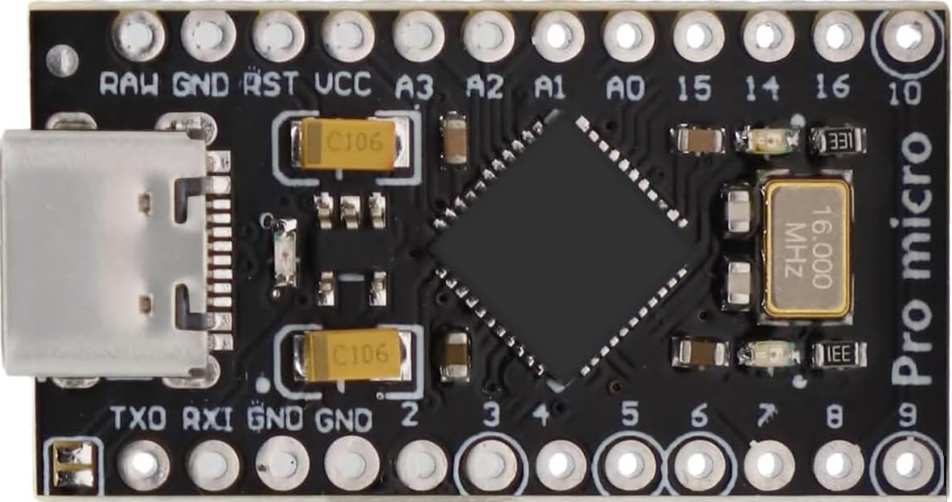
The Pro Micro 5V Clone is a compact microcontroller board based on the ATmega32U4 microcontroller. Manufactured by Generic, this board is designed for USB-based applications, offering a built-in USB interface for seamless communication with computers or other USB devices. Its small form factor and versatile functionality make it a popular choice for embedded systems, DIY electronics, and prototyping.
Explore Projects Built with Pro Micro 5V Clone
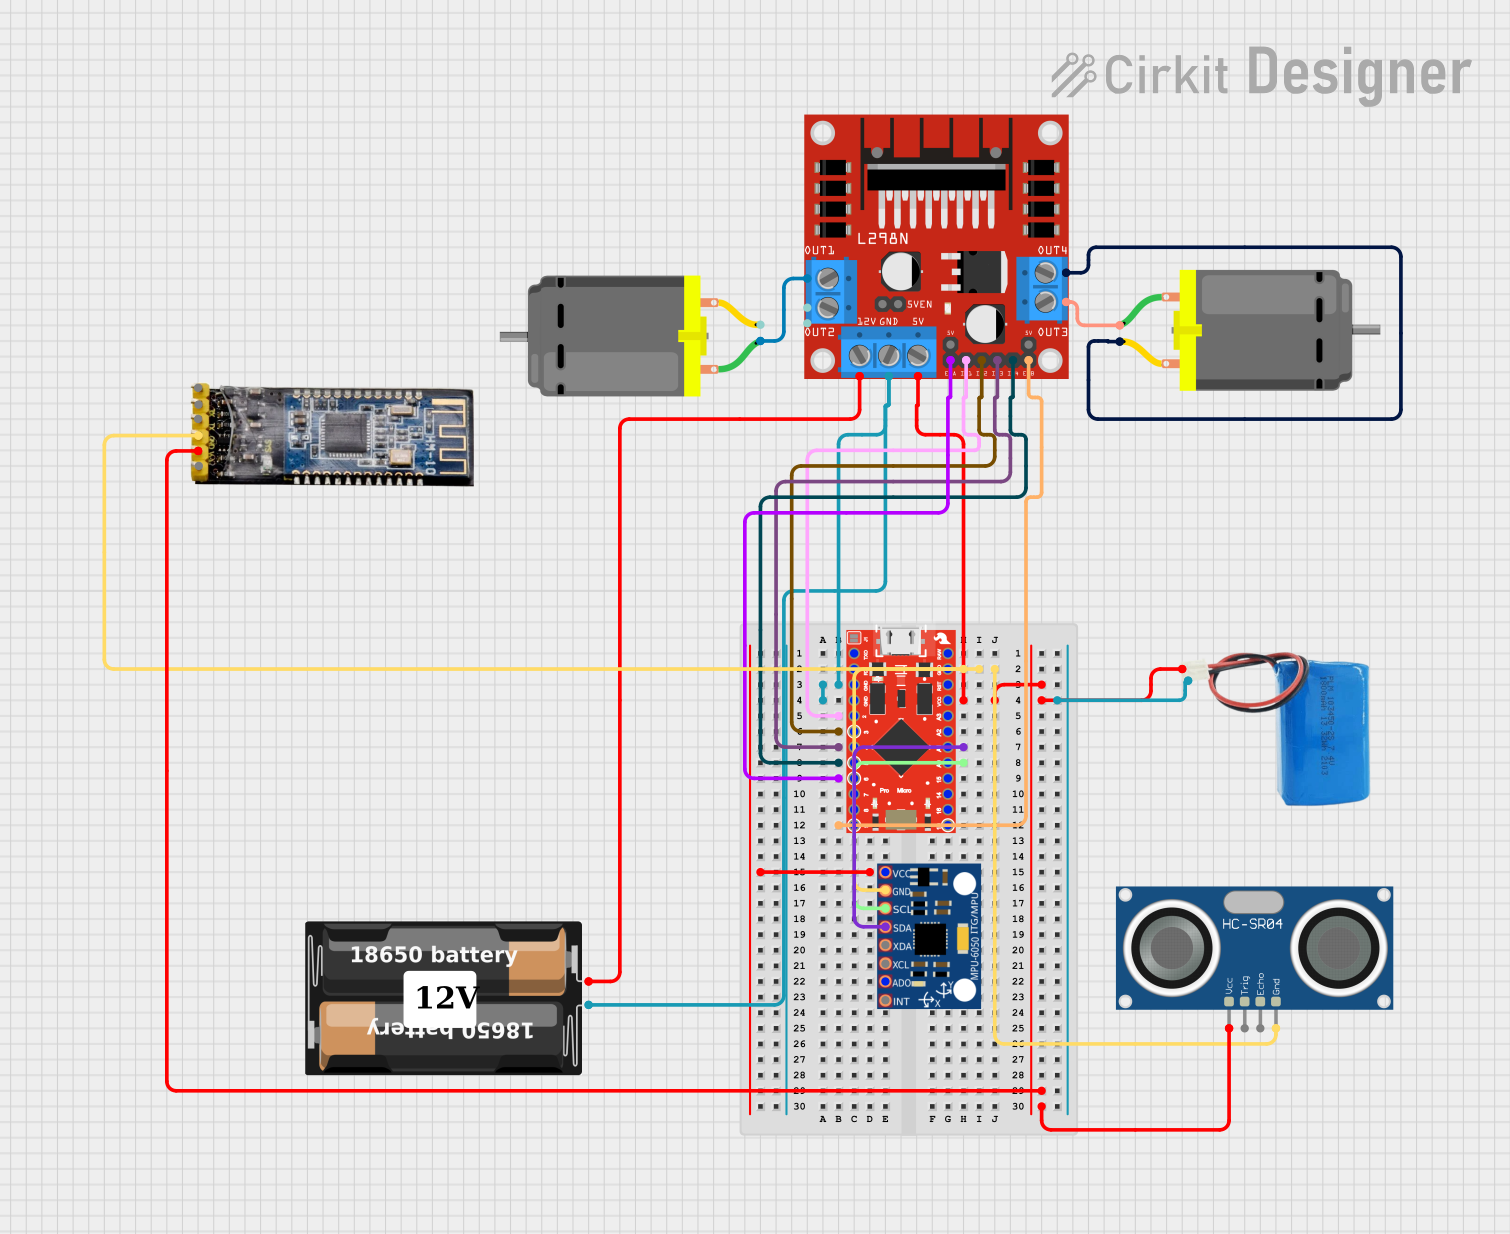

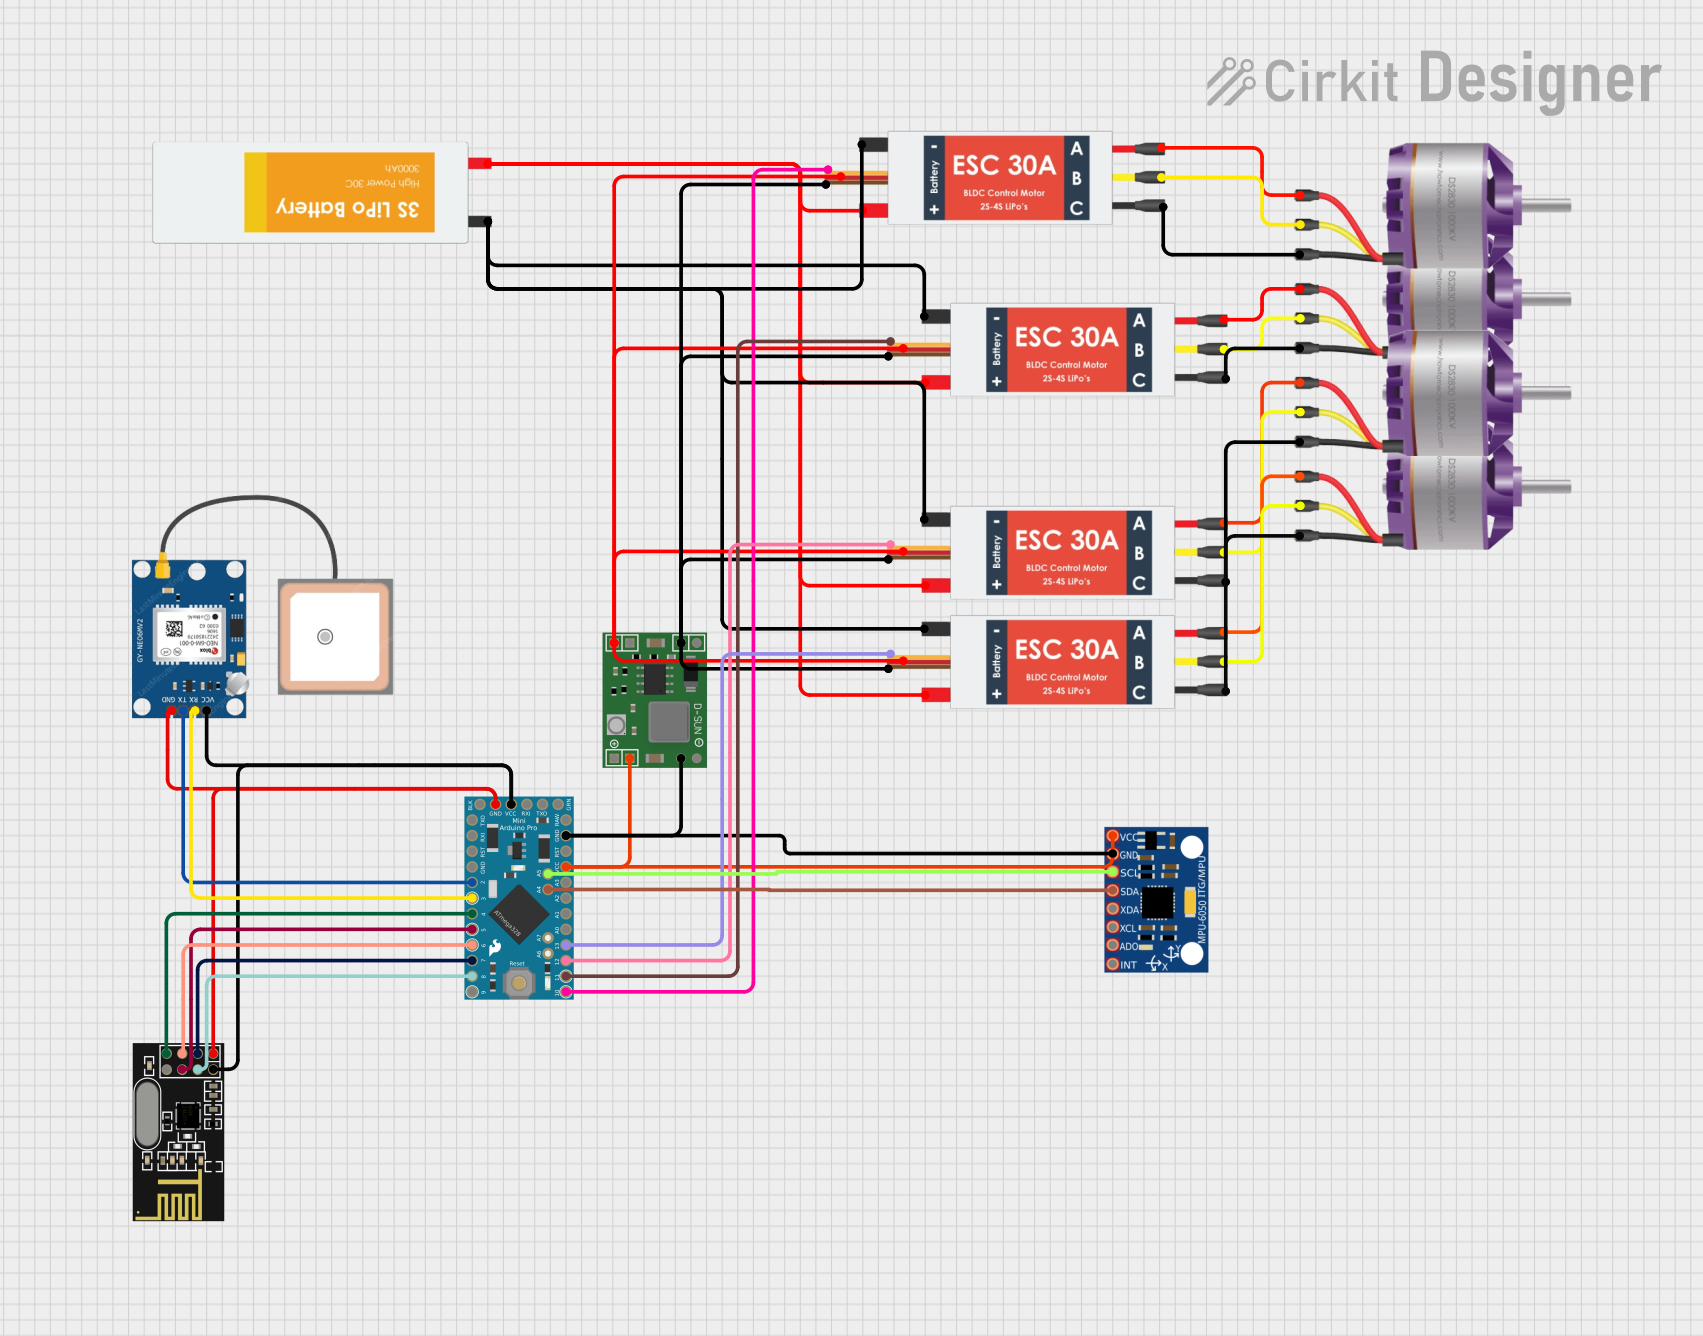
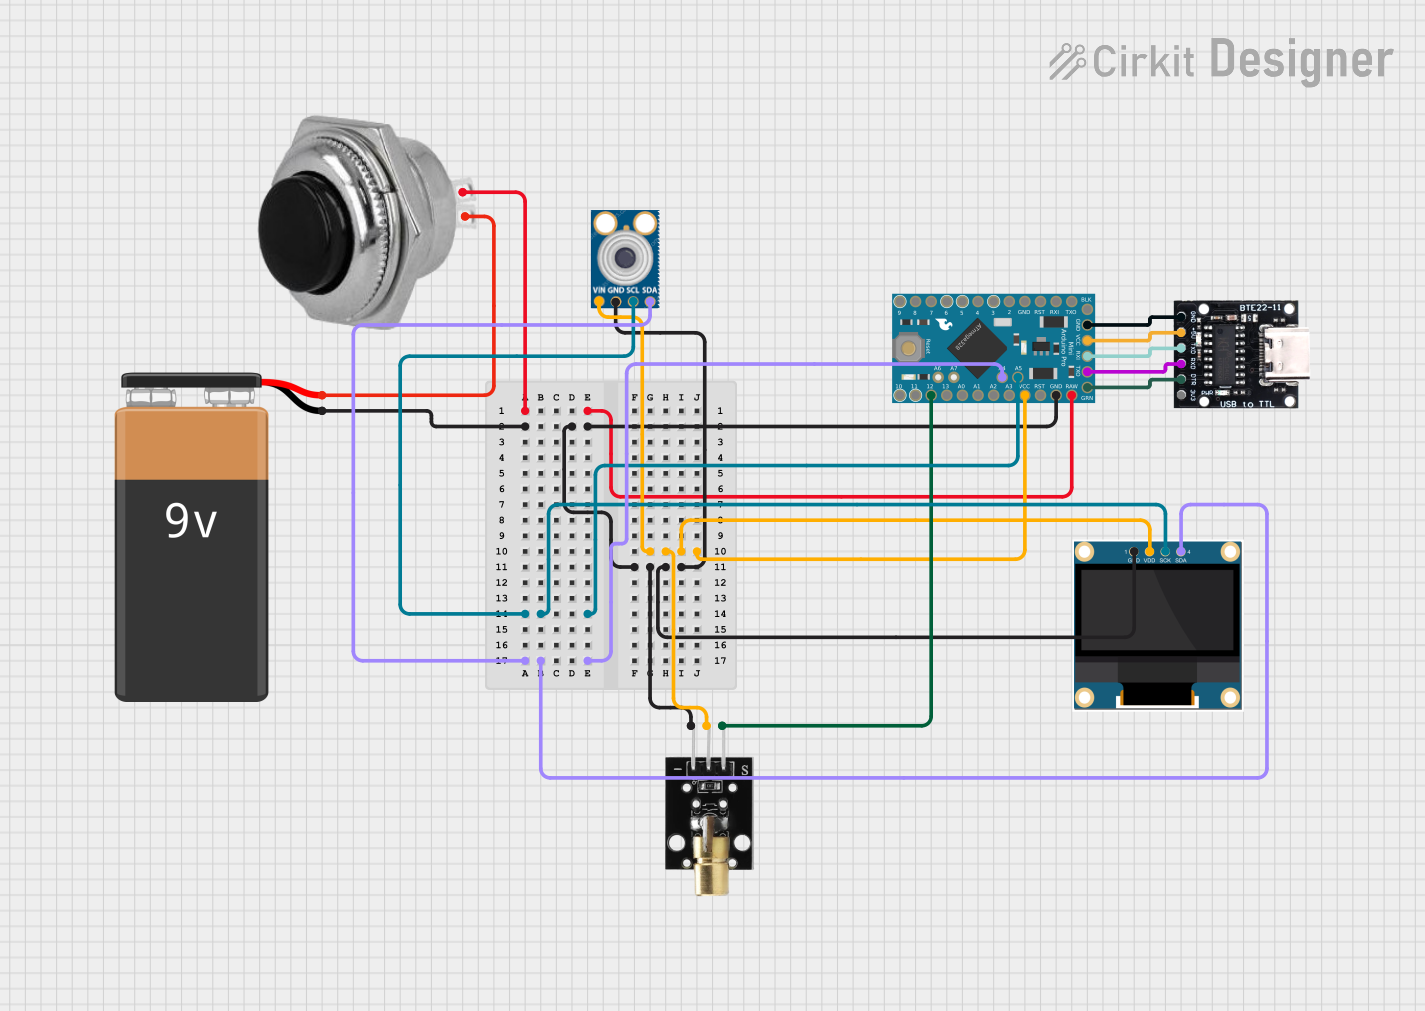
Explore Projects Built with Pro Micro 5V Clone
Common Applications and Use Cases
- USB Human Interface Devices (HID) such as keyboards, mice, and game controllers
- Data logging and USB communication projects
- Compact robotics and automation systems
- Wearable electronics
- Prototyping for Arduino-based projects
Technical Specifications
The following table outlines the key technical details of the Pro Micro 5V Clone:
| Parameter | Specification |
|---|---|
| Microcontroller | ATmega32U4 |
| Operating Voltage | 5V |
| Input Voltage (RAW pin) | 6-12V |
| Digital I/O Pins | 12 |
| PWM Pins | 5 |
| Analog Input Pins | 4 |
| Clock Speed | 16 MHz |
| Flash Memory | 32 KB (4 KB used by bootloader) |
| SRAM | 2.5 KB |
| EEPROM | 1 KB |
| USB Interface | Native USB |
| Dimensions | 33 mm x 18 mm |
Pin Configuration and Descriptions
The Pro Micro 5V Clone features a total of 24 pins. Below is the pinout description:
| Pin Name | Type | Description |
|---|---|---|
| RAW | Power Input | Accepts 6-12V input for onboard voltage regulation. |
| VCC | Power Output | Provides regulated 5V output. |
| GND | Ground | Ground connection. |
| RST | Reset | Resets the microcontroller. |
| TXO | Digital Output | UART Transmit pin. |
| RXI | Digital Input | UART Receive pin. |
| D2-D10 | Digital I/O | General-purpose digital input/output pins. |
| A0-A3 | Analog Input | Analog input pins (can also be used as digital I/O). |
| SDA | Digital I/O | I2C Data pin. |
| SCL | Digital I/O | I2C Clock pin. |
| USB+ / USB- | USB Data | Native USB data lines for communication with a computer or USB device. |
Usage Instructions
How to Use the Pro Micro 5V Clone in a Circuit
Powering the Board:
- Connect the board to a computer or USB power source using a micro-USB cable.
- Alternatively, supply 6-12V to the RAW pin for onboard voltage regulation.
Programming:
- The Pro Micro 5V Clone is compatible with the Arduino IDE. Select "Arduino Leonardo" as the board type in the IDE, as the ATmega32U4 shares the same architecture.
- Use a micro-USB cable to upload code directly to the board.
Connecting Peripherals:
- Use the digital I/O pins (D2-D10) for connecting LEDs, sensors, or other digital devices.
- Use the analog pins (A0-A3) for reading analog signals or as additional digital I/O.
I2C and UART Communication:
- For I2C communication, use the SDA and SCL pins.
- For UART communication, use the TXO and RXI pins.
Important Considerations and Best Practices
- Voltage Levels: Ensure that all connected peripherals operate at 5V logic levels to avoid damage to the board.
- USB Connection: Use a high-quality micro-USB cable to ensure reliable data transfer and power delivery.
- Bootloader Mode: If the board is not recognized by the computer, double-tap the reset button to enter bootloader mode for reprogramming.
- Pin Current Limit: Avoid drawing more than 40 mA per pin to prevent damage to the microcontroller.
Example Code for Arduino IDE
The following example demonstrates how to blink an LED connected to pin D9:
// Blink an LED connected to pin D9 on the Pro Micro 5V Clone

const int ledPin = 9; // Define the pin number for the LED

void setup() {
  pinMode(ledPin, OUTPUT); // Set pin D9 as an output
}

void loop() {
  digitalWrite(ledPin, HIGH); // Turn the LED on
  delay(1000);                // Wait for 1 second
  digitalWrite(ledPin, LOW);  // Turn the LED off
  delay(1000);                // Wait for 1 second
}
Troubleshooting and FAQs
Common Issues and Solutions
Board Not Recognized by Computer:
- Ensure the USB cable is functional and supports data transfer.
- Double-tap the reset button to enter bootloader mode and reattempt programming.
Upload Errors in Arduino IDE:
- Verify that "Arduino Leonardo" is selected as the board type.
- Check the correct COM port is selected in the Arduino IDE.
Unstable Power Supply:
- If the board resets frequently, ensure the power source provides sufficient current (at least 500 mA).
Peripheral Not Responding:
- Double-check wiring and ensure the correct pins are used in the code.
FAQs
Q: Can the Pro Micro 5V Clone be powered directly from a battery?
A: Yes, you can power the board using a 6-12V battery connected to the RAW pin. Ensure the battery voltage is within this range.
Q: How do I restore the bootloader if it gets corrupted?
A: You can use an external programmer (e.g., USBasp) to reflash the bootloader onto the ATmega32U4.
Q: Can I use the Pro Micro 5V Clone for HID applications?
A: Yes, the ATmega32U4 supports native USB HID functionality, making it ideal for creating custom keyboards, mice, or game controllers.
Q: What is the maximum current output of the VCC pin?
A: The VCC pin can supply up to 500 mA, depending on the input power source.
By following this documentation, you can effectively utilize the Pro Micro 5V Clone in your projects.