How to Use Motor de vidro elétrico: Examples, Pinouts, and Specs
Introduction
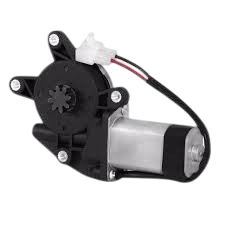
The Motor de Vidro Elétrico is a compact electric motor designed to control the movement of car windows. It enables the raising and lowering of windows with the push of a button, providing convenience and ease of use in modern vehicles. This motor is a critical component in power window systems and is commonly found in automobiles.
Explore Projects Built with Motor de vidro elétrico

Explore Projects Built with Motor de vidro elétrico
Common Applications and Use Cases
- Automotive power window systems
- Custom vehicle projects requiring automated window control
- Robotics and DIY projects involving linear motion
- Small-scale automation systems
Technical Specifications
Below are the key technical details of the Motor de Vidro Elétrico:
| Parameter | Value |
|---|---|
| Operating Voltage | 12V DC |
| Operating Current | 2A to 5A (depending on load) |
| Stall Current | Up to 10A |
| Power Output | ~20W |
| Motor Type | Brushed DC Motor |
| Gearbox Ratio | 1:50 (typical) |
| Torque Output | ~10 Nm (varies by model) |
| Speed | ~50 RPM (under load) |
| Dimensions | ~100mm x 50mm x 40mm |
| Weight | ~500g |
Pin Configuration and Descriptions
The Motor de Vidro Elétrico typically has two terminals for operation:
| Pin | Description |
|---|---|
| Pin 1 | Positive terminal (+12V DC input) |
| Pin 2 | Negative terminal (Ground or -12V input) |
Note: The motor's direction of rotation can be reversed by swapping the polarity of the input voltage.
Usage Instructions
How to Use the Motor in a Circuit
- Power Supply: Connect the motor to a 12V DC power source capable of supplying sufficient current (at least 5A for normal operation).
- Polarity Control: Use an H-bridge motor driver (e.g., L298N or BTS7960) to control the direction of rotation. This allows the window to move up or down.
- Switch or Microcontroller: Integrate a switch or a microcontroller (e.g., Arduino UNO) to control the motor's operation. A microcontroller can provide precise control over the motor's movement.
Example Circuit with Arduino UNO
Below is an example of how to control the Motor de Vidro Elétrico using an Arduino UNO and an L298N motor driver:
Components Required:
- Motor de Vidro Elétrico
- Arduino UNO
- L298N motor driver module
- 12V DC power supply
- Push buttons (for manual control)
- Connecting wires
Circuit Diagram:
- Connect the motor terminals to the
OUT1andOUT2pins of the L298N module. - Connect the
IN1andIN2pins of the L298N to Arduino digital pins 8 and 9, respectively. - Connect the 12V power supply to the L298N's
VCCandGNDpins. - Connect the L298N's
GNDto the Arduino'sGND.
Arduino Code:
// Define motor control pins
const int motorPin1 = 8; // IN1 on L298N
const int motorPin2 = 9; // IN2 on L298N

void setup() {
  // Set motor pins as outputs
  pinMode(motorPin1, OUTPUT);
  pinMode(motorPin2, OUTPUT);
}

void loop() {
  // Example: Move window up
  digitalWrite(motorPin1, HIGH); // Set IN1 high
  digitalWrite(motorPin2, LOW);  // Set IN2 low
  delay(2000); // Run motor for 2 seconds

  // Stop motor
  digitalWrite(motorPin1, LOW);
  digitalWrite(motorPin2, LOW);
  delay(1000); // Wait for 1 second

  // Example: Move window down
  digitalWrite(motorPin1, LOW);  // Set IN1 low
  digitalWrite(motorPin2, HIGH); // Set IN2 high
  delay(2000); // Run motor for 2 seconds

  // Stop motor
  digitalWrite(motorPin1, LOW);
  digitalWrite(motorPin2, LOW);
  delay(1000); // Wait for 1 second
}
Important Considerations and Best Practices
- Current Handling: Ensure the power supply and motor driver can handle the motor's stall current (up to 10A).
- Heat Dissipation: The motor and driver may heat up during prolonged use. Provide adequate ventilation or heat sinks.
- Polarity Reversal: Always use a motor driver or relay to reverse polarity safely. Avoid directly swapping wires under load.
- Noise Suppression: Add a capacitor (e.g., 0.1µF) across the motor terminals to reduce electrical noise.
Troubleshooting and FAQs
Common Issues and Solutions
Motor Does Not Turn On
- Cause: Insufficient power supply or loose connections.
- Solution: Check the power supply voltage and current rating. Ensure all connections are secure.
Motor Runs in One Direction Only
- Cause: Faulty motor driver or incorrect wiring.
- Solution: Verify the motor driver's connections and ensure the control signals are correct.
Motor Overheats
- Cause: Prolonged operation under high load or insufficient ventilation.
- Solution: Reduce the load on the motor or provide better cooling.
Excessive Noise or Vibration
- Cause: Worn-out gears or lack of lubrication.
- Solution: Inspect the motor's gearbox and apply appropriate lubrication.
FAQs
Q: Can I use a 24V power supply with this motor?
A: No, the motor is designed for 12V operation. Using a higher voltage may damage the motor.
Q: How do I reverse the motor's direction?
A: Reverse the polarity of the input voltage using an H-bridge motor driver or a DPDT switch.
Q: Can this motor be used for non-automotive applications?
A: Yes, it can be used in robotics, DIY projects, or any application requiring controlled linear motion.
Q: What is the lifespan of this motor?
A: The lifespan depends on usage conditions but is typically several years under normal operation. Regular maintenance can extend its life.