Cirkit Designer Logo
Cirkit Designer
Your all-in-one circuit design IDE
Home / 
Component Documentation

How to Use Arduino Yun: Examples, Pinouts, and Specs

Image of Arduino Yun
Cirkit Designer LogoDesign with Arduino Yun in Cirkit Designer

Introduction

The Arduino Yún is a powerful microcontroller board that combines the features of the classic Arduino with the capabilities of a Linux system. Based on the ATmega32U4 microcontroller and the Atheros AR9331 processor, the Yún is designed to support Internet of Things (IoT) projects by providing both Wi-Fi connectivity and Ethernet port. It is an ideal choice for projects that require communication with web services, handling of complex data, or integration with sensors and actuators.

Explore Projects Built with Arduino Yun

Use Cirkit Designer to design, explore, and prototype these projects online. Some projects support real-time simulation. Click "Open Project" to start designing instantly!
ATmega328P-Based Sensor Hub with OLED Display and LIDAR
Image of TILTPCB: A project utilizing Arduino Yun in a practical application
This circuit features an Mtiny Uno ATmega328P microcontroller as its central processing unit, interfacing with a variety of sensors and peripherals. It includes a 0.96" OLED display and an MPU6050 accelerometer/gyroscope for user interface and motion sensing, respectively. The circuit also integrates a TF LUNA LIDAR for distance measurement, a DHT11 sensor for temperature and humidity readings, and uses a 9V battery with a 7805 voltage regulator for power management. Communication with a computer for programming and data exchange is facilitated by an Adafruit FTDI Friend module.
Cirkit Designer LogoOpen Project in Cirkit Designer
Arduino UNO Soil Moisture Sensor System
Image of YL-69: A project utilizing Arduino Yun in a practical application
This circuit consists of an Arduino UNO microcontroller connected to a YL-69 soil moisture sensor. The sensor's analog output (AOUT) is connected to the A1 analog input pin of the Arduino, allowing the microcontroller to read soil moisture levels.
Cirkit Designer LogoOpen Project in Cirkit Designer
Arduino UNO and ESP32 CAM Controlled Fire Detection and Alert System with GSM Notification
Image of ASO BOT: A project utilizing Arduino Yun in a practical application
This circuit features an Arduino UNO as the central microcontroller, interfaced with a variety of sensors, actuators, and modules. It includes a 5-channel fire sensor, temperature and humidity sensor (DHT11), two buzzers, and two servomotors controlled by an L293D driver shield. The circuit also integrates an ESP32 CAM for wireless capabilities, a 2-channel relay module controlling a mini water pump, an LCD display for user interface, a SIM 800L GSM module for cellular connectivity, and is powered by a 9V battery.
Cirkit Designer LogoOpen Project in Cirkit Designer
Arduino UNO R4 WiFi Controlled Potentiometer Level Display
Image of インジケータボリューム変調LED: A project utilizing Arduino Yun in a practical application
This circuit features an Arduino UNO R4 WiFi microcontroller connected to a TM1651 display module (referred to as 'YY') and a potentiometer. The Arduino controls the display via digital pins D2 and D3, which are connected to the DIO and CLK pins of the TM1651, respectively. The potentiometer's output is read by the Arduino's analog pin A0 and is used to adjust the display level on the TM1651, indicating a value that likely represents a battery level or similar variable input.
Cirkit Designer LogoOpen Project in Cirkit Designer

Explore Projects Built with Arduino Yun

Use Cirkit Designer to design, explore, and prototype these projects online. Some projects support real-time simulation. Click "Open Project" to start designing instantly!
Image of TILTPCB: A project utilizing Arduino Yun in a practical application
ATmega328P-Based Sensor Hub with OLED Display and LIDAR
This circuit features an Mtiny Uno ATmega328P microcontroller as its central processing unit, interfacing with a variety of sensors and peripherals. It includes a 0.96" OLED display and an MPU6050 accelerometer/gyroscope for user interface and motion sensing, respectively. The circuit also integrates a TF LUNA LIDAR for distance measurement, a DHT11 sensor for temperature and humidity readings, and uses a 9V battery with a 7805 voltage regulator for power management. Communication with a computer for programming and data exchange is facilitated by an Adafruit FTDI Friend module.
Cirkit Designer LogoOpen Project in Cirkit Designer
Image of YL-69: A project utilizing Arduino Yun in a practical application
Arduino UNO Soil Moisture Sensor System
This circuit consists of an Arduino UNO microcontroller connected to a YL-69 soil moisture sensor. The sensor's analog output (AOUT) is connected to the A1 analog input pin of the Arduino, allowing the microcontroller to read soil moisture levels.
Cirkit Designer LogoOpen Project in Cirkit Designer
Image of ASO BOT: A project utilizing Arduino Yun in a practical application
Arduino UNO and ESP32 CAM Controlled Fire Detection and Alert System with GSM Notification
This circuit features an Arduino UNO as the central microcontroller, interfaced with a variety of sensors, actuators, and modules. It includes a 5-channel fire sensor, temperature and humidity sensor (DHT11), two buzzers, and two servomotors controlled by an L293D driver shield. The circuit also integrates an ESP32 CAM for wireless capabilities, a 2-channel relay module controlling a mini water pump, an LCD display for user interface, a SIM 800L GSM module for cellular connectivity, and is powered by a 9V battery.
Cirkit Designer LogoOpen Project in Cirkit Designer
Image of インジケータボリューム変調LED: A project utilizing Arduino Yun in a practical application
Arduino UNO R4 WiFi Controlled Potentiometer Level Display
This circuit features an Arduino UNO R4 WiFi microcontroller connected to a TM1651 display module (referred to as 'YY') and a potentiometer. The Arduino controls the display via digital pins D2 and D3, which are connected to the DIO and CLK pins of the TM1651, respectively. The potentiometer's output is read by the Arduino's analog pin A0 and is used to adjust the display level on the TM1651, indicating a value that likely represents a battery level or similar variable input.
Cirkit Designer LogoOpen Project in Cirkit Designer

Common Applications and Use Cases

  • Home automation systems
  • Remote sensor monitoring
  • Web-connected devices
  • Networked applications
  • IoT prototypes

Technical Specifications

Key Technical Details

  • Microcontroller: ATmega32U4
  • Operating Voltage: 5V
  • Input Voltage (recommended): 5V via micro USB or PoE 802.3af
  • Input Voltage (limits): 6-20V
  • Digital I/O Pins: 20 (of which 7 can be used as PWM outputs)
  • Analog Input Pins: 12
  • DC Current per I/O Pin: 40 mA
  • DC Current for 3.3V Pin: 50 mA
  • Flash Memory: 32 KB (ATmega32U4) of which 4 KB used by bootloader
  • SRAM: 2.5 KB (ATmega32U4)
  • EEPROM: 1 KB (ATmega32U4)
  • Clock Speed: 16 MHz
  • Wi-Fi: IEEE 802.11b/g/n
  • Ethernet: IEEE 802.3af compliant PoE
  • USB: Micro USB connector for programming

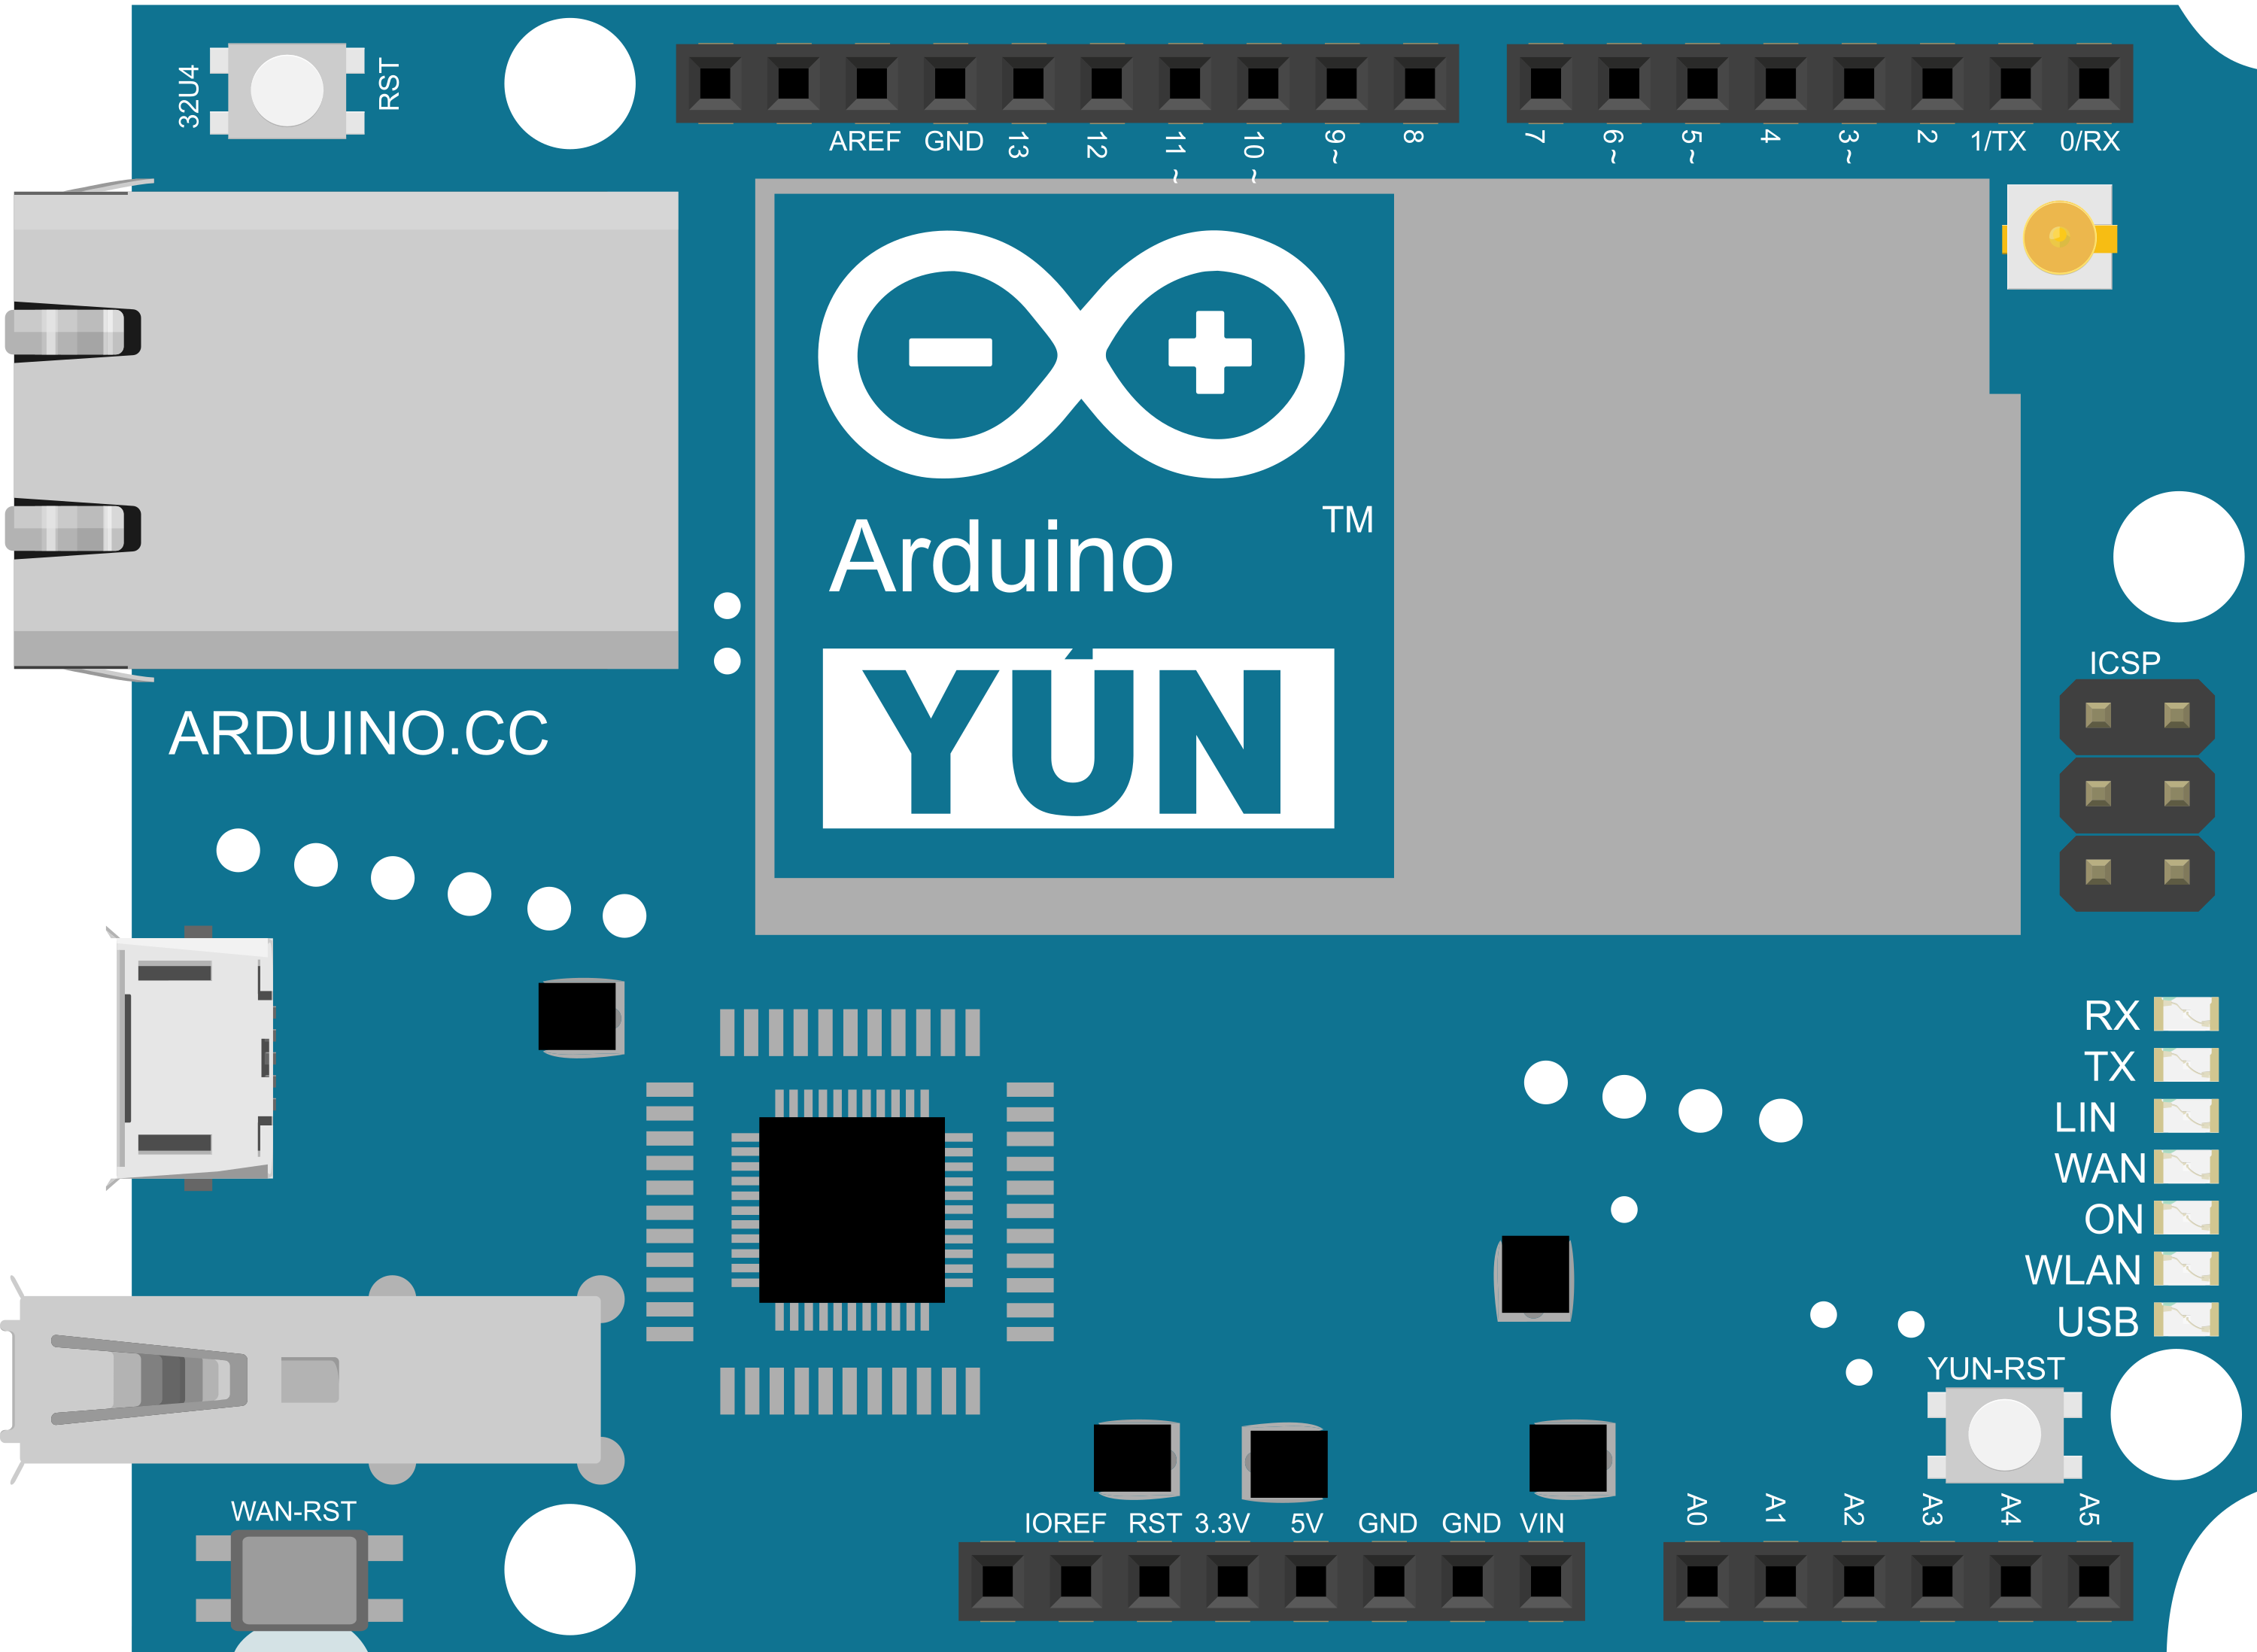
Pin Configuration and Descriptions

Pin Number Function Description
1-14 Digital Pins Used for digital input/output. PWM available on pins 3, 5, 6, 9, 10, 11, and 13.
A0-A5 Analog Inputs Used for analog input. Can also function as digital I/O.
RST Reset Resets the ATmega32U4 microcontroller.
3V3 3.3V Supply Provides a 3.3V supply from the AR9331 processor.
5V 5V Supply Provides a 5V supply to the board.
GND Ground Common ground for circuits.
RX0, TX1 Serial Comm Serial communication pins.
ICSP In-Circuit Serial Programming Used for programming the ATmega32U4.

Usage Instructions

Integrating Arduino Yún into a Circuit

  1. Powering the Arduino Yún:

    • Use a micro USB cable to connect the Yún to a 5V USB power source.
    • Alternatively, power the Yún through the Ethernet port using a PoE adapter.
  2. Programming the Arduino Yún:

    • Connect the Yún to a computer using a micro USB cable.
    • Select the appropriate board and port in the Arduino IDE.
    • Upload your sketch to the ATmega32U4 microcontroller.
  3. Connecting to a Network:

    • Use the onboard Wi-Fi module to connect the Yún to a wireless network.
    • Configure network settings through the Arduino Yún's web panel.
  4. Interfacing with Sensors and Actuators:

    • Connect sensors to the analog pins for reading environmental data.
    • Use digital I/O pins to control actuators like motors, LEDs, or relays.

Important Considerations and Best Practices

  • Ensure that the input voltage does not exceed the recommended limits to prevent damage.
  • Use a regulated power supply to maintain a stable operation.
  • Avoid drawing more than 40 mA from any I/O pin.
  • When using Wi-Fi or Ethernet, secure your network communication with appropriate encryption.

Troubleshooting and FAQs

Common Issues

  • Wi-Fi Connection Problems:

    • Ensure the network credentials are correct.
    • Check the signal strength and reduce distance from the router if necessary.
    • Restart the Yún and router to refresh the network connection.
  • Sketch Upload Failure:

    • Verify the correct board and port are selected in the Arduino IDE.
    • Ensure the Yún and computer are connected properly via USB.
    • Reset the ATmega32U4 using the onboard reset button and try again.

Solutions and Tips for Troubleshooting

  • Use the Arduino IDE's Serial Monitor to debug and print messages from the Yún.
  • Update the Yún's firmware to the latest version for improved stability and features.
  • Consult the Arduino Yún forums and community for help with specific issues.

Example Code for Arduino Yún

Here's a simple example of how to blink an LED connected to pin 13 on the Arduino Yún:

// Define the LED pin
const int ledPin = 13;

void setup() {
  // Initialize the LED pin as an output
  pinMode(ledPin, OUTPUT);
}

void loop() {
  // Turn the LED on
  digitalWrite(ledPin, HIGH);
  // Wait for one second
  delay(1000);
  // Turn the LED off
  digitalWrite(ledPin, LOW);
  // Wait for one second
  delay(1000);
}

Remember to select the correct board and port in the Arduino IDE before uploading this sketch to the Arduino Yún.

For more advanced usage involving the Linux processor and networking capabilities, refer to the Arduino Yún's extensive documentation and examples provided by the Arduino community.