Cirkit Designer Logo
Cirkit Designer
Your all-in-one circuit design IDE
Home / 
Component Documentation

How to Use Vibration sensor: Examples, Pinouts, and Specs

Image of Vibration sensor
Cirkit Designer LogoDesign with Vibration sensor in Cirkit Designer

Introduction

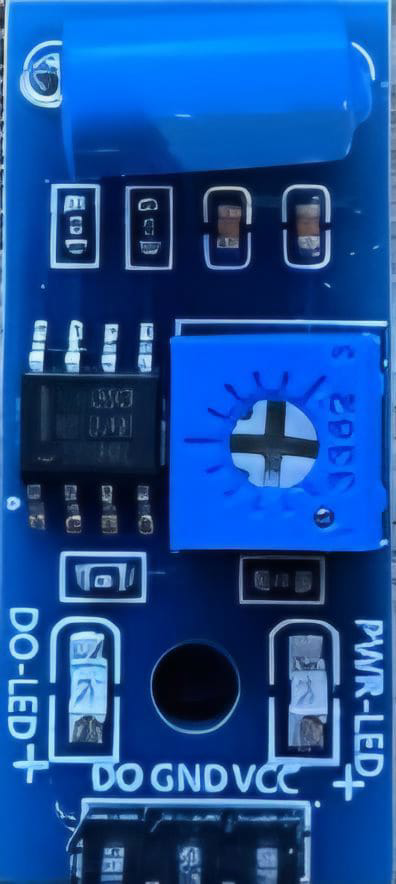
The SW-420 vibration sensor, manufactured by Arduino, is a compact and reliable device designed to detect and measure vibrations or oscillations in an object or environment. It is widely used in applications such as security systems, industrial monitoring, and automation. The sensor outputs a digital signal when vibrations exceed a certain threshold, making it ideal for detecting motion, impacts, or disturbances.

Explore Projects Built with Vibration sensor

Use Cirkit Designer to design, explore, and prototype these projects online. Some projects support real-time simulation. Click "Open Project" to start designing instantly!
Arduino Nano-Based Vibration Detection System with SIM800L GSM Module
Image of asd: A project utilizing Vibration sensor in a practical application
This circuit is designed to detect vibrations using the SW-420 Vibration Sensor and communicate the detection events via the Sim800l GSM module. The Arduino Nano serves as the central controller, interfacing with the vibration sensor on its digital pin D4 and with the Sim800l module through serial communication using pins D0/RX and D1/TX. The circuit is likely intended for remote monitoring of vibrations, potentially for security or machinery fault detection applications.
Cirkit Designer LogoOpen Project in Cirkit Designer
Arduino Nano-Based Wearable Gesture Control Interface with Bluetooth Connectivity
Image of spine: A project utilizing Vibration sensor in a practical application
This is a battery-powered sensor system with Bluetooth communication, featuring an Arduino Nano for control, an MPU-6050 for motion sensing, and an HC-05 module for wireless data transmission. It includes a vibration motor for haptic feedback, a flex resistor as an additional sensor, and a piezo speaker and LED for alerts or status indication.
Cirkit Designer LogoOpen Project in Cirkit Designer
Arduino Nano-Based Haptic Navigation Shoe for the Visually Impaired with Bluetooth Connectivity
Image of Blind shoes layer 2: A project utilizing Vibration sensor in a practical application
This circuit is a haptic navigation system for the visually impaired, utilizing an Arduino Nano to interface with various sensors including a rain sensor, ultrasonic sensor, accelerometer, radar sensor, and Bluetooth module. The system provides feedback through vibration motors and a buzzer, and sends sensor data to a mobile app via Bluetooth for tracking and alerts.
Cirkit Designer LogoOpen Project in Cirkit Designer
Arduino-Based Vibration and Motion Detection System with LCD Display
Image of blueprint: A project utilizing Vibration sensor in a practical application
This circuit uses an Arduino UNO to interface with an SW-420 vibration sensor, an MPU6050 accelerometer and gyroscope, a 16x2 LCD display, and a piezo buzzer. The Arduino reads data from the sensors and displays relevant information on the LCD, while the piezo buzzer provides audible alerts based on sensor inputs.
Cirkit Designer LogoOpen Project in Cirkit Designer

Explore Projects Built with Vibration sensor

Use Cirkit Designer to design, explore, and prototype these projects online. Some projects support real-time simulation. Click "Open Project" to start designing instantly!
Image of asd: A project utilizing Vibration sensor in a practical application
Arduino Nano-Based Vibration Detection System with SIM800L GSM Module
This circuit is designed to detect vibrations using the SW-420 Vibration Sensor and communicate the detection events via the Sim800l GSM module. The Arduino Nano serves as the central controller, interfacing with the vibration sensor on its digital pin D4 and with the Sim800l module through serial communication using pins D0/RX and D1/TX. The circuit is likely intended for remote monitoring of vibrations, potentially for security or machinery fault detection applications.
Cirkit Designer LogoOpen Project in Cirkit Designer
Image of spine: A project utilizing Vibration sensor in a practical application
Arduino Nano-Based Wearable Gesture Control Interface with Bluetooth Connectivity
This is a battery-powered sensor system with Bluetooth communication, featuring an Arduino Nano for control, an MPU-6050 for motion sensing, and an HC-05 module for wireless data transmission. It includes a vibration motor for haptic feedback, a flex resistor as an additional sensor, and a piezo speaker and LED for alerts or status indication.
Cirkit Designer LogoOpen Project in Cirkit Designer
Image of Blind shoes layer 2: A project utilizing Vibration sensor in a practical application
Arduino Nano-Based Haptic Navigation Shoe for the Visually Impaired with Bluetooth Connectivity
This circuit is a haptic navigation system for the visually impaired, utilizing an Arduino Nano to interface with various sensors including a rain sensor, ultrasonic sensor, accelerometer, radar sensor, and Bluetooth module. The system provides feedback through vibration motors and a buzzer, and sends sensor data to a mobile app via Bluetooth for tracking and alerts.
Cirkit Designer LogoOpen Project in Cirkit Designer
Image of blueprint: A project utilizing Vibration sensor in a practical application
Arduino-Based Vibration and Motion Detection System with LCD Display
This circuit uses an Arduino UNO to interface with an SW-420 vibration sensor, an MPU6050 accelerometer and gyroscope, a 16x2 LCD display, and a piezo buzzer. The Arduino reads data from the sensors and displays relevant information on the LCD, while the piezo buzzer provides audible alerts based on sensor inputs.
Cirkit Designer LogoOpen Project in Cirkit Designer

Common Applications

  • Security systems (e.g., detecting unauthorized access or tampering)
  • Industrial equipment monitoring (e.g., detecting abnormal vibrations in machinery)
  • Earthquake detection systems
  • Smart home automation (e.g., detecting door or window vibrations)
  • Robotics and interactive projects

Technical Specifications

The SW-420 vibration sensor is designed for ease of use and integration into various electronic systems. Below are its key technical details:

Parameter Specification
Operating Voltage 3.3V to 5V DC
Output Type Digital (High/Low)
Sensitivity Adjustment Adjustable via onboard potentiometer
Output Signal Voltage 0V (Low) or Vcc (High)
Dimensions 32mm x 14mm x 10mm
Operating Temperature -40°C to +85°C

Pin Configuration and Descriptions

The SW-420 vibration sensor module has three pins for easy interfacing:

Pin Name Description
1 VCC Connect to the positive supply voltage (3.3V–5V).
2 GND Connect to the ground of the power supply.
3 OUT Digital output pin. Outputs HIGH when vibration is detected.

Usage Instructions

How to Use the SW-420 in a Circuit

  1. Power the Sensor: Connect the VCC pin to a 3.3V–5V power source and the GND pin to the ground.
  2. Connect the Output: Connect the OUT pin to a digital input pin of your microcontroller (e.g., Arduino UNO).
  3. Adjust Sensitivity: Use the onboard potentiometer to adjust the vibration sensitivity. Turning it clockwise increases sensitivity, while turning it counterclockwise decreases it.
  4. Monitor the Output: The OUT pin will output a HIGH signal when vibrations exceed the set threshold and LOW otherwise.

Important Considerations and Best Practices

  • Mounting: Securely mount the sensor to the surface or object you want to monitor for vibrations. Loose mounting may result in inaccurate readings.
  • Power Supply: Ensure a stable power supply to avoid false triggers or erratic behavior.
  • Debouncing: If the sensor is used in a noisy environment, consider implementing software debouncing to filter out false signals.
  • Threshold Adjustment: Test and fine-tune the sensitivity threshold for your specific application to avoid false positives or missed detections.

Example Code for Arduino UNO

Below is an example of how to use the SW-420 vibration sensor with an Arduino UNO:

// SW-420 Vibration Sensor Example Code
// Connect the OUT pin of the sensor to Arduino digital pin 2

const int sensorPin = 2;  // Pin connected to the sensor's OUT pin
const int ledPin = 13;    // Built-in LED pin for visual feedback

void setup() {
  pinMode(sensorPin, INPUT);  // Set sensor pin as input
  pinMode(ledPin, OUTPUT);    // Set LED pin as output
  Serial.begin(9600);         // Initialize serial communication
}

void loop() {
  int sensorValue = digitalRead(sensorPin);  // Read the sensor output

  if (sensorValue == HIGH) {
    // Vibration detected
    digitalWrite(ledPin, HIGH);  // Turn on the LED
    Serial.println("Vibration detected!");
  } else {
    // No vibration
    digitalWrite(ledPin, LOW);   // Turn off the LED
  }

  delay(100);  // Small delay to stabilize readings
}

Troubleshooting and FAQs

Common Issues and Solutions

  1. No Output Signal

    • Cause: Incorrect wiring or loose connections.
    • Solution: Double-check all connections, ensuring VCC, GND, and OUT are properly connected.
  2. False Triggers

    • Cause: Sensitivity set too high or environmental noise.
    • Solution: Adjust the potentiometer to lower the sensitivity and ensure the sensor is mounted securely.
  3. Sensor Not Responding

    • Cause: Insufficient power supply or damaged sensor.
    • Solution: Verify the power supply voltage and replace the sensor if necessary.
  4. Erratic Behavior

    • Cause: Electrical noise or unstable power supply.
    • Solution: Use a decoupling capacitor (e.g., 0.1µF) across the VCC and GND pins to stabilize the power supply.

FAQs

Q1: Can the SW-420 detect small vibrations?
A1: Yes, the sensitivity can be adjusted using the onboard potentiometer to detect small or large vibrations.

Q2: Is the SW-420 suitable for outdoor use?
A2: The sensor is not waterproof or weatherproof. For outdoor use, ensure it is enclosed in a protective casing.

Q3: Can I use the SW-420 with a 3.3V microcontroller?
A3: Yes, the sensor operates within a voltage range of 3.3V to 5V, making it compatible with 3.3V systems.

Q4: How do I know if the sensor is working?
A4: When vibrations are detected, the OUT pin will output a HIGH signal, which can be monitored using an LED or a microcontroller.

By following this documentation, you can effectively integrate the SW-420 vibration sensor into your projects and troubleshoot any issues that arise.