Cirkit Designer Logo
Cirkit Designer
Your all-in-one circuit design IDE
Home / 
Component Documentation

How to Use mist maker: Examples, Pinouts, and Specs

Image of mist maker
Cirkit Designer LogoDesign with mist maker in Cirkit Designer

Introduction

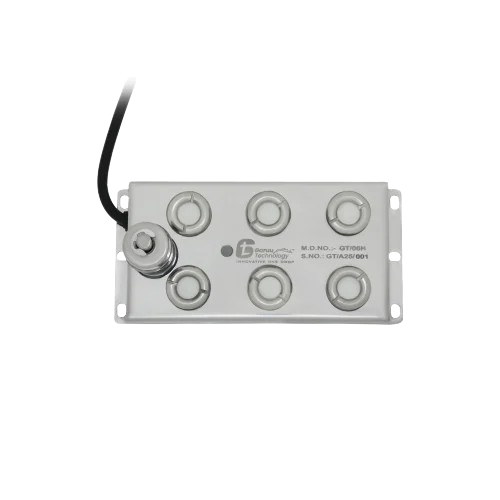
A mist maker is a device that uses ultrasonic technology to create a fine mist of water droplets. It operates by vibrating a ceramic disc at ultrasonic frequencies, which breaks water into tiny droplets, forming a visible mist. Mist makers are commonly used in humidifiers, decorative fountains, terrariums, and for creating atmospheric effects in theatrical productions or photography. They are also employed in horticulture to maintain humidity levels for plants.

Explore Projects Built with mist maker

Use Cirkit Designer to design, explore, and prototype these projects online. Some projects support real-time simulation. Click "Open Project" to start designing instantly!
Arduino Mega 2560 Controlled Ghostbuster Trap Prop with MP3 Player and Haptic Feedback
Image of Trap Wiring: A project utilizing mist maker in a practical application
This circuit is designed to simulate a Ghostbuster trap prop with various interactive features. It includes an Arduino Mega 2560 to control a sequence of events such as playing audio tracks through an MP3 player module, creating vibrations with a haptic motor driver and DC motors, displaying patterns on a bi-color 24-bar LED bargraph, moving servos, and activating a relay-controlled water pump. The sequence is initiated by an IR receiver, and the circuit incorporates LEDs, resistors, a step-down buck converter for voltage regulation, and a Bluetooth module for potential wireless control.
Cirkit Designer LogoOpen Project in Cirkit Designer
MakerEdu Creator with Bluetooth, IR Sensors, LCD Display, and Push Button Interaction
Image of MKL Distance Measurement: A project utilizing mist maker in a practical application
This circuit features a MakerEdu Creator microcontroller board interfaced with two MKE-S11 IR Infrared Obstacle Avoidance Sensors, a MKE-M02 Push Button Tact Switch, a MKE-M15 Bluetooth module, and a MKE-M08 LCD2004 I2C display module. The push button is connected to a digital input for user interaction, while the IR sensors are likely used for detecting obstacles. The Bluetooth module enables wireless communication, and the LCD display provides a user interface for displaying information or statuses.
Cirkit Designer LogoOpen Project in Cirkit Designer
Solar-Powered Bird Repellant System with Arduino and Servo Motors
Image of Copy of thesis 222: A project utilizing mist maker in a practical application
This solar-powered bird repellant system uses a PIR motion sensor to detect birds and activates a passive buzzer and two servo motors to deter them. The system is controlled by an Arduino UNO, which also manages two LEDs to indicate the system's status, and is powered by a 12V battery with a step-down converter providing 5V to the components.
Cirkit Designer LogoOpen Project in Cirkit Designer
Arduino MKR WiFi 1010 Environmental Monitoring Station with Multiple Sensors
Image of idojaras_allomas: A project utilizing mist maker in a practical application
This circuit is designed around an Arduino MKR WiFi 1010 microcontroller and includes a variety of sensors: a water level sensor, an MQ-2 gas sensor, a TEMT6000 ambient light sensor, a steam sensor, a DHT11 temperature and humidity sensor, and a rotary encoder. The sensors are powered by the 5V output from the Arduino and their ground pins are connected to the Arduino's ground. The signal outputs from the sensors are connected to various analog and digital input pins on the Arduino, enabling it to monitor environmental conditions such as gas presence, light levels, temperature, humidity, water level, and user input through the rotary encoder.
Cirkit Designer LogoOpen Project in Cirkit Designer

Explore Projects Built with mist maker

Use Cirkit Designer to design, explore, and prototype these projects online. Some projects support real-time simulation. Click "Open Project" to start designing instantly!
Image of Trap Wiring: A project utilizing mist maker in a practical application
Arduino Mega 2560 Controlled Ghostbuster Trap Prop with MP3 Player and Haptic Feedback
This circuit is designed to simulate a Ghostbuster trap prop with various interactive features. It includes an Arduino Mega 2560 to control a sequence of events such as playing audio tracks through an MP3 player module, creating vibrations with a haptic motor driver and DC motors, displaying patterns on a bi-color 24-bar LED bargraph, moving servos, and activating a relay-controlled water pump. The sequence is initiated by an IR receiver, and the circuit incorporates LEDs, resistors, a step-down buck converter for voltage regulation, and a Bluetooth module for potential wireless control.
Cirkit Designer LogoOpen Project in Cirkit Designer
Image of MKL Distance Measurement: A project utilizing mist maker in a practical application
MakerEdu Creator with Bluetooth, IR Sensors, LCD Display, and Push Button Interaction
This circuit features a MakerEdu Creator microcontroller board interfaced with two MKE-S11 IR Infrared Obstacle Avoidance Sensors, a MKE-M02 Push Button Tact Switch, a MKE-M15 Bluetooth module, and a MKE-M08 LCD2004 I2C display module. The push button is connected to a digital input for user interaction, while the IR sensors are likely used for detecting obstacles. The Bluetooth module enables wireless communication, and the LCD display provides a user interface for displaying information or statuses.
Cirkit Designer LogoOpen Project in Cirkit Designer
Image of Copy of thesis 222: A project utilizing mist maker in a practical application
Solar-Powered Bird Repellant System with Arduino and Servo Motors
This solar-powered bird repellant system uses a PIR motion sensor to detect birds and activates a passive buzzer and two servo motors to deter them. The system is controlled by an Arduino UNO, which also manages two LEDs to indicate the system's status, and is powered by a 12V battery with a step-down converter providing 5V to the components.
Cirkit Designer LogoOpen Project in Cirkit Designer
Image of idojaras_allomas: A project utilizing mist maker in a practical application
Arduino MKR WiFi 1010 Environmental Monitoring Station with Multiple Sensors
This circuit is designed around an Arduino MKR WiFi 1010 microcontroller and includes a variety of sensors: a water level sensor, an MQ-2 gas sensor, a TEMT6000 ambient light sensor, a steam sensor, a DHT11 temperature and humidity sensor, and a rotary encoder. The sensors are powered by the 5V output from the Arduino and their ground pins are connected to the Arduino's ground. The signal outputs from the sensors are connected to various analog and digital input pins on the Arduino, enabling it to monitor environmental conditions such as gas presence, light levels, temperature, humidity, water level, and user input through the rotary encoder.
Cirkit Designer LogoOpen Project in Cirkit Designer

Technical Specifications

Below are the key technical details for a standard mist maker:

Parameter Value
Operating Voltage 24V DC
Operating Current 400-600 mA
Power Consumption 10-20W
Frequency 1.7 MHz (ultrasonic frequency)
Water Level Requirement Minimum 25-30 mm above the sensor
Mist Output 300-500 mL/hour
Operating Temperature 5°C to 50°C
Lifespan ~5,000 hours

Pin Configuration and Descriptions

Most mist makers come with a simple two-wire connection for power input. Below is the pin configuration:

Pin Name Description
1 VCC (+) Positive power supply input (24V DC)
2 GND (-) Ground connection for the power supply

Some mist makers may also include an LED ring for decorative lighting, which may have additional pins for LED control.

Usage Instructions

How to Use the Mist Maker in a Circuit

  1. Power Supply: Connect the mist maker to a 24V DC power supply. Ensure the power supply can provide at least 600 mA of current to avoid underpowering the device.
  2. Water Level: Place the mist maker in a container with clean water. Ensure the water level is above the minimum requirement (25-30 mm above the sensor) for proper operation.
  3. Placement: Position the mist maker horizontally in the water. Avoid tilting, as this may reduce mist output or damage the device.
  4. Safety: Do not operate the mist maker without water, as this can damage the ultrasonic disc.

Important Considerations and Best Practices

  • Water Quality: Use clean, distilled, or filtered water to prevent mineral buildup on the ultrasonic disc.
  • Cleaning: Regularly clean the ceramic disc with a soft cloth or cotton swab to maintain optimal performance.
  • Ventilation: Ensure proper ventilation around the mist maker to prevent overheating.
  • LED Control: If your mist maker includes LEDs, ensure the LED control pins (if present) are connected according to the manufacturer's instructions.

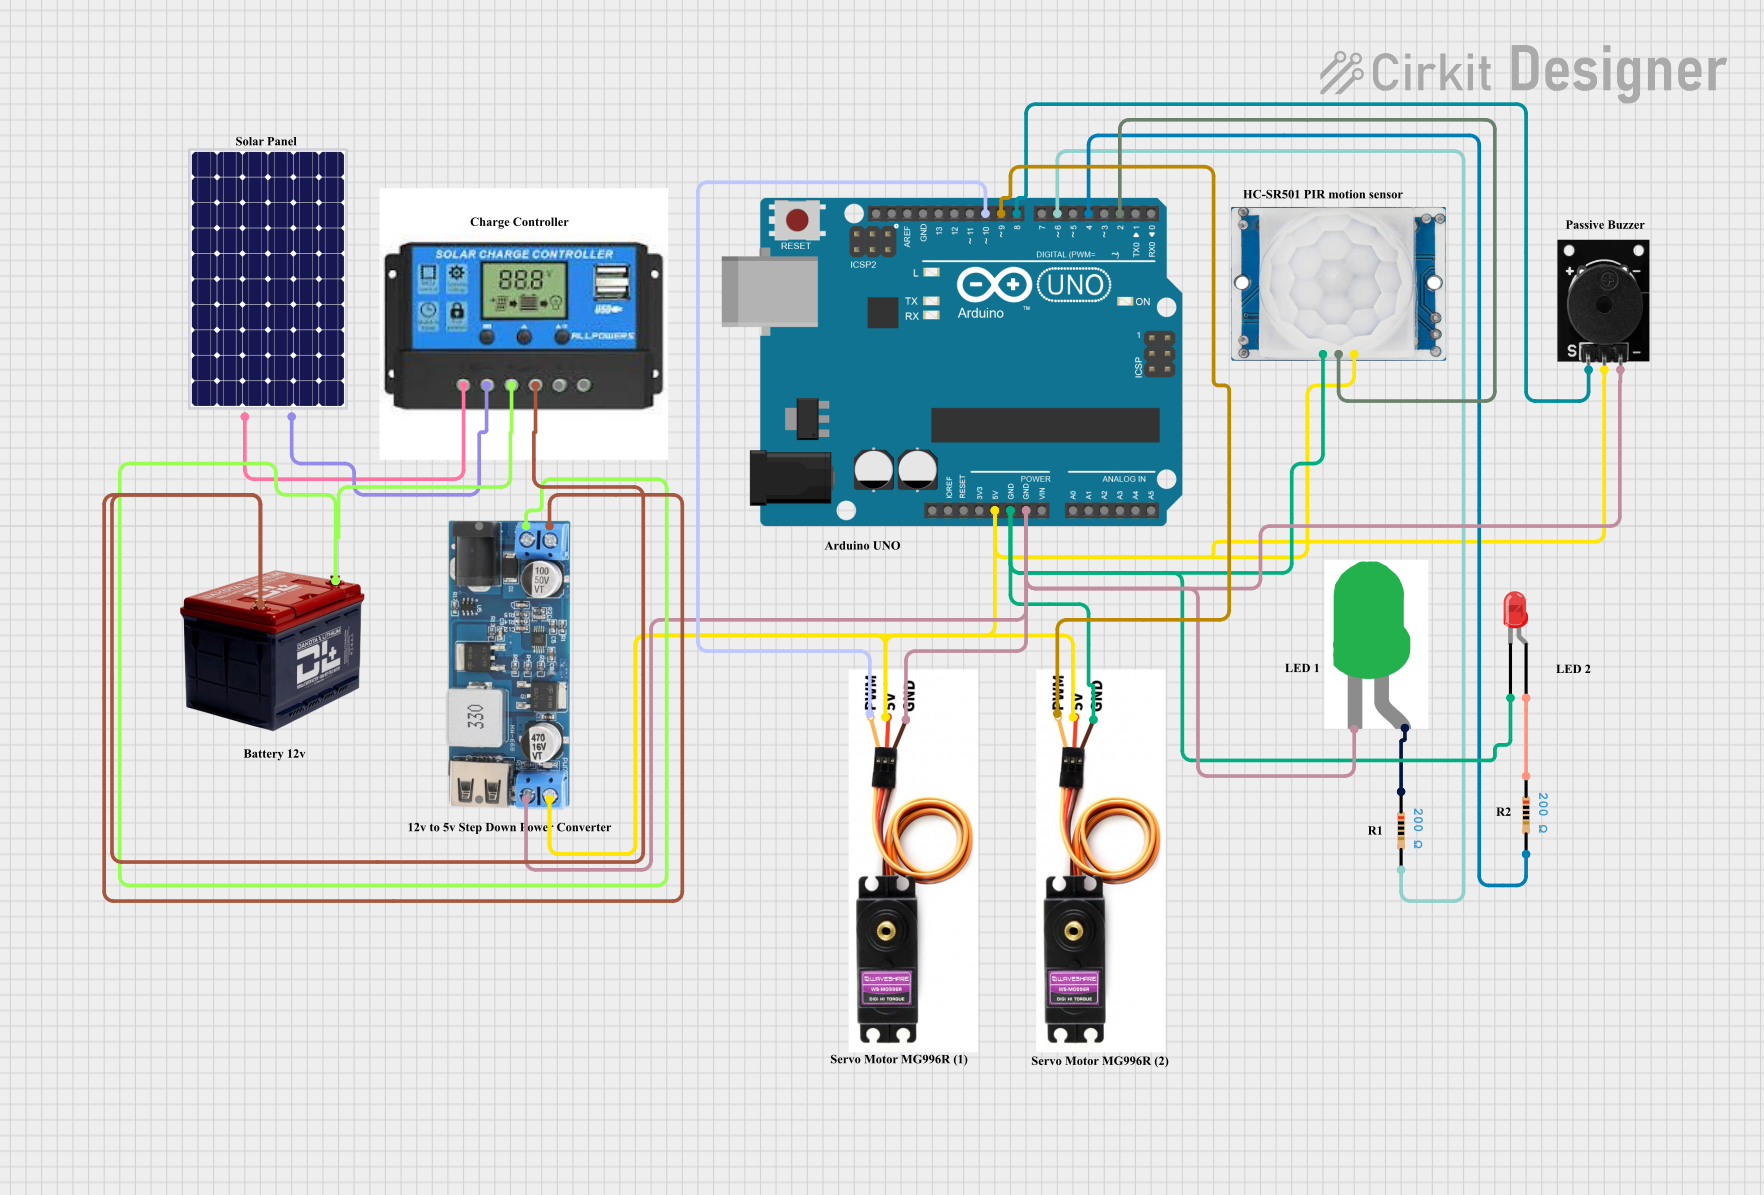
Example: Connecting a Mist Maker to an Arduino UNO

While mist makers are typically standalone devices, you can control them using an Arduino UNO and a relay module. Below is an example circuit and code to toggle the mist maker on and off:

Circuit Diagram

  • Connect the mist maker's VCC and GND to the relay module's output terminals.
  • Connect the relay module's input pin to Arduino pin 7.
  • Power the relay module and Arduino using appropriate power supplies.

Arduino Code

// Define the pin connected to the relay module
const int relayPin = 7;

void setup() {
  pinMode(relayPin, OUTPUT); // Set the relay pin as an output
  digitalWrite(relayPin, LOW); // Ensure the relay is off initially
}

void loop() {
  digitalWrite(relayPin, HIGH); // Turn on the mist maker
  delay(5000); // Keep it on for 5 seconds
  digitalWrite(relayPin, LOW); // Turn off the mist maker
  delay(5000); // Keep it off for 5 seconds
}

Note: Ensure the relay module is rated for the mist maker's voltage and current requirements.

Troubleshooting and FAQs

Common Issues and Solutions

  1. No Mist Output:

    • Cause: Insufficient water level.

    • Solution: Ensure the water level is at least 25-30 mm above the sensor.

    • Cause: Dirty or damaged ultrasonic disc.

    • Solution: Clean the disc gently with a soft cloth or replace it if damaged.

  2. Device Overheating:

    • Cause: Prolonged operation without proper ventilation.
    • Solution: Allow the device to cool down periodically and ensure adequate airflow.
  3. Intermittent Operation:

    • Cause: Unstable power supply.
    • Solution: Use a stable 24V DC power supply with sufficient current capacity.
  4. LEDs Not Working:

    • Cause: Incorrect wiring or damaged LEDs.
    • Solution: Check the LED connections and ensure they are wired correctly.

FAQs

  • Q: Can I use tap water with the mist maker?
    A: Tap water may work, but it can cause mineral buildup on the ultrasonic disc. Distilled water is recommended for longevity.

  • Q: How do I replace the ceramic disc?
    A: Most mist makers have a removable disc. Refer to the manufacturer's instructions for replacing it safely.

  • Q: Can I submerge the entire mist maker?
    A: No, only the sensor and disc should be submerged. The electrical components must remain dry.

  • Q: Is the mist safe for electronics?
    A: The mist is water-based and can damage electronics if it condenses on them. Use the mist maker in a controlled environment to avoid this.

By following this documentation, you can effectively use and maintain your mist maker for various applications.