Cirkit Designer Logo
Cirkit Designer
Your all-in-one circuit design IDE
Home / 
Component Documentation

How to Use LCD 16x2 (Wokwi Compatible): Examples, Pinouts, and Specs

Image of LCD 16x2 (Wokwi Compatible)
Cirkit Designer LogoDesign with LCD 16x2 (Wokwi Compatible) in Cirkit Designer

Introduction

The LCD 16x2 is a widely used liquid crystal display module capable of displaying 16 characters per line across its 2 rows, providing a simple way to showcase data in a human-readable form. This Wokwi Compatible version is specifically designed to interface smoothly with the Wokwi simulator, making it an excellent choice for prototyping and educational purposes. Common applications include user interfaces, status message displays, and simple menus for embedded projects.

Explore Projects Built with LCD 16x2 (Wokwi Compatible)

Use Cirkit Designer to design, explore, and prototype these projects online. Some projects support real-time simulation. Click "Open Project" to start designing instantly!
Arduino Leonardo Controlled LCD Display with I2C Interface
Image of ert: A project utilizing LCD 16x2 (Wokwi Compatible) in a practical application
This circuit connects an Arduino Leonardo microcontroller to a 16x2 LCD display via an LCM1602 IIC interface module, enabling the display of text on the LCD. The Arduino is programmed to display the messages 'TEST LCD i2C' and 'KelasRobot.com' on the LCD. The IIC module facilitates communication between the Arduino and the LCD using the I2C protocol, simplifying the wiring and pin usage.
Cirkit Designer LogoOpen Project in Cirkit Designer
Arduino Mega 2560 LCD Display Controller with Adjustable Contrast
Image of conexion de reles: A project utilizing LCD 16x2 (Wokwi Compatible) in a practical application
This circuit features an Arduino Mega 2560 microcontroller connected to a 16x2 LCD display for visual output. A trimmer potentiometer is used to adjust the contrast of the LCD. The Arduino provides power to the LCD and controls it via several PWM pins.
Cirkit Designer LogoOpen Project in Cirkit Designer
Arduino UNO and 16x2 I2C LCD Display Interface for Data Visualization
Image of lcd: A project utilizing LCD 16x2 (Wokwi Compatible) in a practical application
This circuit consists of an Arduino UNO microcontroller connected to a 16x2 I2C LCD display. The Arduino UNO provides power and I2C communication to the LCD, allowing it to display information controlled by the Arduino.
Cirkit Designer LogoOpen Project in Cirkit Designer
Lilygo 7670e-Based Smart Interface with LCD Display and Keypad
Image of Paower: A project utilizing LCD 16x2 (Wokwi Compatible) in a practical application
This circuit features a Lilygo 7670e microcontroller interfaced with a 16x2 I2C LCD for display, a 4X4 membrane matrix keypad for input, and an arcade button for additional control. It also includes a 4G antenna and a GPS antenna for communication and location tracking capabilities.
Cirkit Designer LogoOpen Project in Cirkit Designer

Explore Projects Built with LCD 16x2 (Wokwi Compatible)

Use Cirkit Designer to design, explore, and prototype these projects online. Some projects support real-time simulation. Click "Open Project" to start designing instantly!
Image of ert: A project utilizing LCD 16x2 (Wokwi Compatible) in a practical application
Arduino Leonardo Controlled LCD Display with I2C Interface
This circuit connects an Arduino Leonardo microcontroller to a 16x2 LCD display via an LCM1602 IIC interface module, enabling the display of text on the LCD. The Arduino is programmed to display the messages 'TEST LCD i2C' and 'KelasRobot.com' on the LCD. The IIC module facilitates communication between the Arduino and the LCD using the I2C protocol, simplifying the wiring and pin usage.
Cirkit Designer LogoOpen Project in Cirkit Designer
Image of conexion de reles: A project utilizing LCD 16x2 (Wokwi Compatible) in a practical application
Arduino Mega 2560 LCD Display Controller with Adjustable Contrast
This circuit features an Arduino Mega 2560 microcontroller connected to a 16x2 LCD display for visual output. A trimmer potentiometer is used to adjust the contrast of the LCD. The Arduino provides power to the LCD and controls it via several PWM pins.
Cirkit Designer LogoOpen Project in Cirkit Designer
Image of lcd: A project utilizing LCD 16x2 (Wokwi Compatible) in a practical application
Arduino UNO and 16x2 I2C LCD Display Interface for Data Visualization
This circuit consists of an Arduino UNO microcontroller connected to a 16x2 I2C LCD display. The Arduino UNO provides power and I2C communication to the LCD, allowing it to display information controlled by the Arduino.
Cirkit Designer LogoOpen Project in Cirkit Designer
Image of Paower: A project utilizing LCD 16x2 (Wokwi Compatible) in a practical application
Lilygo 7670e-Based Smart Interface with LCD Display and Keypad
This circuit features a Lilygo 7670e microcontroller interfaced with a 16x2 I2C LCD for display, a 4X4 membrane matrix keypad for input, and an arcade button for additional control. It also includes a 4G antenna and a GPS antenna for communication and location tracking capabilities.
Cirkit Designer LogoOpen Project in Cirkit Designer

Technical Specifications

Key Technical Details

  • Display Type: Alphanumeric LCD
  • Resolution: 16 characters x 2 lines
  • Character Size: 5 x 8 pixels
  • Backlight: LED, typically blue or green
  • Operating Voltage: 4.7V to 5.3V
  • Logic Voltage: 5V
  • Module Dimensions: 80mm x 36mm x 12mm
  • Viewing Area: 64.5mm x 16mm

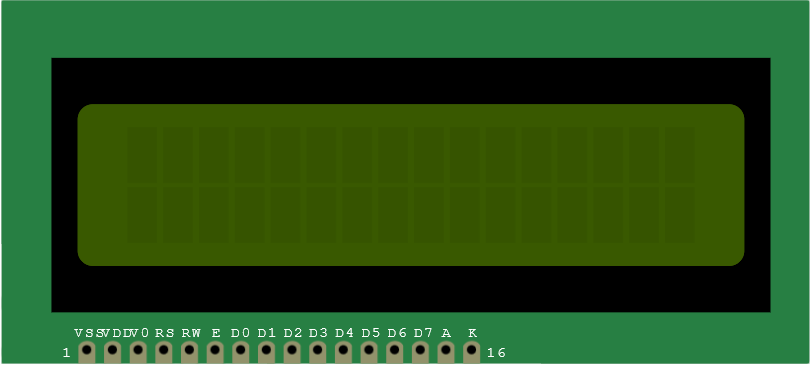
Pin Configuration and Descriptions

Pin Number Symbol Function
1 VSS Ground
2 VDD Power supply (4.7V to 5.3V)
3 VO Contrast adjustment
4 RS Register Select (0: Command, 1: Data)
5 R/W Read/Write (0: Write, 1: Read)
6 E Enable signal
7-14 D0-D7 Data bus lines
15 A Anode for backlight (positive)
16 K Cathode for backlight (negative)

Usage Instructions

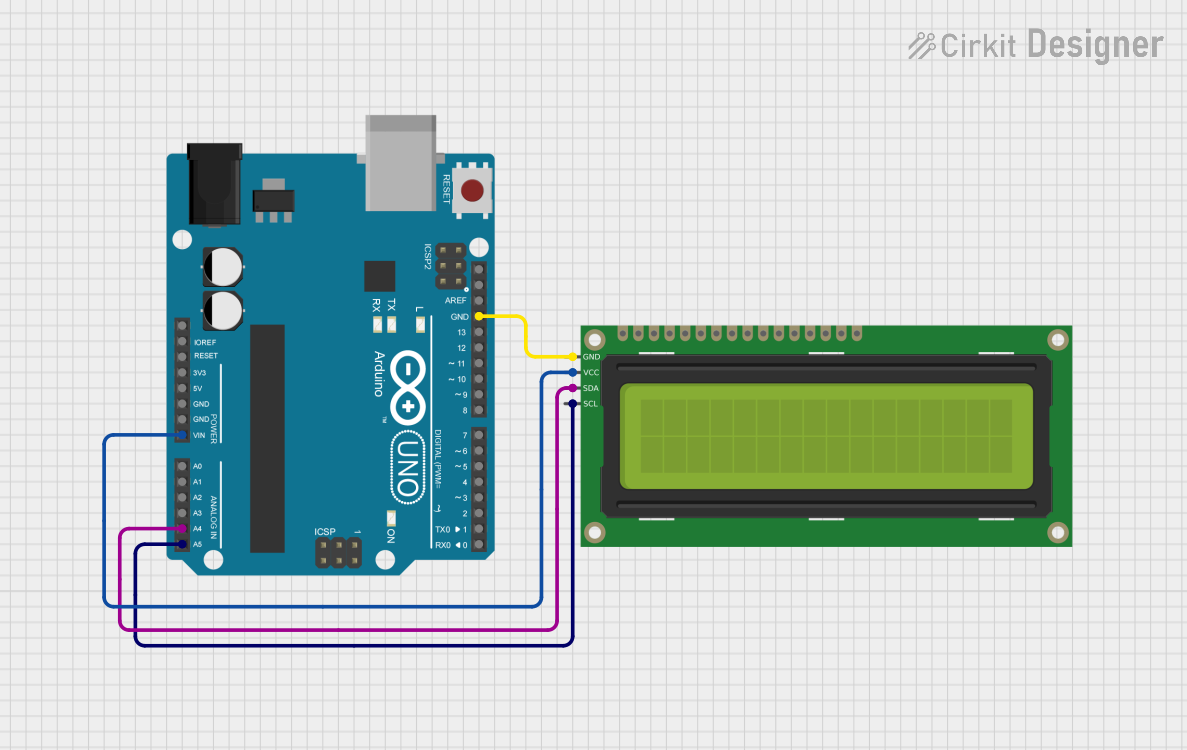
Interfacing with a Circuit

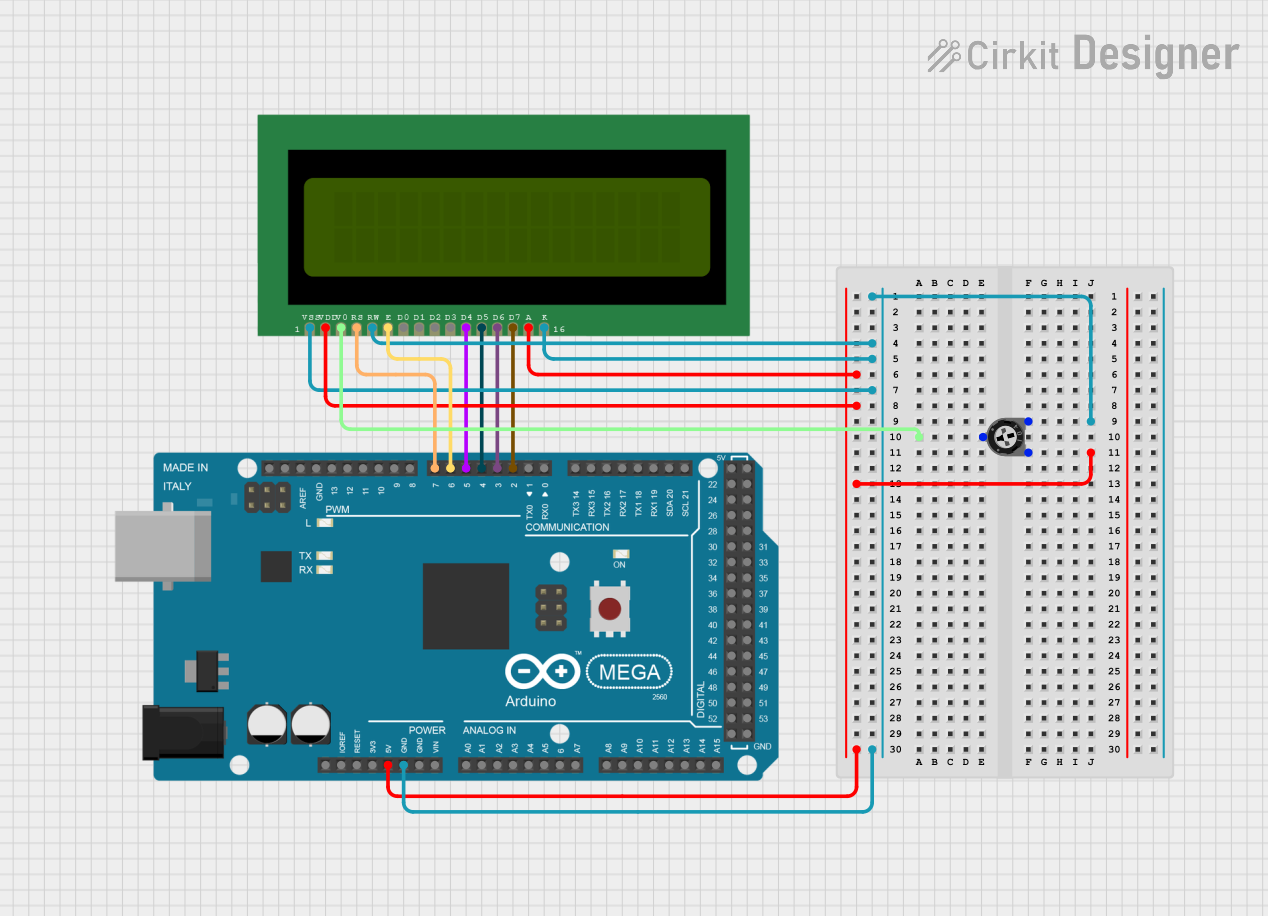
To use the LCD 16x2 in a circuit:

  1. Connect pins 1 (VSS) and 16 (K) to ground.
  2. Connect pin 2 (VDD) to a 5V power supply.
  3. Connect pin 15 (A) to a 5V supply through a current-limiting resistor for backlight.
  4. Connect pin 3 (VO) to a potentiometer for contrast adjustment.
  5. Utilize pins 4 (RS), 5 (R/W), and 6 (E) to interface with your microcontroller for control signals.
  6. Connect data pins 7-14 (D0-D7) to the microcontroller data lines, or use only D4-D7 for 4-bit mode.

Important Considerations and Best Practices

  • Always use a current-limiting resistor for the backlight to prevent damage.
  • Adjust the contrast potentiometer for clear visibility.
  • For longer life and reliable operation, avoid exposing the display to extreme temperatures and humidity.
  • When using 4-bit mode, ensure your software accounts for the correct data transfer sequence.

Example Code for Arduino UNO

#include <LiquidCrystal.h>

// Initialize the library with the interface pins
LiquidCrystal lcd(12, 11, 5, 4, 3, 2);

void setup() {
  // Set up the LCD's number of columns and rows:
  lcd.begin(16, 2);
  // Print a message to the LCD.
  lcd.print("Hello, World!");
}

void loop() {
  // Set the cursor to column 0, line 1
  // (note: line 1 is the second row, since counting begins with 0):
  lcd.setCursor(0, 1);
  // Print the number of seconds since reset:
  lcd.print(millis() / 1000);
}

Troubleshooting and FAQs

Common Issues

  • Display is blank or characters are not visible: Adjust the contrast potentiometer.
  • Backlight not working: Check the connection and the current-limiting resistor.
  • Garbled or incorrect characters: Ensure data lines are connected properly and the code matches the configured data mode (4-bit or 8-bit).

Solutions and Tips for Troubleshooting

  • Double-check wiring against the pin configuration table.
  • Verify that the power supply is within the specified voltage range.
  • Ensure that the Arduino library used matches the mode (4-bit or 8-bit) in which the LCD is operating.
  • Reset the Arduino and the LCD module to clear any residual data that may cause display issues.

FAQs

Q: Can I use this LCD with a 3.3V system? A: The LCD is designed for 5V logic. Using it with a 3.3V system may require level shifters or a different LCD model.

Q: How do I control the backlight brightness? A: The backlight brightness can be controlled by varying the voltage on pin 15 (A) through a PWM signal or by changing the current-limiting resistor value.

Q: What is the purpose of the VO pin? A: The VO pin is used for contrast adjustment. It is typically connected to the middle pin of a potentiometer, with the other two pins connected to VDD and VSS.

Q: Can I display custom characters? A: Yes, the LCD controller allows you to create custom characters by defining a bitmap and storing it in the LCD's CGRAM (Character Generator RAM).