How to Use TBS Crossfire Nano Pro: Examples, Pinouts, and Specs
Introduction
The TBS Crossfire Nano Pro is a high-performance, long-range radio control system designed for drones and RC vehicles. Manufactured by Team BlackSheep (TBS), this compact module offers ultra-low latency, high reliability, and seamless integration into a variety of setups. Its small form factor makes it ideal for applications where space and weight are critical, such as FPV drones and other remote-controlled systems.
Explore Projects Built with TBS Crossfire Nano Pro

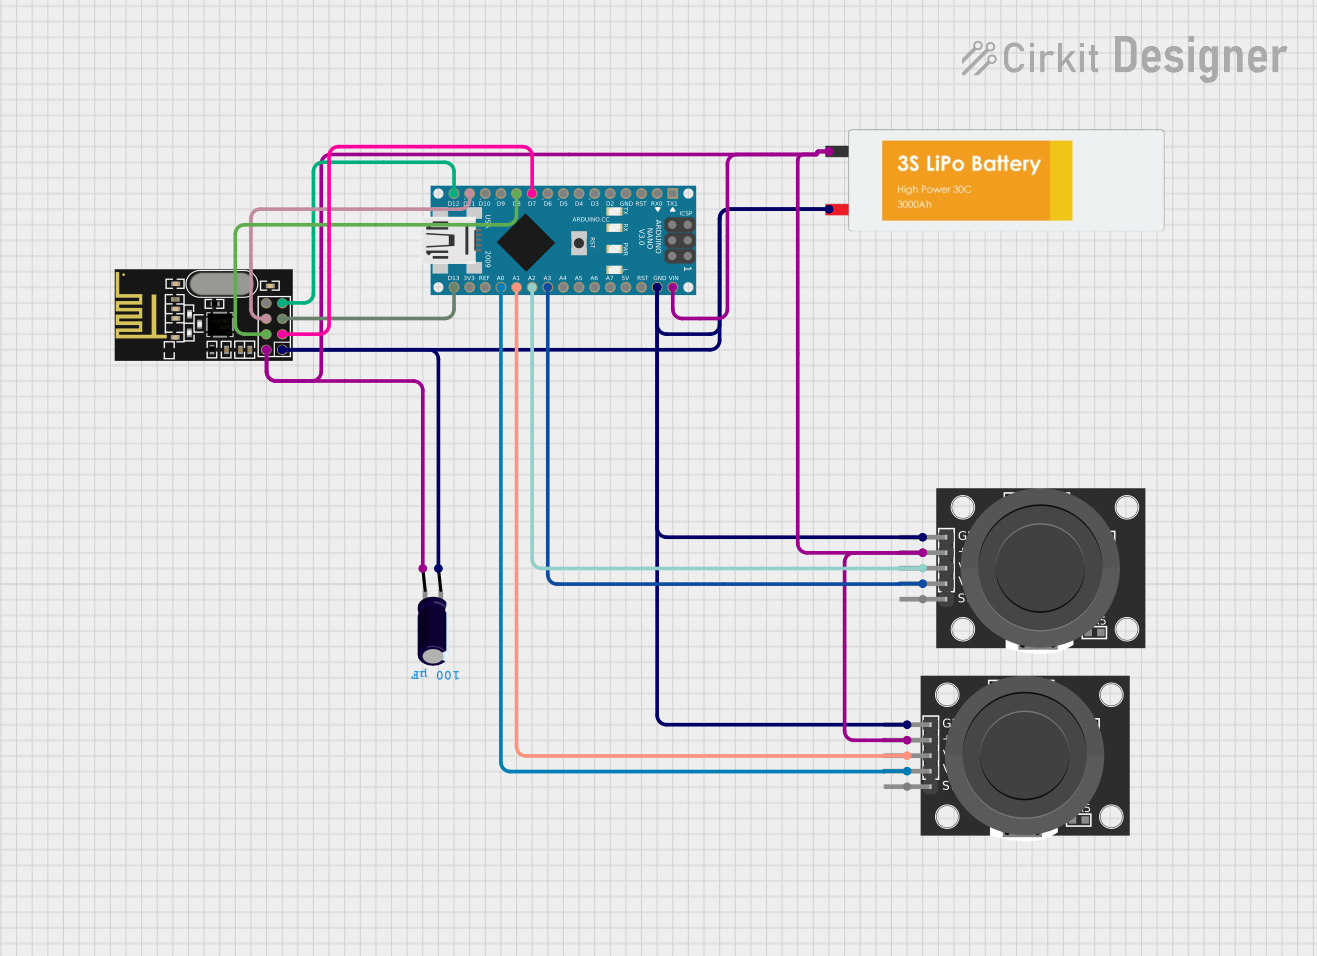
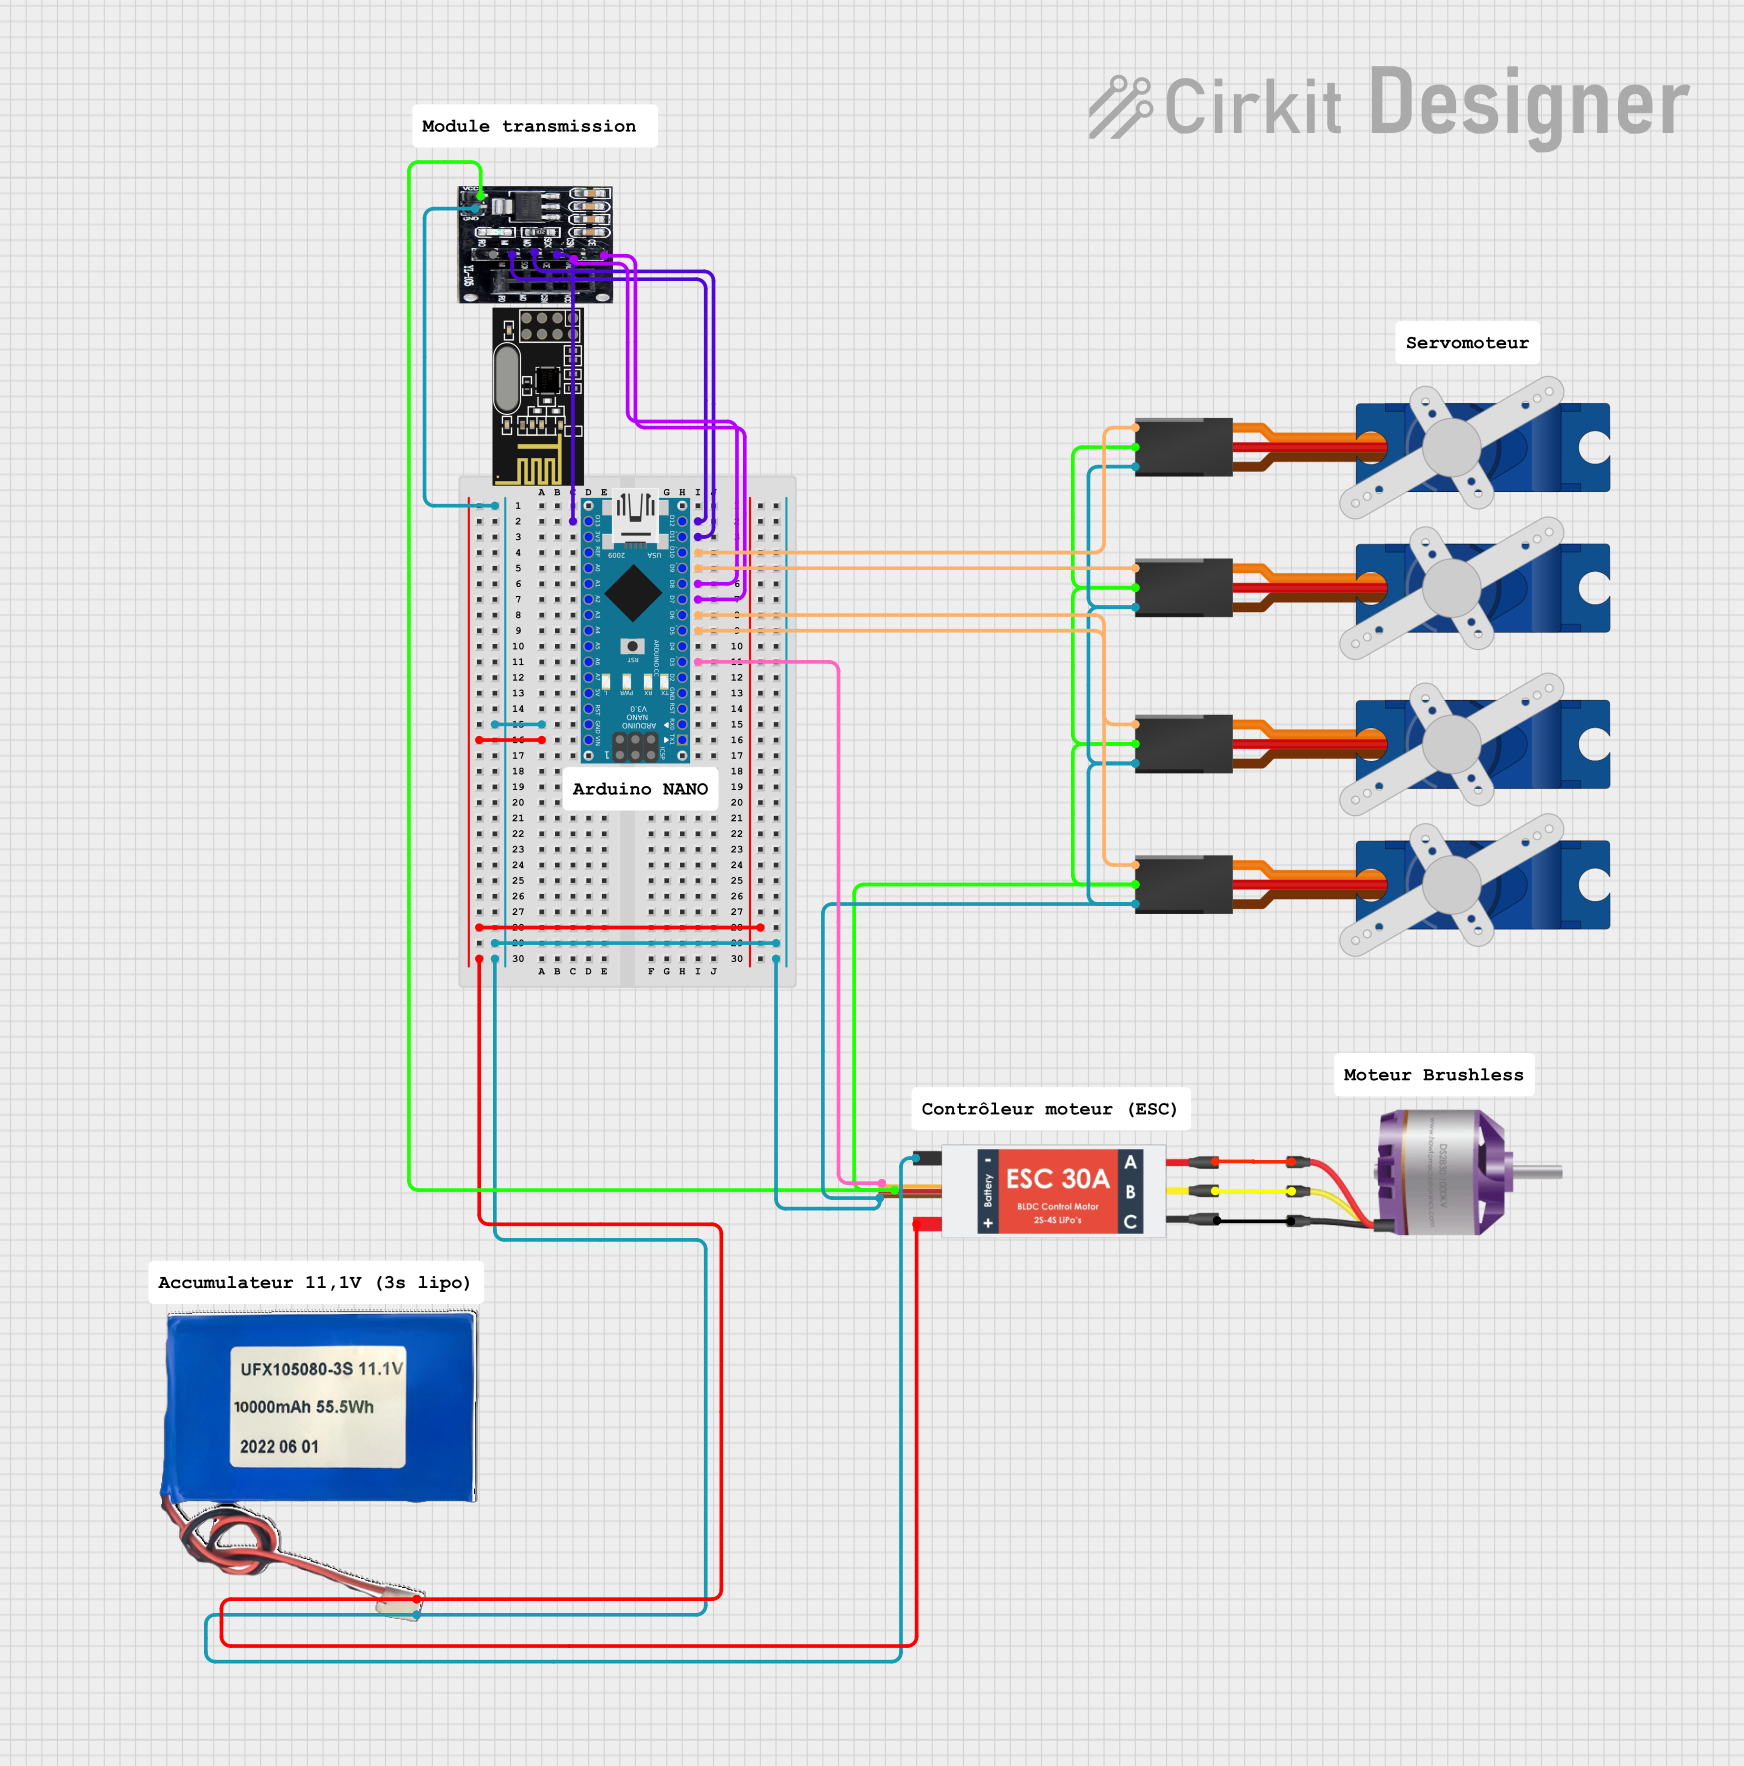
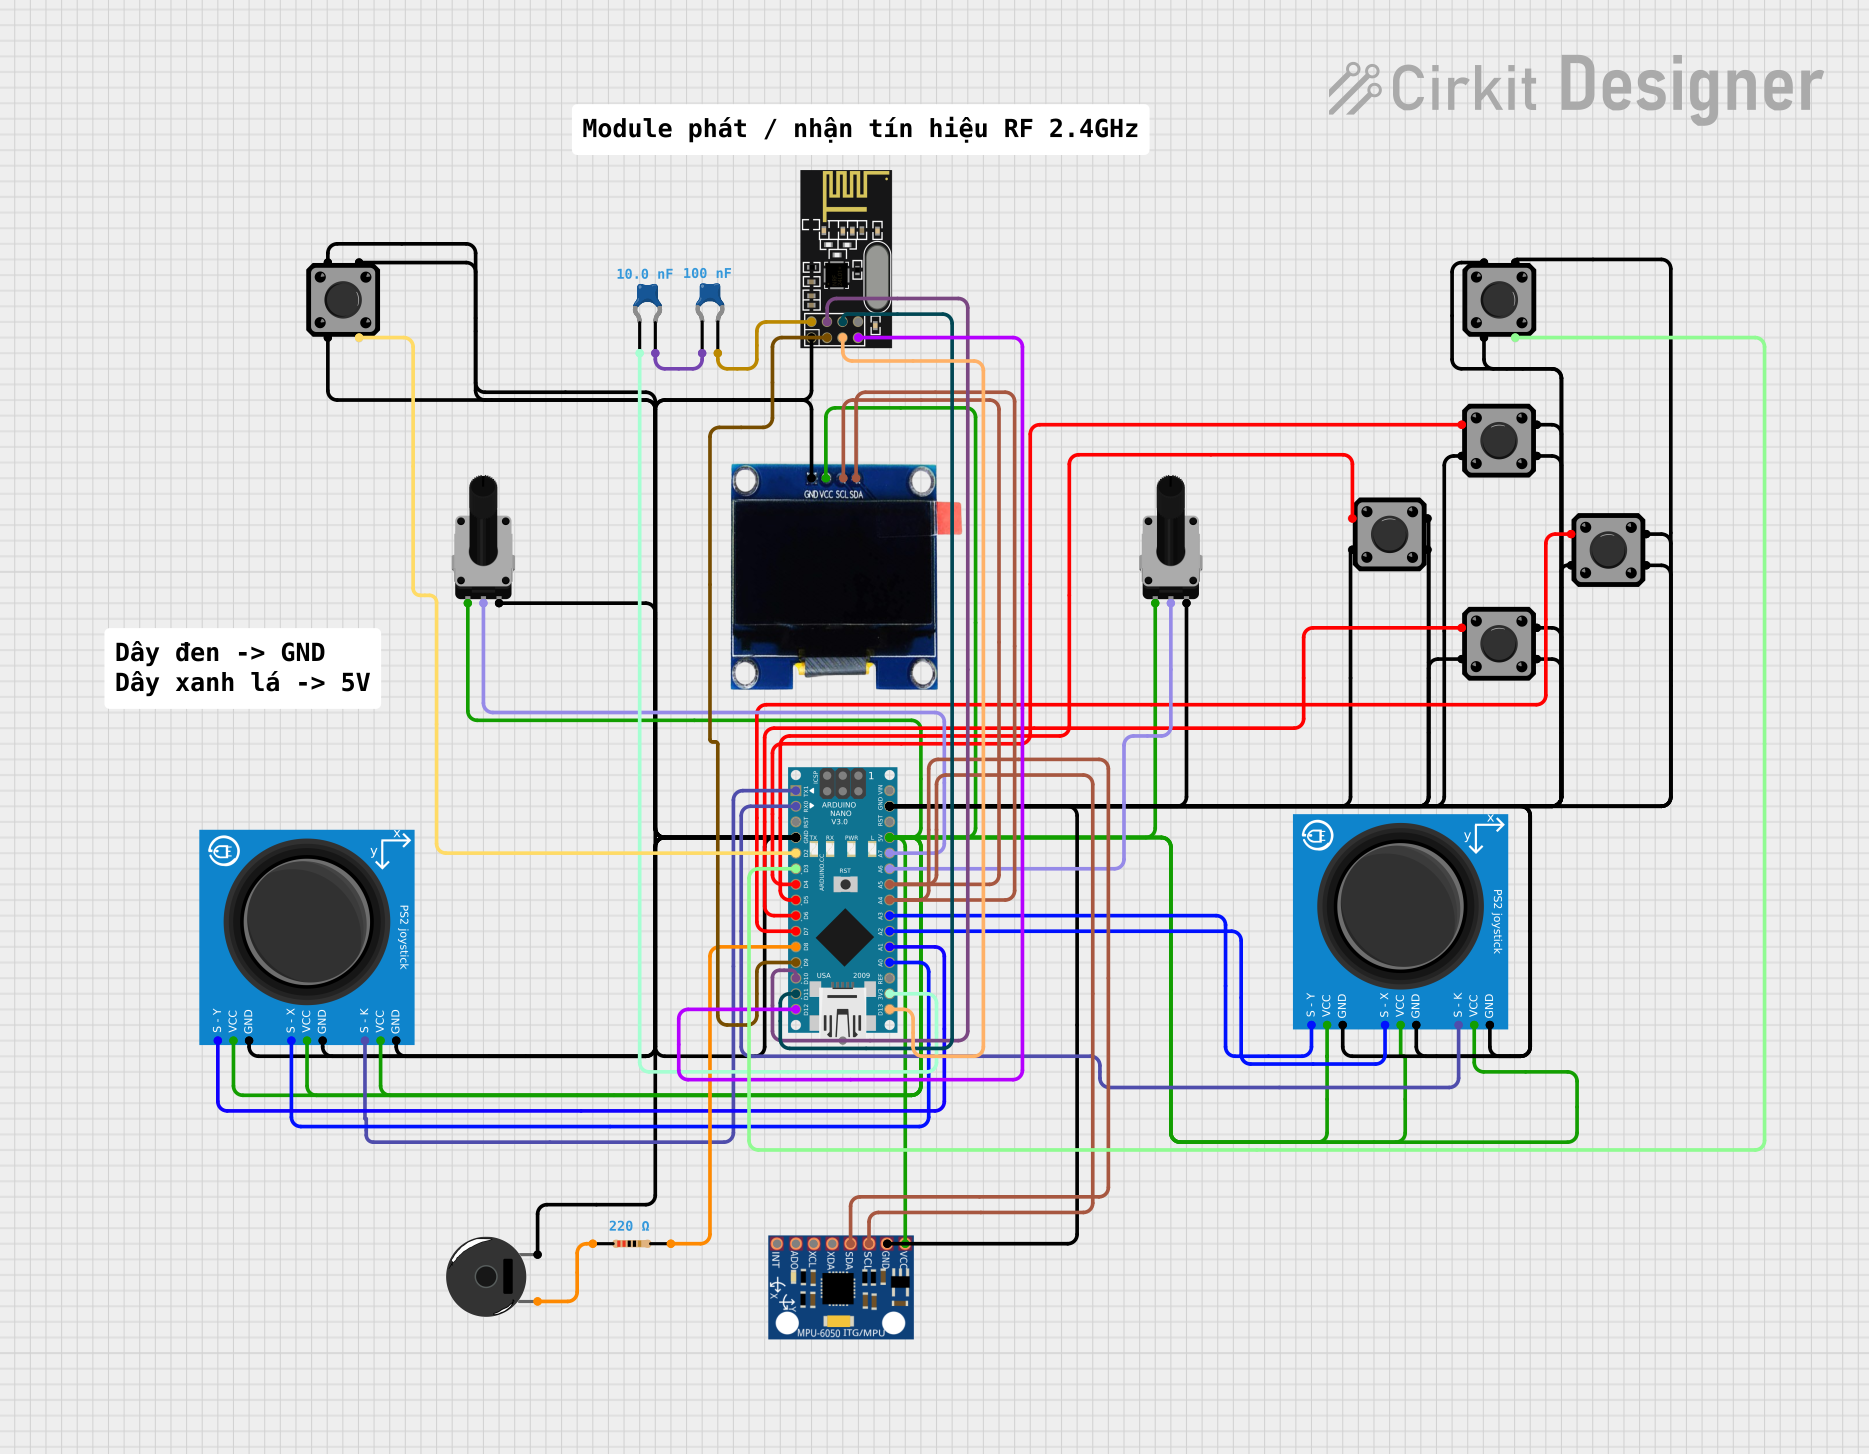
Explore Projects Built with TBS Crossfire Nano Pro
Common Applications and Use Cases
- Long-range FPV (First Person View) drone control
- Remote-controlled vehicles (cars, boats, planes)
- Applications requiring low-latency and high-reliability communication
- Compact builds where space and weight are limited
Technical Specifications
The TBS Crossfire Nano Pro is engineered for robust performance in demanding environments. Below are its key technical specifications:
| Parameter | Specification |
|---|---|
| Operating Voltage | 4.5V - 5.5V |
| Operating Current | 40mA - 120mA (depending on power mode) |
| Frequency Range | 868 MHz / 915 MHz (region-dependent) |
| Output Power | Up to 500mW |
| Latency | As low as 4ms |
| Dimensions | 18mm x 11mm x 2mm |
| Weight | 0.5g |
| Communication Protocol | CRSF (Crossfire Protocol) |
| Antenna Connector | u.FL |
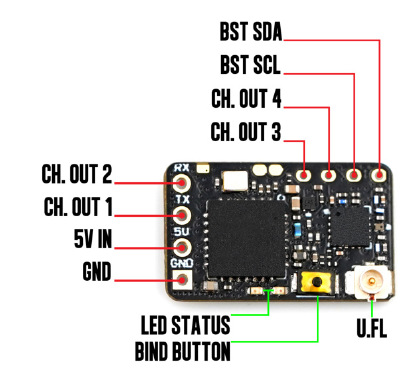
Pin Configuration and Descriptions
The TBS Crossfire Nano Pro features a 4-pin interface for easy integration. Below is the pinout:
| Pin | Name | Description |
|---|---|---|
| 1 | GND | Ground connection |
| 2 | 5V | Power input (4.5V - 5.5V) |
| 3 | CH1 (TX) | CRSF signal output (to flight controller RX pin) |
| 4 | CH2 (RX) | CRSF signal input (from flight controller TX pin) |
Usage Instructions
How to Use the TBS Crossfire Nano Pro in a Circuit
- Power Connection: Connect the
5Vpin to a regulated 5V power source and theGNDpin to the ground of your system. - Signal Connection:
- Connect the
CH1 (TX)pin to the RX pin of your flight controller or receiver. - Connect the
CH2 (RX)pin to the TX pin of your flight controller or receiver.
- Connect the
- Antenna Installation: Attach the included u.FL antenna securely to the antenna connector. Ensure the antenna is properly oriented for optimal signal strength.
- Binding: Follow the TBS Crossfire binding procedure to pair the Nano Pro with your transmitter module. This typically involves:
- Powering on the transmitter and receiver.
- Entering binding mode on the transmitter.
- Waiting for the receiver to automatically bind.
Important Considerations and Best Practices
- Antenna Placement: Ensure the antenna is mounted away from carbon fiber or metal components to avoid signal interference.
- Power Supply: Use a clean, regulated 5V power source to prevent noise or voltage drops that could affect performance.
- Firmware Updates: Regularly update the firmware of both the Nano Pro and your transmitter module using the TBS Agent X software to ensure compatibility and access to the latest features.
- Heat Management: Avoid prolonged operation at maximum output power (500mW) in confined spaces to prevent overheating.
Example: Connecting to an Arduino UNO
The TBS Crossfire Nano Pro can be connected to an Arduino UNO for testing or custom applications. Below is an example of how to read CRSF data using the Arduino:
#include <SoftwareSerial.h>

// Define the RX and TX pins for the Arduino
#define RX_PIN 10  // Arduino pin connected to CH1 (TX) of Nano Pro
#define TX_PIN 11  // Arduino pin connected to CH2 (RX) of Nano Pro

// Initialize SoftwareSerial for communication with the Nano Pro
SoftwareSerial crossfireSerial(RX_PIN, TX_PIN);

void setup() {
  // Start the serial communication with the Nano Pro
  crossfireSerial.begin(115200); // CRSF protocol baud rate
  Serial.begin(9600); // For debugging via the Arduino Serial Monitor

  Serial.println("TBS Crossfire Nano Pro Test Initialized");
}

void loop() {
  // Check if data is available from the Nano Pro
  if (crossfireSerial.available()) {
    // Read and print the incoming data
    char incomingData = crossfireSerial.read();
    Serial.print("Received: ");
    Serial.println(incomingData);
  }
}
Note: Ensure the Arduino is powered by a stable 5V source and that the Nano Pro is properly connected.
Troubleshooting and FAQs
Common Issues and Solutions
No Signal or Binding Issues:
- Ensure the transmitter and receiver are on the same frequency (868 MHz or 915 MHz).
- Verify that the antenna is securely connected and properly positioned.
- Check for firmware mismatches and update both the transmitter and receiver using TBS Agent X.
Intermittent Signal Loss:
- Inspect the antenna for damage or loose connections.
- Avoid mounting the antenna near carbon fiber or metal components.
- Reduce output power if operating in a high-interference environment.
Overheating:
- Ensure adequate airflow around the Nano Pro, especially when operating at high power levels.
- Avoid prolonged use at maximum output power in enclosed spaces.
No Communication with Flight Controller:
- Double-check the wiring between the Nano Pro and the flight controller (TX to RX, RX to TX).
- Verify that the flight controller is configured to use the CRSF protocol.
FAQs
Q: Can the TBS Crossfire Nano Pro be used with other radio systems?
A: The Nano Pro is designed specifically for the TBS Crossfire ecosystem and uses the CRSF protocol. It is not compatible with other radio systems.
Q: What is the maximum range of the Nano Pro?
A: The range depends on environmental conditions and output power. Under ideal conditions, it can achieve ranges of up to 50km.
Q: How do I update the firmware?
A: Use the TBS Agent X software to update the firmware. Connect the Nano Pro to your computer via a compatible transmitter module.
Q: Is the Nano Pro suitable for indoor use?
A: Yes, but ensure the output power is set to a lower level to avoid interference with other devices.
By following this documentation, users can effectively integrate and operate the TBS Crossfire Nano Pro in their projects.