How to Use RJ12 off-centre socket: Examples, Pinouts, and Specs

 Design with RJ12 off-centre socket in Cirkit Designer
Introduction
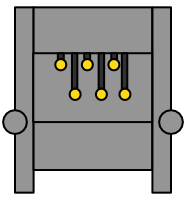
The RJ12 Off-Centre Socket is a modular connector designed for telephone and data communication systems. Manufactured by Lego Mindstorms (Part ID: RJ12), this socket features a 6-position, 6-contact (6P6C) configuration, making it ideal for applications requiring compact and reliable cable connections. Its off-centre design ensures proper alignment and secure connections, reducing the risk of miswiring.
Explore Projects Built with RJ12 off-centre socket

 Open Project in Cirkit Designer
 Open Project in Cirkit Designer
 Open Project in Cirkit Designer
 Open Project in Cirkit Designer
Explore Projects Built with RJ12 off-centre socket

 Open Project in Cirkit Designer
 Open Project in Cirkit Designer
 Open Project in Cirkit Designer
 Open Project in Cirkit Designer
Common Applications and Use Cases
- Telecommunication systems for voice and data transmission
- Robotics and automation systems (e.g., Lego Mindstorms kits)
- Networking and control systems
- Custom electronic projects requiring modular cable connections
Technical Specifications
Key Technical Details
| Parameter | Value |
|---|---|
| Manufacturer | Lego Mindstorms |
| Part ID | RJ12 |
| Connector Type | Modular (6P6C) |
| Number of Positions | 6 |
| Number of Contacts | 6 |
| Contact Plating | Gold or Nickel (varies by model) |
| Voltage Rating | Up to 150V |
| Current Rating | Up to 1.5A |
| Operating Temperature | -40°C to +85°C |
| Mounting Style | Through-hole or PCB mount |
Pin Configuration and Descriptions
The RJ12 socket has six pins, each corresponding to a specific signal or function. Below is the pinout configuration:
| Pin Number | Signal Name | Description |
|---|---|---|
| 1 | GND | Ground connection |
| 2 | VCC | Power supply (e.g., 5V or 3.3V) |
| 3 | DATA+ | Positive data line |
| 4 | DATA- | Negative data line |
| 5 | AUX1 | Auxiliary signal or custom use |
| 6 | AUX2 | Auxiliary signal or custom use |
Note: The exact pinout may vary depending on the application or device. Always refer to the specific wiring diagram for your project.
Usage Instructions
How to Use the RJ12 Off-Centre Socket in a Circuit
Mounting the Socket:
- If using a PCB, solder the socket's pins to the designated through-hole pads.
- For panel mounting, secure the socket using screws or clips as per the design.
Connecting Cables:
- Use an RJ12 cable with a 6P6C connector to interface with the socket.
- Ensure the cable is properly crimped and aligned to avoid connection issues.
Wiring:
- Match the pinout of the socket to the corresponding signals in your circuit.
- Use a multimeter to verify continuity and correct wiring before powering the circuit.
Testing:
- After connecting the socket, test the circuit to ensure proper communication or power delivery.
Important Considerations and Best Practices
- Cable Quality: Use high-quality RJ12 cables to ensure reliable connections and minimize signal loss.
- Alignment: Ensure the off-centre design is properly aligned during installation to avoid damage.
- Voltage and Current Limits: Do not exceed the specified voltage (150V) or current (1.5A) ratings.
- Environmental Conditions: Operate the socket within the specified temperature range (-40°C to +85°C).
Example: Connecting to an Arduino UNO
The RJ12 socket can be used to interface sensors or devices with an Arduino UNO. Below is an example of how to read data from an RJ12-connected sensor:
// Example: Reading data from an RJ12-connected sensor
// Pin 3 (DATA+) and Pin 4 (DATA-) are used for communication

#define DATA_PLUS_PIN 2  // Arduino digital pin connected to DATA+
#define DATA_MINUS_PIN 3 // Arduino digital pin connected to DATA-

void setup() {
  pinMode(DATA_PLUS_PIN, INPUT); // Set DATA+ as input
  pinMode(DATA_MINUS_PIN, INPUT); // Set DATA- as input
  Serial.begin(9600); // Initialize serial communication
}

void loop() {
  int dataPlus = digitalRead(DATA_PLUS_PIN); // Read DATA+ signal
  int dataMinus = digitalRead(DATA_MINUS_PIN); // Read DATA- signal

  // Print the received data to the Serial Monitor
  Serial.print("DATA+: ");
  Serial.print(dataPlus);
  Serial.print(" | DATA-: ");
  Serial.println(dataMinus);

  delay(500); // Wait for 500ms before the next read
}
Note: Modify the code as needed based on the specific sensor or device connected to the RJ12 socket.
Troubleshooting and FAQs
Common Issues and Solutions
Issue: No signal or data transmission.
- Solution: Check the cable for proper crimping and continuity. Verify the pinout and ensure correct wiring.
Issue: Loose or intermittent connection.
- Solution: Ensure the RJ12 cable is fully inserted into the socket. Inspect the socket for physical damage.
Issue: Overheating of the socket.
- Solution: Verify that the current and voltage do not exceed the specified ratings. Check for short circuits in the wiring.
Issue: Misalignment during installation.
- Solution: Align the off-centre design carefully before securing the socket. Use proper mounting hardware.
FAQs
Q1: Can the RJ12 socket be used for Ethernet connections?
A1: No, the RJ12 socket is not suitable for Ethernet as it uses a 6P6C configuration, while Ethernet typically requires an 8P8C (RJ45) connector.
Q2: Is the RJ12 socket compatible with Lego Mindstorms sensors?
A2: Yes, the RJ12 socket is commonly used in Lego Mindstorms kits for connecting sensors and motors.
Q3: Can I use the RJ12 socket for power delivery?
A3: Yes, but ensure the voltage and current do not exceed the specified ratings (150V, 1.5A).
Q4: How do I clean the socket if it gets dirty?
A4: Use a soft brush or compressed air to remove debris. Avoid using liquids that may damage the contacts.
This concludes the documentation for the RJ12 Off-Centre Socket. For further assistance, refer to the manufacturer's datasheet or contact technical support.