Cirkit Designer Logo
Cirkit Designer
Your all-in-one circuit design IDE
Home / 
Component Documentation

How to Use 8 OHM 20W SPEAKER: Examples, Pinouts, and Specs

Image of 8 OHM 20W SPEAKER
Cirkit Designer LogoDesign with 8 OHM 20W SPEAKER in Cirkit Designer

Introduction

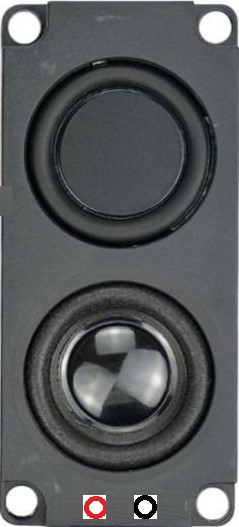
The 8 OHM 20W SPEAKER is an electroacoustic transducer designed to convert electrical signals into audible sound. With a resistance of 8 ohms and a power handling capacity of 20 watts, this speaker is suitable for a wide range of audio applications, from DIY projects to commercial audio systems.

Explore Projects Built with 8 OHM 20W SPEAKER

Use Cirkit Designer to design, explore, and prototype these projects online. Some projects support real-time simulation. Click "Open Project" to start designing instantly!
Bluetooth-Enabled Audio Amplifier System with Subwoofer and Cooling Fan
Image of 2.1 120w amplifier: A project utilizing 8 OHM 20W SPEAKER in a practical application
This circuit is a Bluetooth-enabled audio amplifier system with a subwoofer pre-amp and dual 8-ohm speakers. It includes a 12V power supply, a 7805 voltage regulator, and a cooling fan, with a toggle switch to control power. The Bluetooth module provides audio input to the amplifiers, which drive the speakers and subwoofer.
Cirkit Designer LogoOpen Project in Cirkit Designer
Battery-Powered Audio Jack with LED Indicator and Solar-Powered Loudspeaker
Image of lifi: A project utilizing 8 OHM 20W SPEAKER in a practical application
This circuit consists of a 9V battery powering an LED through a 220 Ohm resistor, and a solar cell driving a loudspeaker. Additionally, a 3.5mm audio jack is connected to the battery's negative terminal and serves as a ground reference for the LED.
Cirkit Designer LogoOpen Project in Cirkit Designer
Bluetooth Audio Receiver with Battery-Powered Amplifier and Loudspeakers
Image of speaker bluetooh portable: A project utilizing 8 OHM 20W SPEAKER in a practical application
This circuit is a Bluetooth-enabled audio system powered by a rechargeable 18650 Li-ion battery. It includes a TP4056 module for battery charging and protection, a PAM8403 amplifier with volume control to drive two loudspeakers, and a Bluetooth audio receiver to wirelessly receive audio signals.
Cirkit Designer LogoOpen Project in Cirkit Designer
Arduino UNO Controlled Soundwave Generator with IR Sensor Activation and Relay Switching
Image of Fish Attractor: A project utilizing 8 OHM 20W SPEAKER in a practical application
This circuit features an Arduino UNO microcontroller interfaced with a 4-channel relay, two IR sensors, a servo motor, an LCD I2C display, a PAM8403 audio amplifier connected to a speaker, and an XR2206 function generator with a resistor and capacitor for frequency shaping. The Arduino controls the relays based on a potentiometer input, displays frequency information on the LCD, and adjusts the servo position in response to the IR sensors. The XR2206 generates an adjustable frequency signal, while the PAM8403 amplifies audio for the speaker.
Cirkit Designer LogoOpen Project in Cirkit Designer

Explore Projects Built with 8 OHM 20W SPEAKER

Use Cirkit Designer to design, explore, and prototype these projects online. Some projects support real-time simulation. Click "Open Project" to start designing instantly!
Image of 2.1 120w amplifier: A project utilizing 8 OHM 20W SPEAKER in a practical application
Bluetooth-Enabled Audio Amplifier System with Subwoofer and Cooling Fan
This circuit is a Bluetooth-enabled audio amplifier system with a subwoofer pre-amp and dual 8-ohm speakers. It includes a 12V power supply, a 7805 voltage regulator, and a cooling fan, with a toggle switch to control power. The Bluetooth module provides audio input to the amplifiers, which drive the speakers and subwoofer.
Cirkit Designer LogoOpen Project in Cirkit Designer
Image of lifi: A project utilizing 8 OHM 20W SPEAKER in a practical application
Battery-Powered Audio Jack with LED Indicator and Solar-Powered Loudspeaker
This circuit consists of a 9V battery powering an LED through a 220 Ohm resistor, and a solar cell driving a loudspeaker. Additionally, a 3.5mm audio jack is connected to the battery's negative terminal and serves as a ground reference for the LED.
Cirkit Designer LogoOpen Project in Cirkit Designer
Image of speaker bluetooh portable: A project utilizing 8 OHM 20W SPEAKER in a practical application
Bluetooth Audio Receiver with Battery-Powered Amplifier and Loudspeakers
This circuit is a Bluetooth-enabled audio system powered by a rechargeable 18650 Li-ion battery. It includes a TP4056 module for battery charging and protection, a PAM8403 amplifier with volume control to drive two loudspeakers, and a Bluetooth audio receiver to wirelessly receive audio signals.
Cirkit Designer LogoOpen Project in Cirkit Designer
Image of Fish Attractor: A project utilizing 8 OHM 20W SPEAKER in a practical application
Arduino UNO Controlled Soundwave Generator with IR Sensor Activation and Relay Switching
This circuit features an Arduino UNO microcontroller interfaced with a 4-channel relay, two IR sensors, a servo motor, an LCD I2C display, a PAM8403 audio amplifier connected to a speaker, and an XR2206 function generator with a resistor and capacitor for frequency shaping. The Arduino controls the relays based on a potentiometer input, displays frequency information on the LCD, and adjusts the servo position in response to the IR sensors. The XR2206 generates an adjustable frequency signal, while the PAM8403 amplifies audio for the speaker.
Cirkit Designer LogoOpen Project in Cirkit Designer

Common Applications and Use Cases

  • Home audio systems
  • Public address systems
  • DIY audio projects
  • Educational electronics
  • Robotics with audio feedback

Technical Specifications

Key Technical Details

Parameter Specification
Nominal Impedance 8 ohms
Power Handling 20 watts
Frequency Response Typically 20 Hz to 20 kHz (varies by model)
Sensitivity Varies by model, typically around 88-92 dB
Magnet Material Ferrite or Neodymium (varies by model)

Pin Configuration and Descriptions

Pin Number Description
1 Positive Terminal
2 Negative Terminal

Usage Instructions

How to Use the Component in a Circuit

  1. Identify the Terminals: Locate the positive (+) and negative (-) terminals on the speaker.
  2. Connect to Amplifier: Connect the speaker's positive terminal to the amplifier's output positive terminal, and the speaker's negative terminal to the amplifier's output negative terminal.
  3. Power Rating: Ensure that the amplifier's output does not exceed the speaker's power handling capacity of 20 watts to avoid damage.
  4. Impedance Matching: Match the speaker's impedance with the amplifier's recommended load to ensure optimal performance and avoid damage to the amplifier.

Important Considerations and Best Practices

  • Avoid Overpowering: Do not exceed the speaker's power rating as it can cause permanent damage to the speaker.
  • Proper Mounting: Secure the speaker in an appropriate enclosure or mounting bracket to prevent vibrations and potential damage.
  • Ventilation: Ensure adequate ventilation around the speaker to dissipate heat generated during operation.
  • Cable Quality: Use good quality cables and connectors to minimize signal loss and interference.

Troubleshooting and FAQs

Common Issues Users Might Face

  • Distortion: If the sound is distorted, check if the speaker is being overpowered or if there is a loose connection.
  • No Sound: Verify connections, ensure the amplifier is powered on, and check if the speaker is damaged.
  • Low Volume: Ensure that the amplifier's volume is set correctly and that the speaker's sensitivity matches the application's requirements.

Solutions and Tips for Troubleshooting

  • Check Connections: Ensure all connections are secure and free of corrosion.
  • Test with Another Speaker: If possible, connect another speaker to the amplifier to determine if the issue is with the speaker or the amplifier.
  • Inspect for Damage: Look for visible signs of damage to the speaker cone or terminals.

FAQs

Q: Can I use this speaker with any amplifier? A: You can use this speaker with any amplifier that supports an 8-ohm load and does not exceed the speaker's 20-watt power rating.

Q: Do I need a crossover network for this speaker? A: It depends on your application. For full-range use, a crossover may not be necessary. For more complex systems, a crossover can help direct appropriate frequencies to the speaker.

Q: How can I improve the sound quality of the speaker? A: Using a proper enclosure designed for the speaker's characteristics can significantly improve sound quality. Also, ensure that the amplifier and source audio are of high quality.

Q: Is it possible to connect multiple speakers together? A: Yes, but you must understand how to correctly wire them in series or parallel to maintain an appropriate load for the amplifier.

Note: This documentation is for general guidance. For specific models, refer to the manufacturer's datasheet for exact specifications and recommendations.