Cirkit Designer Logo
Cirkit Designer
Your all-in-one circuit design IDE
Home / 
Component Documentation

How to Use MLX90640: Examples, Pinouts, and Specs

Image of MLX90640
Cirkit Designer LogoDesign with MLX90640 in Cirkit Designer

Introduction

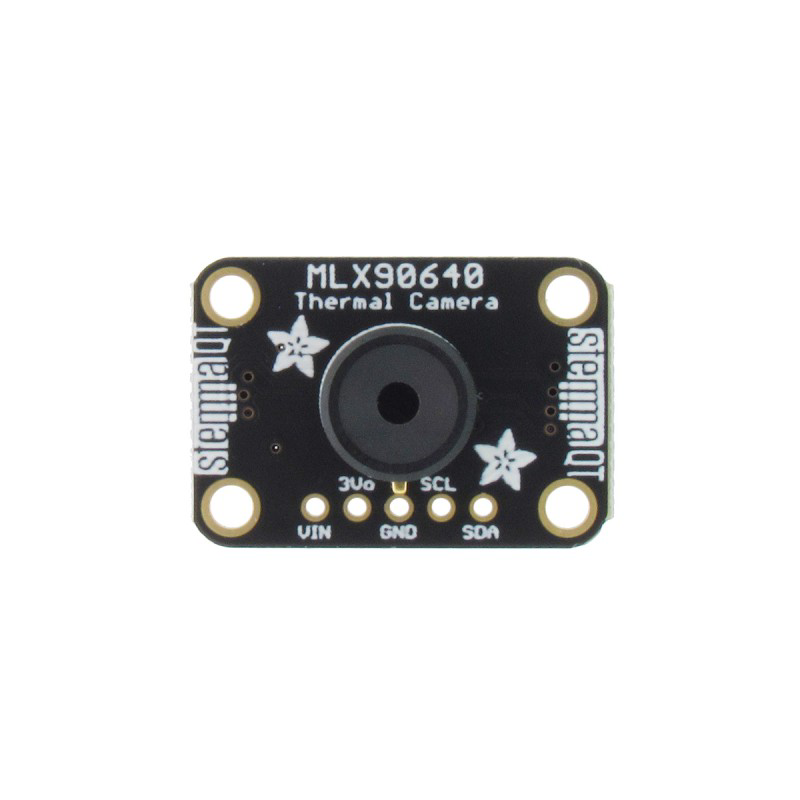
The MLX90640 is a 32x24 pixel thermal imaging sensor designed for non-contact temperature measurement. It operates in the infrared spectrum, allowing it to detect temperature variations across a surface or environment. With a wide temperature detection range of -40°C to 300°C, the MLX90640 is ideal for applications such as thermal monitoring, HVAC systems, robotics, and even human body temperature detection. Its compact size and high accuracy make it a versatile choice for both industrial and consumer applications.

Explore Projects Built with MLX90640

Use Cirkit Designer to design, explore, and prototype these projects online. Some projects support real-time simulation. Click "Open Project" to start designing instantly!
ESP32-Based Infrared Thermometer with I2C LCD Display
Image of infrared thermometer: A project utilizing MLX90640 in a practical application
This circuit features an ESP32 microcontroller powered by a 18650 Li-Ion battery, with a TP4056 module for charging the battery via a USB plug. The ESP32 reads temperature data from an MLX90614 infrared temperature sensor and displays it on an I2C LCD 16x2 screen. The ESP32, MLX90614 sensor, and LCD screen are connected via I2C communication lines (SCL, SDA), and the circuit is designed to measure and display ambient and object temperatures.
Cirkit Designer LogoOpen Project in Cirkit Designer
Battery-Powered Raspberry Pi Pico GPS Tracker with Sensor Integration
Image of Copy of CanSet v1: A project utilizing MLX90640 in a practical application
This circuit is a data acquisition and communication system powered by a LiPoly battery and managed by a Raspberry Pi Pico. It includes sensors (BMP280, MPU9250) for environmental data, a GPS module for location tracking, an SD card for data storage, and a WLR089-CanSAT for wireless communication. The TP4056 module handles battery charging, and a toggle switch controls power distribution.
Cirkit Designer LogoOpen Project in Cirkit Designer
Arduino Mega 2560-Based Autonomous Robot with GPS, Bluetooth, and Environmental Sensors
Image of botfinal: A project utilizing MLX90640 in a practical application
This circuit is a robotic system controlled by an Arduino Mega 2560, which uses multiple sensors including temperature sensors (MLX90614), gas sensors (MQ-136), a GPS module, and a Bluetooth module to navigate and detect environmental conditions. The system drives motors via an L298N motor driver and displays information on a 16x2 I2C LCD, with the ability to receive commands via Bluetooth.
Cirkit Designer LogoOpen Project in Cirkit Designer
Arduino Nano Based GPS Tracker with GSM Communication and Accelerometer
Image of Circuit Aayush: A project utilizing MLX90640 in a practical application
This circuit is designed for communication and location tracking purposes. It features an Arduino Nano interfaced with a SIM800L GSM module for cellular connectivity, a GPS NEO 6M module for obtaining geographical coordinates, and an AITrip ADXL335 GY-61 accelerometer for motion sensing. The LM2596 Step Down Module is used to regulate the power supply to the components.
Cirkit Designer LogoOpen Project in Cirkit Designer

Explore Projects Built with MLX90640

Use Cirkit Designer to design, explore, and prototype these projects online. Some projects support real-time simulation. Click "Open Project" to start designing instantly!
Image of infrared thermometer: A project utilizing MLX90640 in a practical application
ESP32-Based Infrared Thermometer with I2C LCD Display
This circuit features an ESP32 microcontroller powered by a 18650 Li-Ion battery, with a TP4056 module for charging the battery via a USB plug. The ESP32 reads temperature data from an MLX90614 infrared temperature sensor and displays it on an I2C LCD 16x2 screen. The ESP32, MLX90614 sensor, and LCD screen are connected via I2C communication lines (SCL, SDA), and the circuit is designed to measure and display ambient and object temperatures.
Cirkit Designer LogoOpen Project in Cirkit Designer
Image of Copy of CanSet v1: A project utilizing MLX90640 in a practical application
Battery-Powered Raspberry Pi Pico GPS Tracker with Sensor Integration
This circuit is a data acquisition and communication system powered by a LiPoly battery and managed by a Raspberry Pi Pico. It includes sensors (BMP280, MPU9250) for environmental data, a GPS module for location tracking, an SD card for data storage, and a WLR089-CanSAT for wireless communication. The TP4056 module handles battery charging, and a toggle switch controls power distribution.
Cirkit Designer LogoOpen Project in Cirkit Designer
Image of botfinal: A project utilizing MLX90640 in a practical application
Arduino Mega 2560-Based Autonomous Robot with GPS, Bluetooth, and Environmental Sensors
This circuit is a robotic system controlled by an Arduino Mega 2560, which uses multiple sensors including temperature sensors (MLX90614), gas sensors (MQ-136), a GPS module, and a Bluetooth module to navigate and detect environmental conditions. The system drives motors via an L298N motor driver and displays information on a 16x2 I2C LCD, with the ability to receive commands via Bluetooth.
Cirkit Designer LogoOpen Project in Cirkit Designer
Image of Circuit Aayush: A project utilizing MLX90640 in a practical application
Arduino Nano Based GPS Tracker with GSM Communication and Accelerometer
This circuit is designed for communication and location tracking purposes. It features an Arduino Nano interfaced with a SIM800L GSM module for cellular connectivity, a GPS NEO 6M module for obtaining geographical coordinates, and an AITrip ADXL335 GY-61 accelerometer for motion sensing. The LM2596 Step Down Module is used to regulate the power supply to the components.
Cirkit Designer LogoOpen Project in Cirkit Designer

Technical Specifications

  • Resolution: 32x24 pixels
  • Temperature Range: -40°C to 300°C
  • Field of View (FoV): Available in 55°x35° or 110°x75° models
  • Accuracy: ±1°C (typical, for ambient temperatures of 0°C to 50°C)
  • Interface: I²C (Inter-Integrated Circuit)
  • Supply Voltage: 3.3V to 3.6V
  • Current Consumption: ~23mA (typical)
  • Refresh Rate: Configurable, 0.5Hz to 64Hz
  • Operating Temperature: -40°C to 85°C
  • Dimensions: 11mm x 12mm x 5.5mm (approx.)

Pin Configuration and Descriptions

The MLX90640 typically comes in a breakout board format. Below is the pin configuration:

Pin Name Description
VDD Power supply input (3.3V to 3.6V)
GND Ground connection
SDA I²C data line for communication
SCL I²C clock line for communication
INT Interrupt pin (optional, used for advanced configurations)
ADDR I²C address selection pin (used to set the device's I²C address)

Usage Instructions

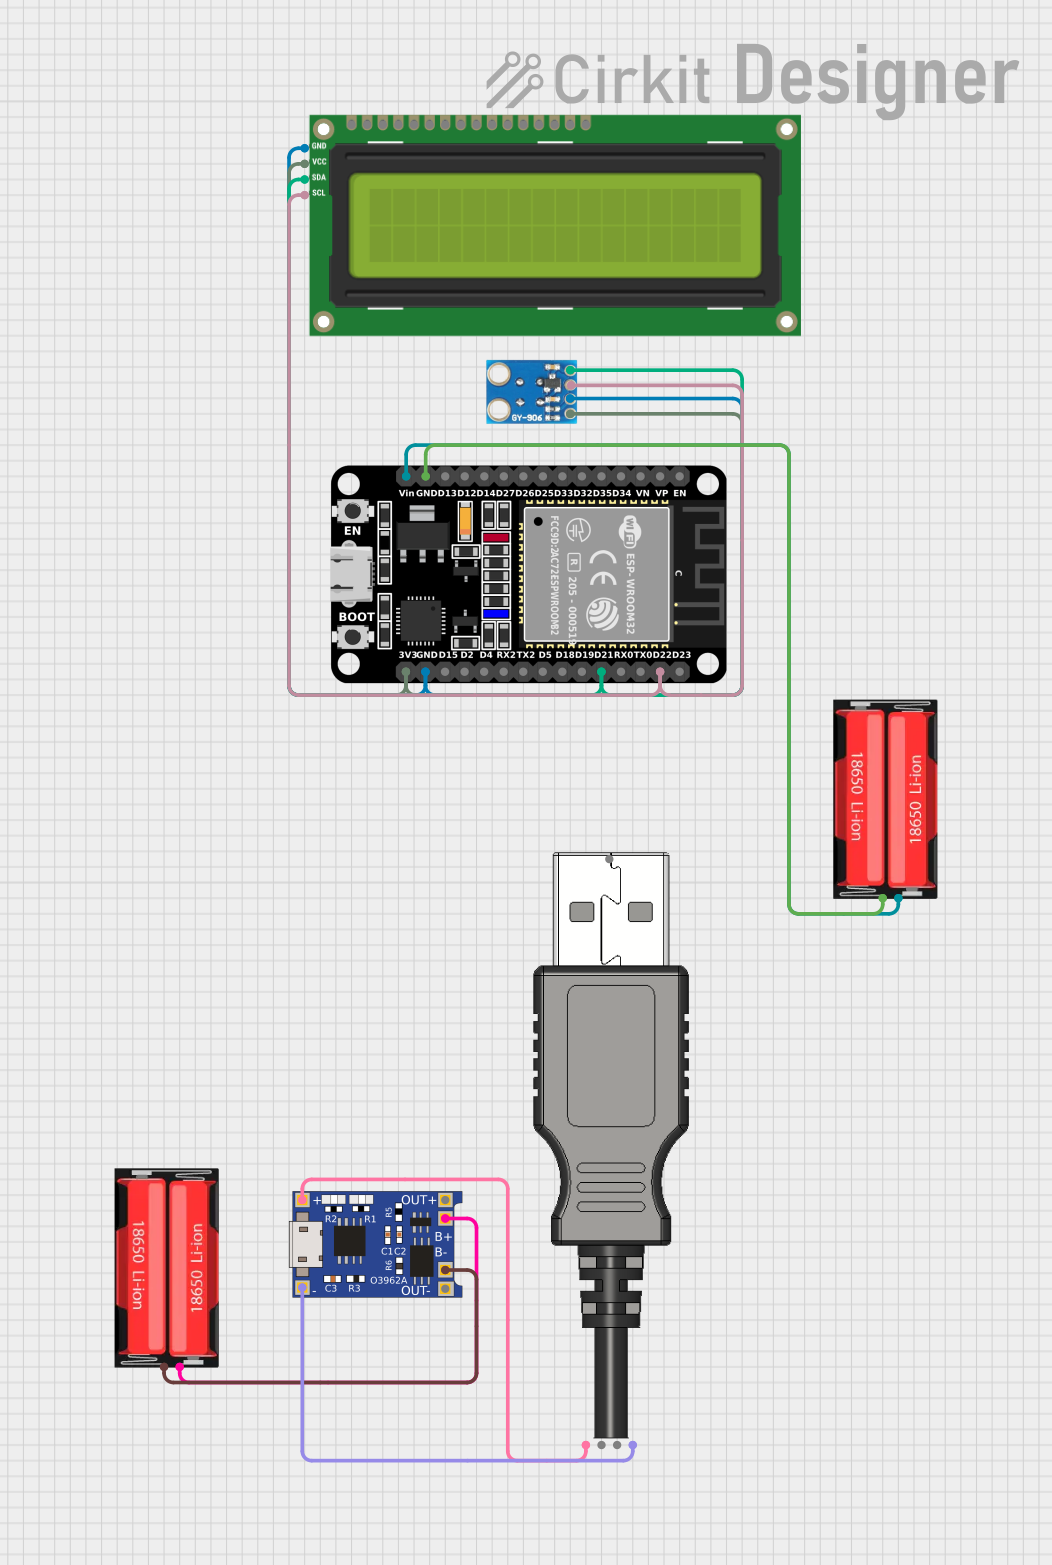
How to Use the MLX90640 in a Circuit

  1. Power Supply: Connect the VDD pin to a 3.3V power source and the GND pin to ground.
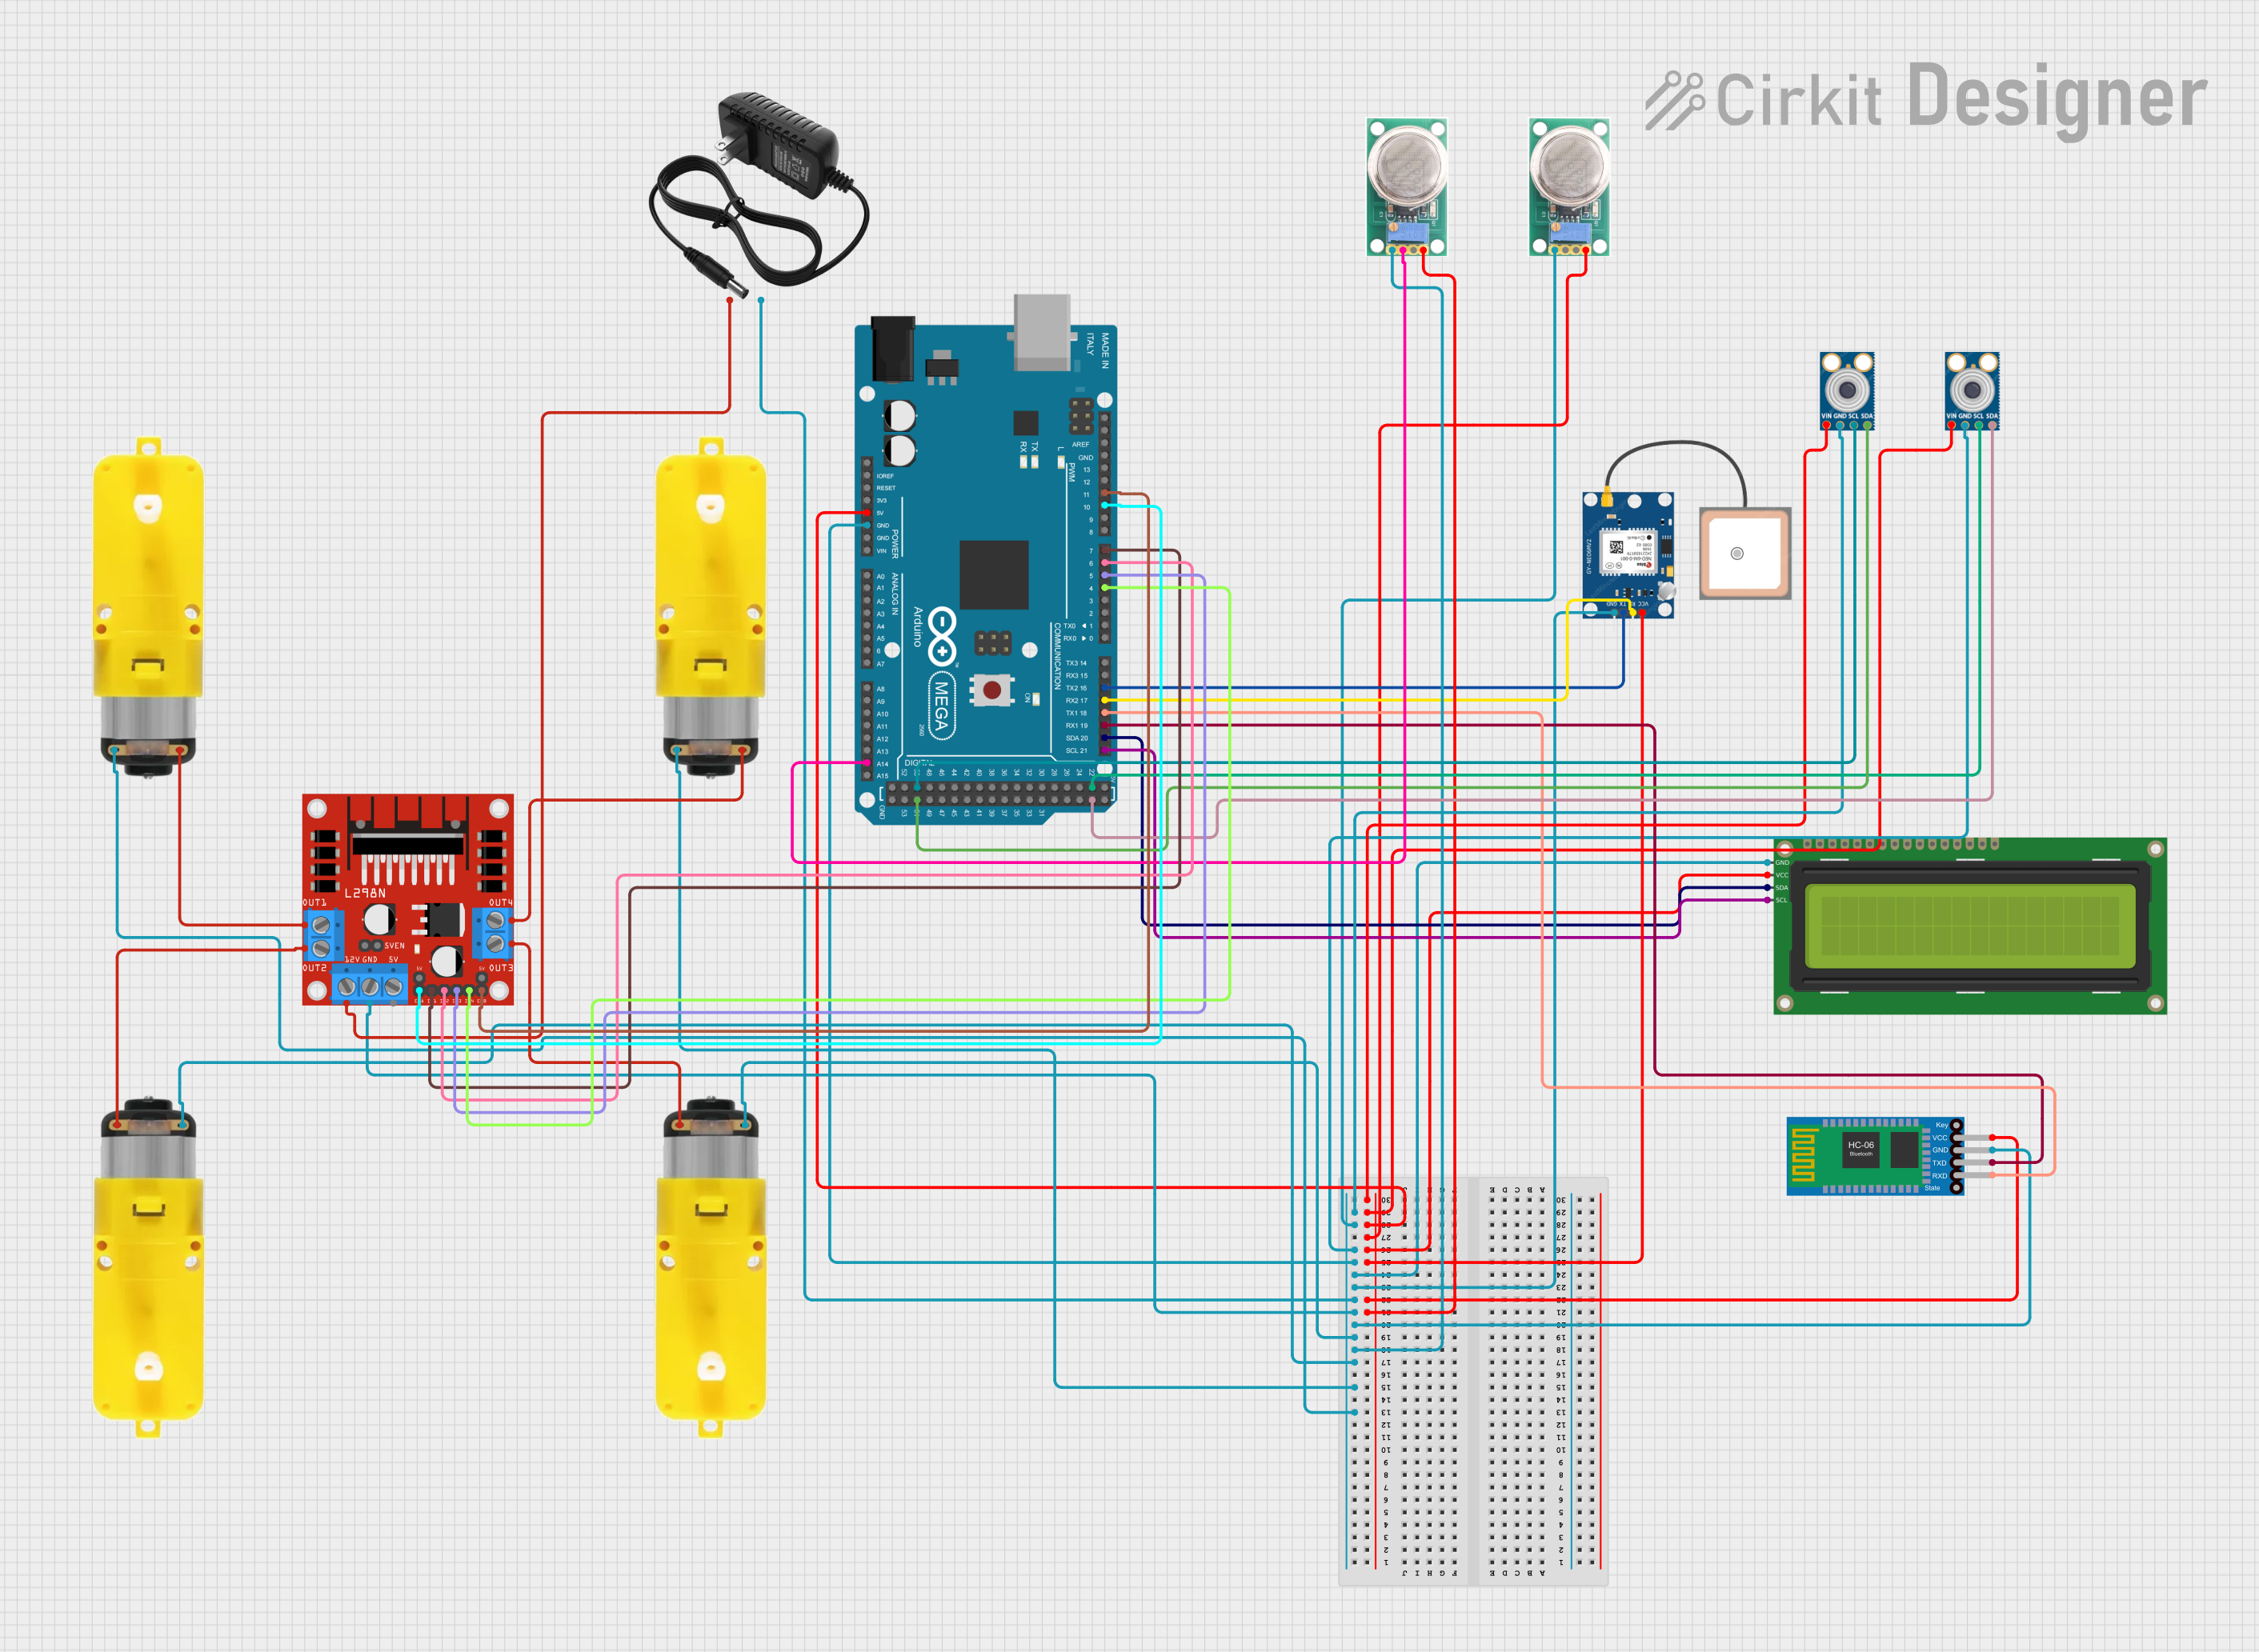
  2. I²C Communication: Connect the SDA and SCL pins to the corresponding I²C pins on your microcontroller (e.g., Arduino UNO).
  3. Pull-Up Resistors: Ensure that the SDA and SCL lines have pull-up resistors (typically 4.7kΩ) to maintain proper I²C communication.
  4. I²C Address: Use the ADDR pin to set the I²C address if multiple MLX90640 sensors are used on the same bus.
  5. Interrupt Pin: The INT pin is optional and can be used for advanced configurations, such as triggering specific events.

Important Considerations and Best Practices

  • Thermal Isolation: Avoid placing the sensor near heat sources or reflective surfaces to prevent inaccurate readings.
  • Refresh Rate: Choose an appropriate refresh rate based on your application. Higher refresh rates consume more power.
  • Calibration: The MLX90640 is factory-calibrated, but additional calibration may be required for specific use cases.
  • I²C Pull-Up Resistors: Ensure proper pull-up resistors are in place for reliable I²C communication.
  • Field of View: Select the appropriate FoV model (55°x35° or 110°x75°) based on the area you want to monitor.

Example: Using MLX90640 with Arduino UNO

Below is an example of how to interface the MLX90640 with an Arduino UNO:

#include <Wire.h>
#include <Adafruit_MLX90640.h>

// Create an MLX90640 object
Adafruit_MLX90640 mlx;

// Define the refresh rate (e.g., 8Hz)
#define REFRESH_RATE MLX90640_REFRESH_8_HZ

// Create a buffer to store temperature data
float frame[32 * 24];

void setup() {
  Serial.begin(115200);
  Wire.begin();

  // Initialize the MLX90640 sensor
  if (!mlx.begin()) {
    Serial.println("Failed to find MLX90640 sensor. Check connections!");
    while (1);
  }

  // Set the refresh rate
  mlx.setMode(REFRESH_RATE);
  Serial.println("MLX90640 initialized successfully!");
}

void loop() {
  // Read temperature data into the frame buffer
  if (mlx.getFrame(frame)) {
    Serial.println("Temperature data:");
    for (int i = 0; i < 32 * 24; i++) {
      Serial.print(frame[i]);
      Serial.print(" ");
      if ((i + 1) % 32 == 0) {
        Serial.println(); // Print a new line after every 32 values
      }
    }
    delay(1000); // Delay to match the refresh rate
  } else {
    Serial.println("Failed to read frame data!");
  }
}

Notes:

  • Install the Adafruit MLX90640 library in the Arduino IDE before running the code.
  • Ensure the I²C pull-up resistors are properly connected for stable communication.

Troubleshooting and FAQs

Common Issues

  1. Sensor Not Detected:

    • Cause: Incorrect wiring or I²C address mismatch.
    • Solution: Double-check the connections and ensure the correct I²C address is used.
  2. Inaccurate Temperature Readings:

    • Cause: Sensor exposed to heat sources or reflective surfaces.
    • Solution: Isolate the sensor from direct heat sources and avoid reflective surfaces.
  3. I²C Communication Errors:

    • Cause: Missing or incorrect pull-up resistors on SDA/SCL lines.
    • Solution: Add 4.7kΩ pull-up resistors to the SDA and SCL lines.
  4. Slow Refresh Rate:

    • Cause: Refresh rate set too low.
    • Solution: Increase the refresh rate in the code, but be mindful of power consumption.

FAQs

  1. Can the MLX90640 detect human body temperature?

    • Yes, the MLX90640 can detect human body temperature, but ensure proper calibration for accurate results.
  2. What is the maximum distance for accurate temperature measurement?

    • The effective distance depends on the Field of View (FoV) and the size of the object. For small objects, closer distances yield better accuracy.
  3. Can I use multiple MLX90640 sensors on the same I²C bus?

    • Yes, you can use multiple sensors by configuring different I²C addresses using the ADDR pin.
  4. Is the MLX90640 suitable for outdoor use?

    • The sensor can operate in outdoor environments, but it should be protected from direct sunlight, rain, and extreme conditions for reliable performance.