Cirkit Designer Logo
Cirkit Designer
Your all-in-one circuit design IDE
Home / 
Component Documentation

How to Use tfmini-s: Examples, Pinouts, and Specs

Image of tfmini-s
Cirkit Designer LogoDesign with tfmini-s in Cirkit Designer

Introduction

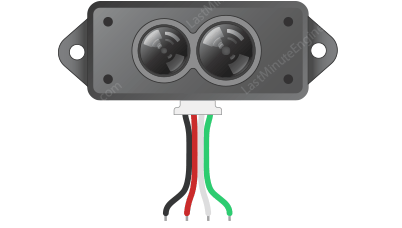
The TFmini-S is a compact, high-precision LiDAR distance sensor designed for accurate distance measurements in a variety of applications. With a measurement range of up to 12 meters and a small form factor, the TFmini-S is ideal for robotics, drones, and other embedded systems requiring reliable distance sensing. Its simple serial interface ensures easy integration into projects, making it a versatile choice for both hobbyists and professionals.

Explore Projects Built with tfmini-s

Use Cirkit Designer to design, explore, and prototype these projects online. Some projects support real-time simulation. Click "Open Project" to start designing instantly!
Beelink Mini S12 N95 and Arduino UNO Based Fingerprint Authentication System with ESP32 CAM
Image of design 3: A project utilizing tfmini-s in a practical application
This circuit features a Beelink MINI S12 N95 computer connected to a 7-inch display via HDMI for video output and two USB connections for power and touch screen functionality. An Arduino UNO is interfaced with a fingerprint scanner for biometric input. The Beelink MINI S12 N95 is powered by a PC power supply, which in turn is connected to a 240V power source. Additionally, an ESP32 CAM module is powered and programmed via a USB plug and an FTDI programmer, respectively, for wireless camera capabilities.
Cirkit Designer LogoOpen Project in Cirkit Designer
ATmega328P-Based Sensor Hub with OLED Display and LIDAR
Image of TILTPCB: A project utilizing tfmini-s in a practical application
This circuit features an Mtiny Uno ATmega328P microcontroller as its central processing unit, interfacing with a variety of sensors and peripherals. It includes a 0.96" OLED display and an MPU6050 accelerometer/gyroscope for user interface and motion sensing, respectively. The circuit also integrates a TF LUNA LIDAR for distance measurement, a DHT11 sensor for temperature and humidity readings, and uses a 9V battery with a 7805 voltage regulator for power management. Communication with a computer for programming and data exchange is facilitated by an Adafruit FTDI Friend module.
Cirkit Designer LogoOpen Project in Cirkit Designer
Arduino Pro Mini Fingerprint Access Control System with MAX3232
Image of R503 with arduino pro mini: A project utilizing tfmini-s in a practical application
This circuit integrates an Arduino Pro Mini with an R503 fingerprint sensor and a MAX 3232 module for serial communication. The Arduino controls the fingerprint sensor and communicates with external devices via the MAX 3232 module, enabling secure biometric authentication.
Cirkit Designer LogoOpen Project in Cirkit Designer
Arduino UNO and DFPlayer Mini-Based Smart Glove with LCD Display and Flex Sensors
Image of smart gloves: A project utilizing tfmini-s in a practical application
This circuit is a smart glove system that uses flex sensors to detect finger movements and trigger corresponding audio messages via a DFPlayer Mini module. An Arduino UNO reads the sensor values, displays messages on an LCD screen, and plays audio tracks through a connected speaker based on the detected gestures.
Cirkit Designer LogoOpen Project in Cirkit Designer

Explore Projects Built with tfmini-s

Use Cirkit Designer to design, explore, and prototype these projects online. Some projects support real-time simulation. Click "Open Project" to start designing instantly!
Image of design 3: A project utilizing tfmini-s in a practical application
Beelink Mini S12 N95 and Arduino UNO Based Fingerprint Authentication System with ESP32 CAM
This circuit features a Beelink MINI S12 N95 computer connected to a 7-inch display via HDMI for video output and two USB connections for power and touch screen functionality. An Arduino UNO is interfaced with a fingerprint scanner for biometric input. The Beelink MINI S12 N95 is powered by a PC power supply, which in turn is connected to a 240V power source. Additionally, an ESP32 CAM module is powered and programmed via a USB plug and an FTDI programmer, respectively, for wireless camera capabilities.
Cirkit Designer LogoOpen Project in Cirkit Designer
Image of TILTPCB: A project utilizing tfmini-s in a practical application
ATmega328P-Based Sensor Hub with OLED Display and LIDAR
This circuit features an Mtiny Uno ATmega328P microcontroller as its central processing unit, interfacing with a variety of sensors and peripherals. It includes a 0.96" OLED display and an MPU6050 accelerometer/gyroscope for user interface and motion sensing, respectively. The circuit also integrates a TF LUNA LIDAR for distance measurement, a DHT11 sensor for temperature and humidity readings, and uses a 9V battery with a 7805 voltage regulator for power management. Communication with a computer for programming and data exchange is facilitated by an Adafruit FTDI Friend module.
Cirkit Designer LogoOpen Project in Cirkit Designer
Image of R503 with arduino pro mini: A project utilizing tfmini-s in a practical application
Arduino Pro Mini Fingerprint Access Control System with MAX3232
This circuit integrates an Arduino Pro Mini with an R503 fingerprint sensor and a MAX 3232 module for serial communication. The Arduino controls the fingerprint sensor and communicates with external devices via the MAX 3232 module, enabling secure biometric authentication.
Cirkit Designer LogoOpen Project in Cirkit Designer
Image of smart gloves: A project utilizing tfmini-s in a practical application
Arduino UNO and DFPlayer Mini-Based Smart Glove with LCD Display and Flex Sensors
This circuit is a smart glove system that uses flex sensors to detect finger movements and trigger corresponding audio messages via a DFPlayer Mini module. An Arduino UNO reads the sensor values, displays messages on an LCD screen, and plays audio tracks through a connected speaker based on the detected gestures.
Cirkit Designer LogoOpen Project in Cirkit Designer

Common Applications

  • Obstacle detection in robotics
  • Altitude measurement for drones
  • Distance sensing in industrial automation
  • Smart home devices and security systems
  • Educational and research projects

Technical Specifications

The TFmini-S offers robust performance in a compact package. Below are its key technical details:

Parameter Specification
Measurement Range 0.1 m to 12 m
Accuracy ±6 cm (0.1–6 m), ±1% (>6 m)
Resolution 1 cm
Operating Voltage 5 V DC
Average Current ≤120 mA
Communication Interface UART (default) / I2C (configurable)
Operating Temperature -20°C to 60°C
Frame Rate 1 Hz to 1000 Hz (adjustable)
Dimensions 42 mm × 15 mm × 16 mm
Weight 5 g

Pin Configuration

The TFmini-S has a 4-pin interface for power and communication. The pinout is as follows:

Pin Name Description
1 VCC Power supply (5 V DC)
2 GND Ground
3 TX UART Transmit (data output)
4 RX UART Receive (data input)

Usage Instructions

Connecting the TFmini-S to an Arduino UNO

To use the TFmini-S with an Arduino UNO, follow these steps:

  1. Wiring:

    • Connect the VCC pin of the TFmini-S to the 5V pin on the Arduino.
    • Connect the GND pin of the TFmini-S to the GND pin on the Arduino.
    • Connect the TX pin of the TFmini-S to the Arduino's D2 pin (for software serial).
    • Connect the RX pin of the TFmini-S to the Arduino's D3 pin (for software serial).
  2. Install Required Libraries:

    • Install the SoftwareSerial library (pre-installed with the Arduino IDE).
  3. Arduino Code: Use the following example code to read distance data from the TFmini-S:

    #include <SoftwareSerial.h>
    
    // Define software serial pins for TFmini-S
    SoftwareSerial tfminiSerial(2, 3); // RX, TX
    
    void setup() {
      Serial.begin(9600); // Initialize serial monitor
      tfminiSerial.begin(115200); // Initialize TFmini-S serial communication
      Serial.println("TFmini-S Distance Sensor Initialized");
    }
    
    void loop() {
      if (tfminiSerial.available()) {
        uint8_t data[9];
        if (tfminiSerial.read() == 0x59) { // Check for frame header
          if (tfminiSerial.read() == 0x59) { // Check for second frame header
            for (int i = 0; i < 7; i++) {
              data[i] = tfminiSerial.read(); // Read remaining data bytes
            }
            uint16_t distance = data[0] + (data[1] << 8); // Calculate distance
            uint16_t strength = data[2] + (data[3] << 8); // Signal strength
            Serial.print("Distance: ");
            Serial.print(distance);
            Serial.print(" cm, Strength: ");
            Serial.println(strength);
          }
        }
      }
    }
    

Important Considerations

  • Power Supply: Ensure a stable 5V power supply to avoid measurement errors.
  • Baud Rate: The default UART baud rate is 115200. Ensure your microcontroller matches this setting.
  • Signal Strength: Low signal strength may indicate poor reflectivity of the target or excessive ambient light.

Troubleshooting and FAQs

Common Issues

  1. No Data Output:

    • Cause: Incorrect wiring or baud rate mismatch.
    • Solution: Double-check the wiring and ensure the Arduino's baud rate matches the TFmini-S.
  2. Inaccurate Measurements:

    • Cause: Target surface is too reflective or not reflective enough.
    • Solution: Use a target with moderate reflectivity and avoid direct sunlight.
  3. Intermittent Data:

    • Cause: Unstable power supply.
    • Solution: Use a regulated 5V power source.

FAQs

  1. Can the TFmini-S be used outdoors?

    • Yes, but performance may be affected by direct sunlight or extreme temperatures.
  2. How do I switch between UART and I2C modes?

    • The TFmini-S supports mode switching via specific commands. Refer to the manufacturer's datasheet for details.
  3. What is the maximum frame rate?

    • The TFmini-S supports frame rates up to 1000 Hz, configurable via commands.

By following this documentation, you can effectively integrate the TFmini-S into your projects and troubleshoot common issues.