Cirkit Designer Logo
Cirkit Designer
Your all-in-one circuit design IDE
Home / 
Component Documentation

How to Use Reciver wireless power coil: Examples, Pinouts, and Specs

Image of Reciver wireless power coil
Cirkit Designer LogoDesign with Reciver wireless power coil in Cirkit Designer

Introduction

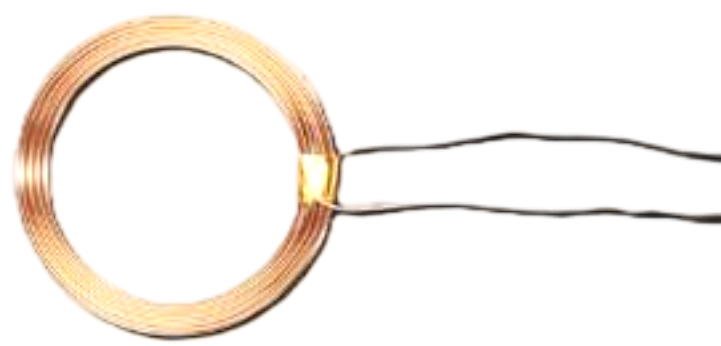
The Receiver Wireless Power Coil is a specialized electronic component designed to receive electromagnetic energy wirelessly and convert it into electrical energy. This component is commonly used in wireless power transfer systems, enabling the charging or powering of devices without the need for physical connectors. It is an essential part of modern wireless charging solutions for smartphones, wearable devices, medical implants, and other portable electronics.

Explore Projects Built with Reciver wireless power coil

Use Cirkit Designer to design, explore, and prototype these projects online. Some projects support real-time simulation. Click "Open Project" to start designing instantly!
Arduino-Based Wireless Power Transmission System with Copper Coils
Image of nagesh: A project utilizing Reciver wireless power coil in a practical application
This circuit consists of multiple copper coils connected to transmitters and a receiver, likely forming a wireless power transfer or communication system. The transmitters are connected to individual coils, and the receiver is connected to another coil, facilitating the transmission and reception of signals or power wirelessly.
Cirkit Designer LogoOpen Project in Cirkit Designer
ESP8266-Controlled Wireless EV Charging System with RFID Authentication
Image of Minor Project: A project utilizing Reciver wireless power coil in a practical application
This circuit appears to be a wireless charging system with RFID access control, powered by an AC supply that is rectified and regulated. It includes an ESP8266 microcontroller for managing the charging process and displaying status information on an OLED display. The RFID-RC522 module is used to authorize the charging process, and a MOSFET is likely used to control the power to the charging coil.
Cirkit Designer LogoOpen Project in Cirkit Designer
Arduino Nano Controlled RF Receiver with SD Logging and Audio Output
Image of Teacher Helping: A project utilizing Reciver wireless power coil in a practical application
This is a wireless audio playback system featuring an Arduino Nano interfaced with an RF receiver for signal acquisition, an SD card module for audio data storage, and a PAM8403 amplifier to drive stereo loudspeakers. The system is powered by a 18650 Li-Ion battery with a 7805 regulator for voltage stabilization, and a rocker switch for power control.
Cirkit Designer LogoOpen Project in Cirkit Designer
Battery-Powered nRF52840 and HT-RA62 Communication Module
Image of NRF52840+HT-RA62: A project utilizing Reciver wireless power coil in a practical application
This circuit is a wireless communication system powered by a 18650 Li-ion battery, featuring an nRF52840 ProMicro microcontroller and an HT-RA62 transceiver module. The nRF52840 handles the control logic and interfaces with the HT-RA62 for data transmission, while the battery provides the necessary power for the entire setup.
Cirkit Designer LogoOpen Project in Cirkit Designer

Explore Projects Built with Reciver wireless power coil

Use Cirkit Designer to design, explore, and prototype these projects online. Some projects support real-time simulation. Click "Open Project" to start designing instantly!
Image of nagesh: A project utilizing Reciver wireless power coil in a practical application
Arduino-Based Wireless Power Transmission System with Copper Coils
This circuit consists of multiple copper coils connected to transmitters and a receiver, likely forming a wireless power transfer or communication system. The transmitters are connected to individual coils, and the receiver is connected to another coil, facilitating the transmission and reception of signals or power wirelessly.
Cirkit Designer LogoOpen Project in Cirkit Designer
Image of Minor Project: A project utilizing Reciver wireless power coil in a practical application
ESP8266-Controlled Wireless EV Charging System with RFID Authentication
This circuit appears to be a wireless charging system with RFID access control, powered by an AC supply that is rectified and regulated. It includes an ESP8266 microcontroller for managing the charging process and displaying status information on an OLED display. The RFID-RC522 module is used to authorize the charging process, and a MOSFET is likely used to control the power to the charging coil.
Cirkit Designer LogoOpen Project in Cirkit Designer
Image of Teacher Helping: A project utilizing Reciver wireless power coil in a practical application
Arduino Nano Controlled RF Receiver with SD Logging and Audio Output
This is a wireless audio playback system featuring an Arduino Nano interfaced with an RF receiver for signal acquisition, an SD card module for audio data storage, and a PAM8403 amplifier to drive stereo loudspeakers. The system is powered by a 18650 Li-Ion battery with a 7805 regulator for voltage stabilization, and a rocker switch for power control.
Cirkit Designer LogoOpen Project in Cirkit Designer
Image of NRF52840+HT-RA62: A project utilizing Reciver wireless power coil in a practical application
Battery-Powered nRF52840 and HT-RA62 Communication Module
This circuit is a wireless communication system powered by a 18650 Li-ion battery, featuring an nRF52840 ProMicro microcontroller and an HT-RA62 transceiver module. The nRF52840 handles the control logic and interfaces with the HT-RA62 for data transmission, while the battery provides the necessary power for the entire setup.
Cirkit Designer LogoOpen Project in Cirkit Designer

Common Applications and Use Cases

  • Wireless charging pads for smartphones and tablets
  • Wearable devices such as smartwatches and fitness trackers
  • Medical devices like pacemakers and hearing aids
  • Industrial applications for contactless power transfer
  • Internet of Things (IoT) devices requiring wireless power

Technical Specifications

The Receiver Wireless Power Coil is designed to operate efficiently in wireless power transfer systems. Below are its key technical specifications:

Parameter Value
Operating Frequency 100 kHz to 300 kHz
Input Voltage (Induced) 5V to 20V (depending on system)
Output Voltage 5V (regulated, typical)
Output Current Up to 2A
Efficiency Up to 85% (depending on alignment)
Coil Inductance 10 µH to 50 µH
Dimensions Varies (e.g., 30mm diameter)
Operating Temperature -20°C to +85°C

Pin Configuration and Descriptions

The Receiver Wireless Power Coil typically has two output pins for electrical connections:

Pin Name Description
1 VOUT (+) Positive output voltage terminal
2 GND (-) Ground terminal for the output voltage

Usage Instructions

How to Use the Component in a Circuit

  1. Placement and Alignment: Place the Receiver Wireless Power Coil in close proximity to the transmitter coil. Ensure proper alignment for maximum power transfer efficiency.
  2. Connection: Connect the VOUT pin to the input of your device or a voltage regulator circuit. Connect the GND pin to the ground of your circuit.
  3. Load Matching: Ensure the load connected to the coil matches the power output specifications to avoid overloading or inefficiency.
  4. Testing: Use a multimeter to verify the output voltage and current before connecting sensitive devices.

Important Considerations and Best Practices

  • Alignment: Misalignment between the transmitter and receiver coils can significantly reduce efficiency. Use alignment guides if available.
  • Distance: Keep the distance between the transmitter and receiver coils as small as possible for optimal performance.
  • Interference: Avoid placing metal objects between the coils, as they can cause interference and reduce power transfer efficiency.
  • Heat Management: Ensure proper ventilation or heat dissipation if the coil operates at high power levels for extended periods.
  • Regulation: If the output voltage is not regulated, use an external voltage regulator to protect sensitive devices.

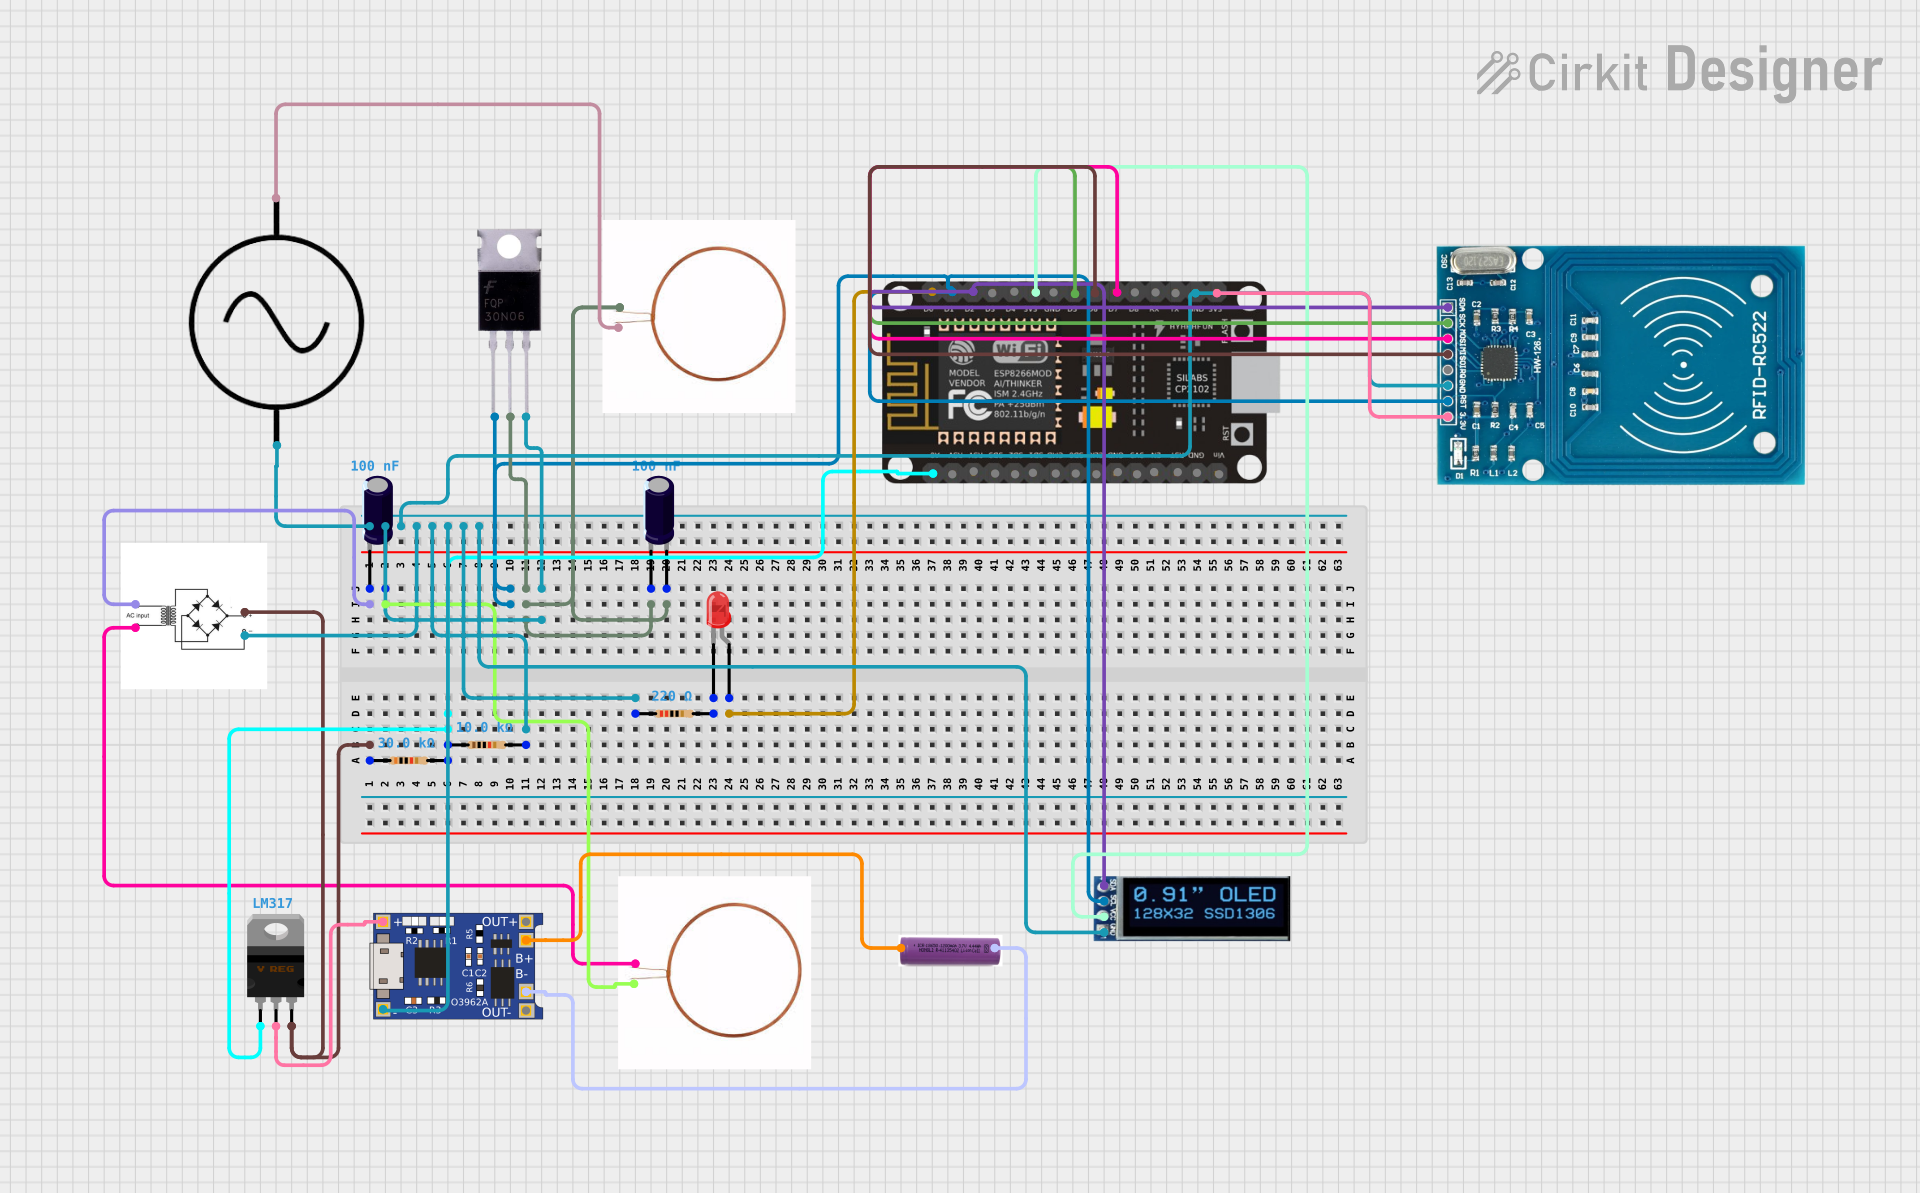
Example: Connecting to an Arduino UNO

The Receiver Wireless Power Coil can be used to power an Arduino UNO wirelessly. Below is an example circuit and code:

Circuit Setup

  1. Connect the VOUT pin of the coil to the VIN pin of the Arduino UNO.
  2. Connect the GND pin of the coil to the GND pin of the Arduino UNO.

Example Code

// Example code for Arduino UNO powered by a wireless power coil
// This code blinks the onboard LED to verify power is being received.

void setup() {
  pinMode(LED_BUILTIN, OUTPUT); // Set the onboard LED pin as output
}

void loop() {
  digitalWrite(LED_BUILTIN, HIGH); // Turn the LED on
  delay(1000);                     // Wait for 1 second
  digitalWrite(LED_BUILTIN, LOW);  // Turn the LED off
  delay(1000);                     // Wait for 1 second
}

Troubleshooting and FAQs

Common Issues Users Might Face

  1. No Output Voltage:

    • Cause: Misalignment between the transmitter and receiver coils.
    • Solution: Adjust the alignment and ensure the coils are within the specified distance.
  2. Low Efficiency:

    • Cause: Interference from nearby metal objects or poor coil design.
    • Solution: Remove any metal objects near the coils and ensure proper alignment.
  3. Overheating:

    • Cause: Excessive current draw or poor ventilation.
    • Solution: Reduce the load or improve heat dissipation.
  4. Voltage Fluctuations:

    • Cause: Unregulated output voltage.
    • Solution: Use an external voltage regulator to stabilize the output.

FAQs

  1. Can this coil be used with any transmitter?

    • The coil must be compatible with the transmitter's frequency and power specifications. Check the datasheets for compatibility.
  2. What is the maximum distance for power transfer?

    • The effective distance depends on the coil design and power requirements, typically a few millimeters to a few centimeters.
  3. Can I use this coil for data transfer?

    • No, this coil is designed for power transfer only. Use dedicated components for wireless data transfer.
  4. Is it safe to use near medical devices?

    • Consult the manufacturer of the medical device to ensure compatibility and safety.