Cirkit Designer Logo
Cirkit Designer
Your all-in-one circuit design IDE
Home / 
Component Documentation

How to Use Adafruit Switched 20mm Coin Cell Breakout: Examples, Pinouts, and Specs

Image of Adafruit Switched 20mm Coin Cell Breakout
Cirkit Designer LogoDesign with Adafruit Switched 20mm Coin Cell Breakout in Cirkit Designer

Introduction

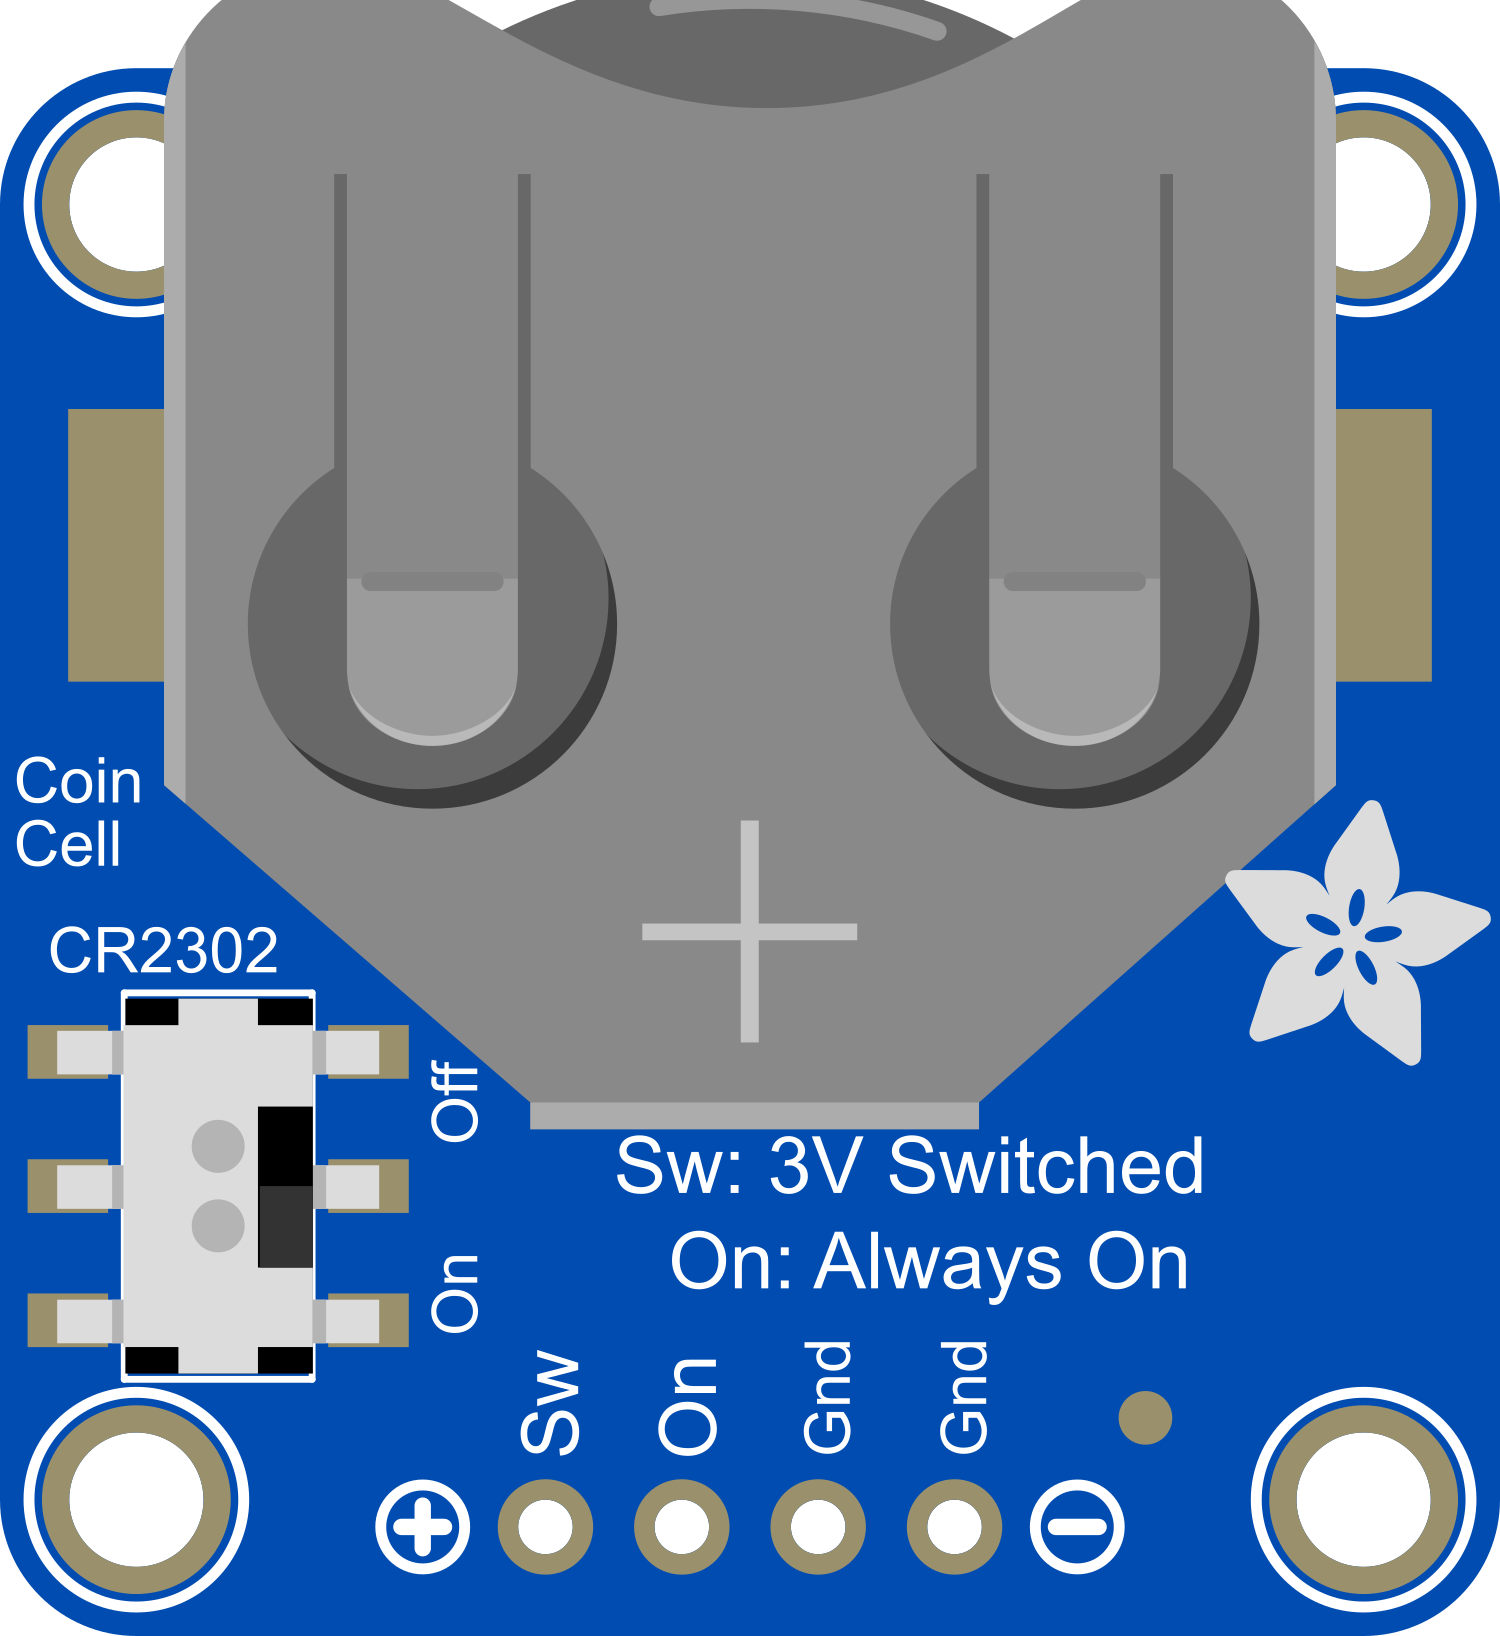
The Adafruit Switched 20mm Coin Cell Breakout is a compact and convenient power solution for low-power electronics projects. It is designed to hold a 20mm coin cell battery, such as the CR2032, and features an integrated on/off switch to control power flow. This breakout is ideal for wearable electronics, small gadgets, and temporary projects where a simple and replaceable power source is needed.

Explore Projects Built with Adafruit Switched 20mm Coin Cell Breakout

Use Cirkit Designer to design, explore, and prototype these projects online. Some projects support real-time simulation. Click "Open Project" to start designing instantly!
Battery-Powered Smart Light with Proximity Sensor and OLED Display using Adafruit QT Py RP2040
Image of lab: A project utilizing Adafruit Switched 20mm Coin Cell Breakout in a practical application
This circuit is a portable, battery-powered system featuring an Adafruit QT Py RP2040 microcontroller that interfaces with an OLED display, a proximity sensor, an accelerometer, and an RGB LED strip. The system is powered by a lithium-ion battery with a step-up boost converter to provide 5V for the LED strip, and it includes a toggle switch for power control. The microcontroller communicates with the sensors and display via I2C.
Cirkit Designer LogoOpen Project in Cirkit Designer
Battery-Powered Smart Sensor Hub with Adafruit QT Py RP2040
Image of wearable final: A project utilizing Adafruit Switched 20mm Coin Cell Breakout in a practical application
This circuit features an Adafruit QT Py RP2040 microcontroller interfaced with an APDS9960 proximity sensor, an MPU6050 accelerometer and gyroscope, and an OLED display via I2C communication. It also includes a buzzer controlled by the microcontroller and is powered by a 3.7V LiPo battery with a toggle switch for power control.
Cirkit Designer LogoOpen Project in Cirkit Designer
Arduino-Controlled Multi-Stage Coin-Operated Car Wash System with LCD Display
Image of 4in1: A project utilizing Adafruit Switched 20mm Coin Cell Breakout in a practical application
This circuit is a coin-operated control system for a multi-stage process, such as a car wash, managed by an Arduino microcontroller. It includes solid-state relays to control high-power devices, an LCD for user interface, and arcade buttons for user input. The system allows users to insert coins to activate different stages, with settings adjustable via a long-press menu.
Cirkit Designer LogoOpen Project in Cirkit Designer
Arduino UNO Controlled GSM Interface with LCD Feedback and Relay Switching
Image of pascal_issac project: A project utilizing Adafruit Switched 20mm Coin Cell Breakout in a practical application
This circuit features an Arduino UNO microcontroller interfaced with a variety of components. It controls a KY-019 relay module to switch power to a motor and communicates with a SIM800L module for cellular connectivity. User inputs are handled via a membrane matrix keypad and pushbuttons, and feedback is provided through an I2C-connected LCD display. A step-up boost converter adjusts voltage from a 12V battery to power the motor, and a 3-position switch is used for additional control.
Cirkit Designer LogoOpen Project in Cirkit Designer

Explore Projects Built with Adafruit Switched 20mm Coin Cell Breakout

Use Cirkit Designer to design, explore, and prototype these projects online. Some projects support real-time simulation. Click "Open Project" to start designing instantly!
Image of lab: A project utilizing Adafruit Switched 20mm Coin Cell Breakout in a practical application
Battery-Powered Smart Light with Proximity Sensor and OLED Display using Adafruit QT Py RP2040
This circuit is a portable, battery-powered system featuring an Adafruit QT Py RP2040 microcontroller that interfaces with an OLED display, a proximity sensor, an accelerometer, and an RGB LED strip. The system is powered by a lithium-ion battery with a step-up boost converter to provide 5V for the LED strip, and it includes a toggle switch for power control. The microcontroller communicates with the sensors and display via I2C.
Cirkit Designer LogoOpen Project in Cirkit Designer
Image of wearable final: A project utilizing Adafruit Switched 20mm Coin Cell Breakout in a practical application
Battery-Powered Smart Sensor Hub with Adafruit QT Py RP2040
This circuit features an Adafruit QT Py RP2040 microcontroller interfaced with an APDS9960 proximity sensor, an MPU6050 accelerometer and gyroscope, and an OLED display via I2C communication. It also includes a buzzer controlled by the microcontroller and is powered by a 3.7V LiPo battery with a toggle switch for power control.
Cirkit Designer LogoOpen Project in Cirkit Designer
Image of 4in1: A project utilizing Adafruit Switched 20mm Coin Cell Breakout in a practical application
Arduino-Controlled Multi-Stage Coin-Operated Car Wash System with LCD Display
This circuit is a coin-operated control system for a multi-stage process, such as a car wash, managed by an Arduino microcontroller. It includes solid-state relays to control high-power devices, an LCD for user interface, and arcade buttons for user input. The system allows users to insert coins to activate different stages, with settings adjustable via a long-press menu.
Cirkit Designer LogoOpen Project in Cirkit Designer
Image of pascal_issac project: A project utilizing Adafruit Switched 20mm Coin Cell Breakout in a practical application
Arduino UNO Controlled GSM Interface with LCD Feedback and Relay Switching
This circuit features an Arduino UNO microcontroller interfaced with a variety of components. It controls a KY-019 relay module to switch power to a motor and communicates with a SIM800L module for cellular connectivity. User inputs are handled via a membrane matrix keypad and pushbuttons, and feedback is provided through an I2C-connected LCD display. A step-up boost converter adjusts voltage from a 12V battery to power the motor, and a 3-position switch is used for additional control.
Cirkit Designer LogoOpen Project in Cirkit Designer

Common Applications and Use Cases

  • Wearable electronics
  • Small portable devices
  • Prototyping and educational projects
  • Temporary installations or displays

Technical Specifications

Key Technical Details

  • Battery Type: 20mm coin cell (e.g., CR2032)
  • Max Continuous Current: 200mA
  • Max Peak Current: 300mA (short duration)
  • Operating Temperature: -40°C to +85°C

Pin Configuration and Descriptions

Pin Name Description
+ Positive terminal connected to the battery
- Negative terminal connected to the battery
S Slide switch to control power flow

Usage Instructions

How to Use the Component in a Circuit

  1. Inserting the Battery:

    • Open the battery holder by gently prying it open.
    • Place the 20mm coin cell battery with the positive side facing up.
    • Close the holder to secure the battery in place.
  2. Connecting to a Circuit:

    • Connect the + pin to the positive power rail or VCC of your circuit.
    • Connect the - pin to the ground or GND of your circuit.
    • Ensure that the current draw of your circuit does not exceed 200mA continuously.
  3. Powering the Circuit:

    • Slide the switch to the ON position to power the circuit.
    • Slide the switch to the OFF position to cut off power and conserve battery life when not in use.

Important Considerations and Best Practices

  • Always check the battery orientation before inserting it into the breakout.
  • Do not exceed the recommended current ratings to prevent damage to the breakout or battery.
  • When not in use for extended periods, switch off the power to prevent battery drain.
  • Store and operate the breakout within the specified temperature range.

Troubleshooting and FAQs

Common Issues

  • Circuit not powering on: Ensure the battery is properly inserted and the switch is in the ON position.
  • Low power output: Check if the battery is depleted and replace it if necessary.
  • Intermittent power: Ensure that the battery holder is securely closed and the battery contacts are clean.

Solutions and Tips for Troubleshooting

  • If the circuit does not power on, double-check all connections and the orientation of the battery.
  • Measure the battery voltage with a multimeter to ensure it is not depleted.
  • Clean the battery contacts with isopropyl alcohol if there is any corrosion or residue.

FAQs

Q: Can I use rechargeable coin cell batteries with this breakout? A: Yes, as long as they are the correct size (20mm) and voltage.

Q: How long will the battery last? A: Battery life depends on the capacity of the coin cell and the current draw of your circuit. Calculate the expected life by dividing the battery capacity (in mAh) by the circuit's current draw (in mA).

Q: Is it possible to connect multiple breakouts in parallel for increased capacity? A: Yes, you can connect multiple breakouts in parallel to increase the total capacity, but ensure that the batteries are of the same type and charge level.

Example Code for Arduino UNO

// Example code to demonstrate how to control an LED with the Adafruit Switched 20mm Coin Cell Breakout

const int ledPin = 13; // LED connected to digital pin 13

void setup() {
  pinMode(ledPin, OUTPUT); // Initialize the digital pin as an output
}

void loop() {
  digitalWrite(ledPin, HIGH); // Turn the LED on
  delay(1000);                // Wait for a second
  digitalWrite(ledPin, LOW);  // Turn the LED off
  delay(1000);                // Wait for a second
}

This example assumes that an LED is connected to pin 13 of the Arduino UNO and the Adafruit Switched 20mm Coin Cell Breakout is providing power to the Arduino. The code will blink the LED on and off in one-second intervals. Remember to switch on the power using the breakout's switch before running the code.