
How to Use 2X12 Position Screw Terminal Block Distribution Module: Examples, Pinouts, and Specs
 Design with 2X12 Position Screw Terminal Block Distribution Module in Cirkit Designer
Introduction
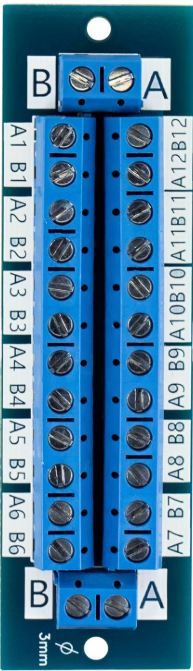
The 2X12 Position Screw Terminal Block Distribution Module by YDDMYO is a versatile and reliable terminal block designed to securely connect multiple wires. It features 12 positions in two rows, allowing for organized and efficient distribution of electrical connections. This module is ideal for applications requiring robust and reusable wiring solutions, such as prototyping, industrial control systems, and home automation projects.
Explore Projects Built with 2X12 Position Screw Terminal Block Distribution Module
 Open Project in Cirkit Designer
 Open Project in Cirkit Designer
 Open Project in Cirkit Designer
 Open Project in Cirkit Designer
Explore Projects Built with 2X12 Position Screw Terminal Block Distribution Module
Open Project in Cirkit DesignerOpen Project in Cirkit DesignerOpen Project in Cirkit DesignerOpen Project in Cirkit DesignerCommon Applications and Use Cases
- Prototyping and Testing: Easily connect and disconnect wires during circuit development.
- Industrial Control Systems: Distribute power or signals across multiple devices.
- Home Automation: Organize wiring for smart home devices and sensors.
- Power Distribution: Safely distribute power to multiple components in a circuit.
- DIY Electronics Projects: Simplify wiring for hobbyist projects.
Technical Specifications
The following table outlines the key technical details of the 2X12 Position Screw Terminal Block Distribution Module:
| Parameter | Specification |
|---|---|
| Manufacturer | YDDMYO |
| Number of Positions | 12 positions per row (2 rows total) |
| Voltage Rating | Up to 300V AC/DC |
| Current Rating | Up to 15A |
| Wire Gauge Compatibility | 26 AWG to 12 AWG |
| Material | Flame-retardant plastic housing, brass terminals |
| Mounting Type | PCB mount or standalone |
| Dimensions | 60mm x 25mm x 15mm |
| Operating Temperature | -40°C to 105°C |
Pin Configuration and Descriptions
The terminal block does not have traditional "pins" but instead features screw terminals for wire connections. Below is a description of the layout:
| Position | Description |
|---|---|
| 1-12 (Row 1) | First row of screw terminals for wire connections. |
| 1-12 (Row 2) | Second row of screw terminals for wire connections. |
| Mounting Holes | Two holes for securing the module to a surface. |
Usage Instructions
How to Use the Component in a Circuit
Prepare the Wires:
- Strip the insulation from the ends of the wires you wish to connect (approximately 5-7mm).
- Ensure the wire gauge is compatible with the terminal block (26 AWG to 12 AWG).
Connect the Wires:
- Loosen the screw on the desired terminal using a small flathead screwdriver.
- Insert the stripped end of the wire into the terminal opening.
- Tighten the screw to secure the wire. Ensure the connection is firm but avoid overtightening.
Mount the Module (Optional):
- Use the mounting holes to secure the module to a PCB or other surface using screws.
Verify Connections:
- Double-check all connections to ensure there are no loose wires or short circuits.
Important Considerations and Best Practices
- Avoid Overloading: Ensure the total current passing through the terminal block does not exceed 15A.
- Proper Insulation: Use insulated wires to prevent accidental short circuits.
- Secure Mounting: If the module is used in a high-vibration environment, secure it firmly to prevent movement.
- Polarity Awareness: For DC circuits, maintain consistent polarity across connections to avoid damage to components.
- Periodic Maintenance: Periodically check and retighten screws to ensure connections remain secure over time.
Example: Connecting to an Arduino UNO
The terminal block can be used to connect multiple sensors or devices to an Arduino UNO. Below is an example of wiring a 5V power supply and a sensor:
- Connect the 5V and GND pins of the Arduino UNO to two terminals on the block.
- Connect the sensor's power and ground wires to the corresponding terminals.
- Use additional terminals to distribute power to other devices.
Here is a sample Arduino code snippet for reading a sensor connected via the terminal block:
// Example: Reading a sensor connected via the terminal block

const int sensorPin = A0; // Analog pin connected to the sensor
int sensorValue = 0;      // Variable to store the sensor reading

void setup() {
  Serial.begin(9600); // Initialize serial communication
  pinMode(sensorPin, INPUT); // Set the sensor pin as input
}

void loop() {
  sensorValue = analogRead(sensorPin); // Read the sensor value
  Serial.print("Sensor Value: ");
  Serial.println(sensorValue); // Print the sensor value to the Serial Monitor
  delay(500); // Wait for 500ms before the next reading
}
Troubleshooting and FAQs
Common Issues and Solutions
| Issue | Possible Cause | Solution |
|---|---|---|
| Loose wire connections | Screws not tightened properly | Retighten the screws securely. |
| Overheating of terminals | Exceeding current rating | Reduce the load to stay within the 15A limit. |
| Wires slipping out of terminals | Incorrect wire stripping or loose screws | Strip wires to the correct length and retighten screws. |
| Short circuits | Exposed wires touching each other | Ensure proper insulation and spacing between wires. |
| Module not securely mounted | Improper mounting or missing screws | Use appropriate screws to secure the module. |
FAQs
Can I use this terminal block for AC circuits?
- Yes, the terminal block supports both AC and DC circuits up to 300V.
What is the maximum wire size I can use?
- The terminal block supports wire gauges from 26 AWG to 12 AWG.
Can I use this module in outdoor environments?
- The module is not waterproof. If used outdoors, ensure it is housed in a weatherproof enclosure.
How do I clean the terminal block?
- Use a dry cloth or compressed air to remove dust. Avoid using water or cleaning agents.
Can I daisy-chain multiple terminal blocks?
- Yes, you can connect multiple terminal blocks to expand the number of connections, but ensure the total current does not exceed the rating.
By following this documentation, you can effectively use the 2X12 Position Screw Terminal Block Distribution Module in your projects for secure and organized wiring.