How to Use Raspi Cam 3: Examples, Pinouts, and Specs
Introduction
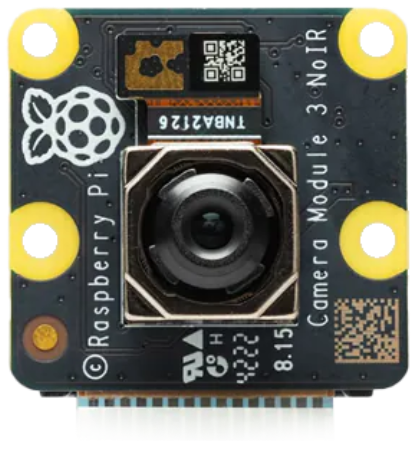
The Raspi Cam 3 is a high-quality camera module designed specifically for use with Raspberry Pi boards. It features improved image resolution, enhanced low-light performance, and versatile functionality, making it an excellent choice for photography, video recording, and computer vision applications. With its compact design and robust capabilities, the Raspi Cam 3 is ideal for hobbyists, educators, and professionals alike.
Explore Projects Built with Raspi Cam 3

Explore Projects Built with Raspi Cam 3
Common Applications and Use Cases
- Photography and Videography: Capture high-resolution images and videos.
- Surveillance Systems: Use in security and monitoring setups.
- Computer Vision Projects: Ideal for object detection, facial recognition, and AI-based applications.
- Time-Lapse Photography: Create stunning time-lapse videos.
- Robotics: Integrate into robots for vision-based navigation and tasks.
Technical Specifications
The Raspi Cam 3 offers advanced features and specifications to meet a wide range of project requirements.
Key Technical Details
- Sensor: 12-megapixel Sony IMX708
- Resolution: Up to 4608 x 2592 pixels
- Video Modes:
- 1080p at 30/60 fps
- 720p at 120 fps
- Field of View (FoV): 120° (wide-angle lens option available)
- Shutter Type: Rolling shutter
- Interface: CSI-2 (Camera Serial Interface)
- Connector: 15-pin ribbon cable
- Power Supply: 3.3V (via Raspberry Pi)
- Dimensions: 25mm x 24mm x 9mm
- Weight: 3g
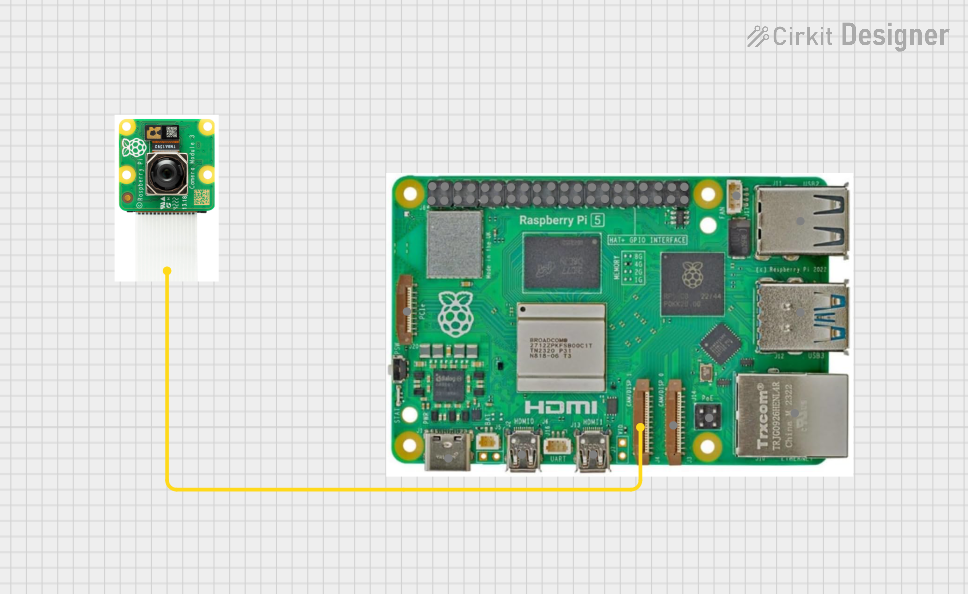
Pin Configuration and Descriptions
The Raspi Cam 3 connects to the Raspberry Pi via the CSI interface using a 15-pin ribbon cable. Below is the pin configuration for the CSI connector:
| Pin Number | Signal Name | Description |
|---|---|---|
| 1 | GND | Ground |
| 2 | 3.3V | Power supply (3.3V) |
| 3 | I2C SDA | I2C data line for camera control |
| 4 | I2C SCL | I2C clock line for camera control |
| 5 | GPIO0 | General-purpose input/output |
| 6 | GPIO1 | General-purpose input/output |
| 7 | MIPI D0+ | MIPI data lane 0 (positive) |
| 8 | MIPI D0- | MIPI data lane 0 (negative) |
| 9 | GND | Ground |
| 10 | MIPI CLK+ | MIPI clock lane (positive) |
| 11 | MIPI CLK- | MIPI clock lane (negative) |
| 12 | MIPI D1+ | MIPI data lane 1 (positive) |
| 13 | MIPI D1- | MIPI data lane 1 (negative) |
| 14 | GPIO2 | General-purpose input/output |
| 15 | GPIO3 | General-purpose input/output |
Usage Instructions
How to Use the Raspi Cam 3 in a Circuit
Connect the Camera:
- Power off your Raspberry Pi.
- Locate the CSI connector on the Raspberry Pi board.
- Gently lift the plastic clip on the CSI connector.
- Insert the 15-pin ribbon cable from the Raspi Cam 3 into the connector, ensuring the metal contacts face the Raspberry Pi's PCB.
- Secure the cable by pressing the plastic clip back down.
Enable the Camera Interface:
- Boot up your Raspberry Pi.
- Open a terminal and run the following command to access the Raspberry Pi configuration tool:
sudo raspi-config - Navigate to Interface Options > Camera and enable the camera interface.
- Reboot the Raspberry Pi to apply the changes.
Capture Images and Videos:
- Install the
libcameratools if not already installed:sudo apt update sudo apt install libcamera-apps - To capture an image:
libcamera-still -o image.jpg - To record a video:
libcamera-vid -o video.h264
- Install the
Important Considerations and Best Practices
- Ensure the ribbon cable is securely connected to avoid communication issues.
- Avoid touching the camera lens to prevent smudges or scratches.
- Use a stable power supply to prevent unexpected shutdowns or malfunctions.
- For low-light environments, consider using an external IR illuminator or adjusting the camera's exposure settings.
- When using the camera for extended periods, ensure proper ventilation to prevent overheating.
Example: Using Raspi Cam 3 with Arduino UNO
The Raspi Cam 3 is designed for Raspberry Pi and does not natively interface with Arduino boards. However, you can use an intermediary device, such as a Raspberry Pi, to process the camera data and communicate with the Arduino via serial or I2C.
Troubleshooting and FAQs
Common Issues and Solutions
Camera Not Detected:
- Ensure the ribbon cable is properly connected to the CSI port.
- Verify that the camera interface is enabled in the Raspberry Pi configuration.
- Check for software updates and install the latest version of
libcamera.
Poor Image Quality:
- Clean the camera lens with a microfiber cloth.
- Adjust the camera's focus if using a model with a manual focus lens.
- Experiment with different lighting conditions or use external lighting.
Video Recording Fails:
- Ensure sufficient storage space is available on the Raspberry Pi.
- Use a high-speed microSD card to avoid write speed bottlenecks.
Camera Overheating:
- Ensure proper ventilation around the Raspberry Pi and camera module.
- Avoid using the camera in high-temperature environments for extended periods.
FAQs
Q: Can the Raspi Cam 3 be used with older Raspberry Pi models?
A: Yes, the Raspi Cam 3 is compatible with most Raspberry Pi models that feature a CSI connector. However, performance may vary depending on the Raspberry Pi's processing power.
Q: Does the Raspi Cam 3 support autofocus?
A: Yes, the Raspi Cam 3 features autofocus capabilities for sharper images and videos.
Q: Can I use the Raspi Cam 3 for night vision?
A: The Raspi Cam 3 has improved low-light performance, but for true night vision, consider using an IR-sensitive version of the camera along with an IR illuminator.
Q: How do I update the camera firmware?
A: Firmware updates are typically included in Raspberry Pi OS updates. Run the following commands to update your system:
sudo apt update
sudo apt full-upgrade
By following this documentation, you can effectively integrate and utilize the Raspi Cam 3 in your projects.