Cirkit Designer Logo
Cirkit Designer
Your all-in-one circuit design IDE
Home / 
Component Documentation

How to Use Raspberry Pi zero w: Examples, Pinouts, and Specs

Image of Raspberry Pi zero w
Cirkit Designer LogoDesign with Raspberry Pi zero w in Cirkit Designer

Introduction

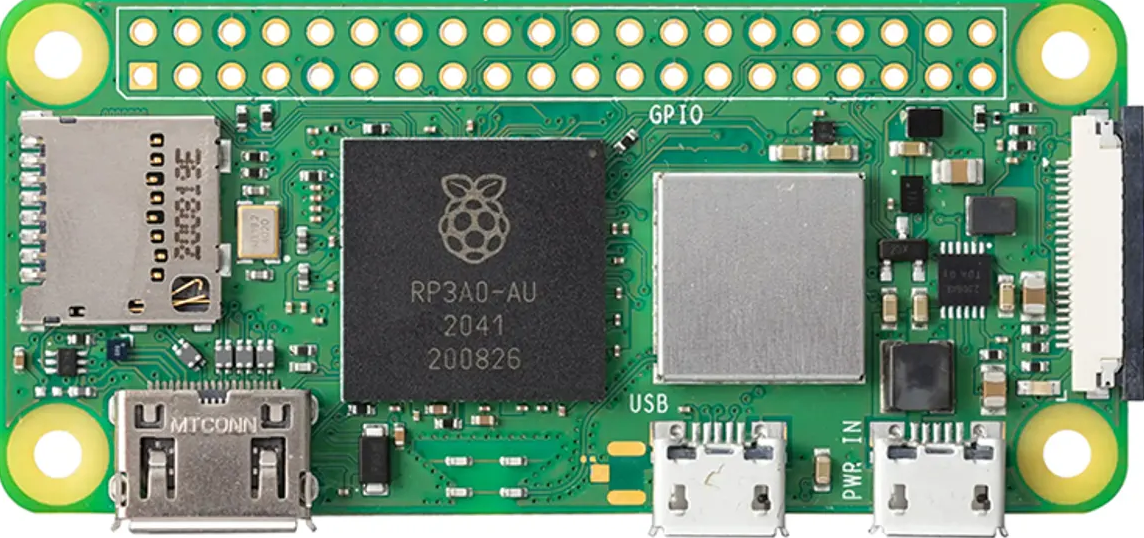
The Raspberry Pi Zero W is a highly compact single-board computer that integrates wireless LAN and Bluetooth connectivity, making it an ideal choice for a wide range of embedded projects, from DIY enthusiasts to educational purposes. Its small form factor and low power consumption, combined with its wireless capabilities, allow for its use in IoT devices, wearables, and portable applications.

Explore Projects Built with Raspberry Pi zero w

Use Cirkit Designer to design, explore, and prototype these projects online. Some projects support real-time simulation. Click "Open Project" to start designing instantly!
Raspberry Pi Zero W-Based Security System with PIR, Ultrasonic Sensors, and Camera
Image of electronic 2: A project utilizing Raspberry Pi zero w in a practical application
This circuit features a Raspberry Pi Zero W connected to various sensors and output devices. It includes two PIR sensors for motion detection, two HC-SR04 ultrasonic sensors for distance measurement, a reed switch for magnetic field detection, and a Raspberry Pi camera module. Additionally, the circuit has a buzzer for audible alerts and a 12V blue LED for visual indication, both controlled by the Raspberry Pi's GPIO pins. Power is supplied through a USB power connection linked to a battery pack.
Cirkit Designer LogoOpen Project in Cirkit Designer
Raspberry Pi Zero W-Based Handheld Gaming Console with LCD Display
Image of pigame: A project utilizing Raspberry Pi zero w in a practical application
This circuit integrates a Raspberry Pi Zero W with an LCD TFT screen and two custom PiGrrl Zero gamepad PCBs. The Raspberry Pi provides power to the LCD screen and communicates with it via GPIO pins for control signals and SPI for data transfer. The gamepad PCBs are connected to the Raspberry Pi's GPIO pins, allowing for user input to be processed by the Raspberry Pi for gaming or other interactive applications.
Cirkit Designer LogoOpen Project in Cirkit Designer
Raspberry Pi Zero W Controlled Multi-Color LED Indicator
Image of CSC615-Assignment#1-TrafficLight: A project utilizing Raspberry Pi zero w in a practical application
This circuit consists of a Raspberry Pi Zero W connected to three LEDs (red, green, and yellow) through GPIO pins 23, 24, and 25, respectively. Each LED is connected in series with a 220-ohm resistor to limit the current, and all LEDs share a common ground with the Raspberry Pi. The circuit is designed to control the individual LEDs using the Raspberry Pi's GPIO pins, likely for signaling or status indication purposes.
Cirkit Designer LogoOpen Project in Cirkit Designer
Raspberry Pi Zero W-Based Security System with Motion Detection and Camera
Image of electronic 2: A project utilizing Raspberry Pi zero w in a practical application
This circuit is a Raspberry Pi Zero W-based security system equipped with two PIR sensors for motion detection, two HC-SR04 ultrasonic sensors for distance measurement, a reed switch for magnetic field detection, and a Raspberry Pi camera module for visual monitoring. It also includes a buzzer and a 12V blue LED for audio-visual alerts. The system is powered through a USB power connection linked to a battery pack, and the Raspberry Pi is programmed to control the sensors and output signals based on detected motion, distance changes, or magnetic field presence.
Cirkit Designer LogoOpen Project in Cirkit Designer

Explore Projects Built with Raspberry Pi zero w

Use Cirkit Designer to design, explore, and prototype these projects online. Some projects support real-time simulation. Click "Open Project" to start designing instantly!
Image of electronic 2: A project utilizing Raspberry Pi zero w in a practical application
Raspberry Pi Zero W-Based Security System with PIR, Ultrasonic Sensors, and Camera
This circuit features a Raspberry Pi Zero W connected to various sensors and output devices. It includes two PIR sensors for motion detection, two HC-SR04 ultrasonic sensors for distance measurement, a reed switch for magnetic field detection, and a Raspberry Pi camera module. Additionally, the circuit has a buzzer for audible alerts and a 12V blue LED for visual indication, both controlled by the Raspberry Pi's GPIO pins. Power is supplied through a USB power connection linked to a battery pack.
Cirkit Designer LogoOpen Project in Cirkit Designer
Image of pigame: A project utilizing Raspberry Pi zero w in a practical application
Raspberry Pi Zero W-Based Handheld Gaming Console with LCD Display
This circuit integrates a Raspberry Pi Zero W with an LCD TFT screen and two custom PiGrrl Zero gamepad PCBs. The Raspberry Pi provides power to the LCD screen and communicates with it via GPIO pins for control signals and SPI for data transfer. The gamepad PCBs are connected to the Raspberry Pi's GPIO pins, allowing for user input to be processed by the Raspberry Pi for gaming or other interactive applications.
Cirkit Designer LogoOpen Project in Cirkit Designer
Image of CSC615-Assignment#1-TrafficLight: A project utilizing Raspberry Pi zero w in a practical application
Raspberry Pi Zero W Controlled Multi-Color LED Indicator
This circuit consists of a Raspberry Pi Zero W connected to three LEDs (red, green, and yellow) through GPIO pins 23, 24, and 25, respectively. Each LED is connected in series with a 220-ohm resistor to limit the current, and all LEDs share a common ground with the Raspberry Pi. The circuit is designed to control the individual LEDs using the Raspberry Pi's GPIO pins, likely for signaling or status indication purposes.
Cirkit Designer LogoOpen Project in Cirkit Designer
Image of electronic 2: A project utilizing Raspberry Pi zero w in a practical application
Raspberry Pi Zero W-Based Security System with Motion Detection and Camera
This circuit is a Raspberry Pi Zero W-based security system equipped with two PIR sensors for motion detection, two HC-SR04 ultrasonic sensors for distance measurement, a reed switch for magnetic field detection, and a Raspberry Pi camera module for visual monitoring. It also includes a buzzer and a 12V blue LED for audio-visual alerts. The system is powered through a USB power connection linked to a battery pack, and the Raspberry Pi is programmed to control the sensors and output signals based on detected motion, distance changes, or magnetic field presence.
Cirkit Designer LogoOpen Project in Cirkit Designer

Common Applications and Use Cases

  • IoT devices
  • Home automation systems
  • Wearable technology
  • Educational projects for learning programming and electronics
  • Portable applications
  • Prototyping for software and hardware development

Technical Specifications

Key Technical Details

  • SoC: Broadcom BCM2835
  • CPU: ARM11 running at 1GHz
  • RAM: 512MB
  • Wireless: 2.4GHz 802.11n wireless LAN
  • Bluetooth: Bluetooth 4.1, Bluetooth Low Energy (BLE)
  • Power Ratings: 5V/1.2A via micro USB or GPIO header
  • Storage: microSD card slot for operating system and data storage
  • Dimensions: 65mm x 30mm x 5mm

Pin Configuration and Descriptions

Pin Number Name Description
1 3V3 3.3V Power Supply
2 5V 5V Power Supply
3 GPIO2 SDA (I2C)
4 5V 5V Power Supply
5 GPIO3 SCL (I2C)
6 GND Ground
... ... ...
39 GND Ground
40 GPIO21 SPI MISO

Note: This table is not exhaustive. Refer to the official GPIO pinout diagram for complete details.

Usage Instructions

How to Use the Raspberry Pi Zero W in a Circuit

  1. Power Supply: Connect a 5V micro USB power supply to the PWR IN port. Ensure that the power supply can provide sufficient current (at least 1.2A).

  2. MicroSD Card: Insert a microSD card with the appropriate Raspberry Pi OS image into the microSD card slot.

  3. Peripherals: Connect necessary peripherals such as a keyboard, mouse, and display through the mini HDMI port or USB OTG port.

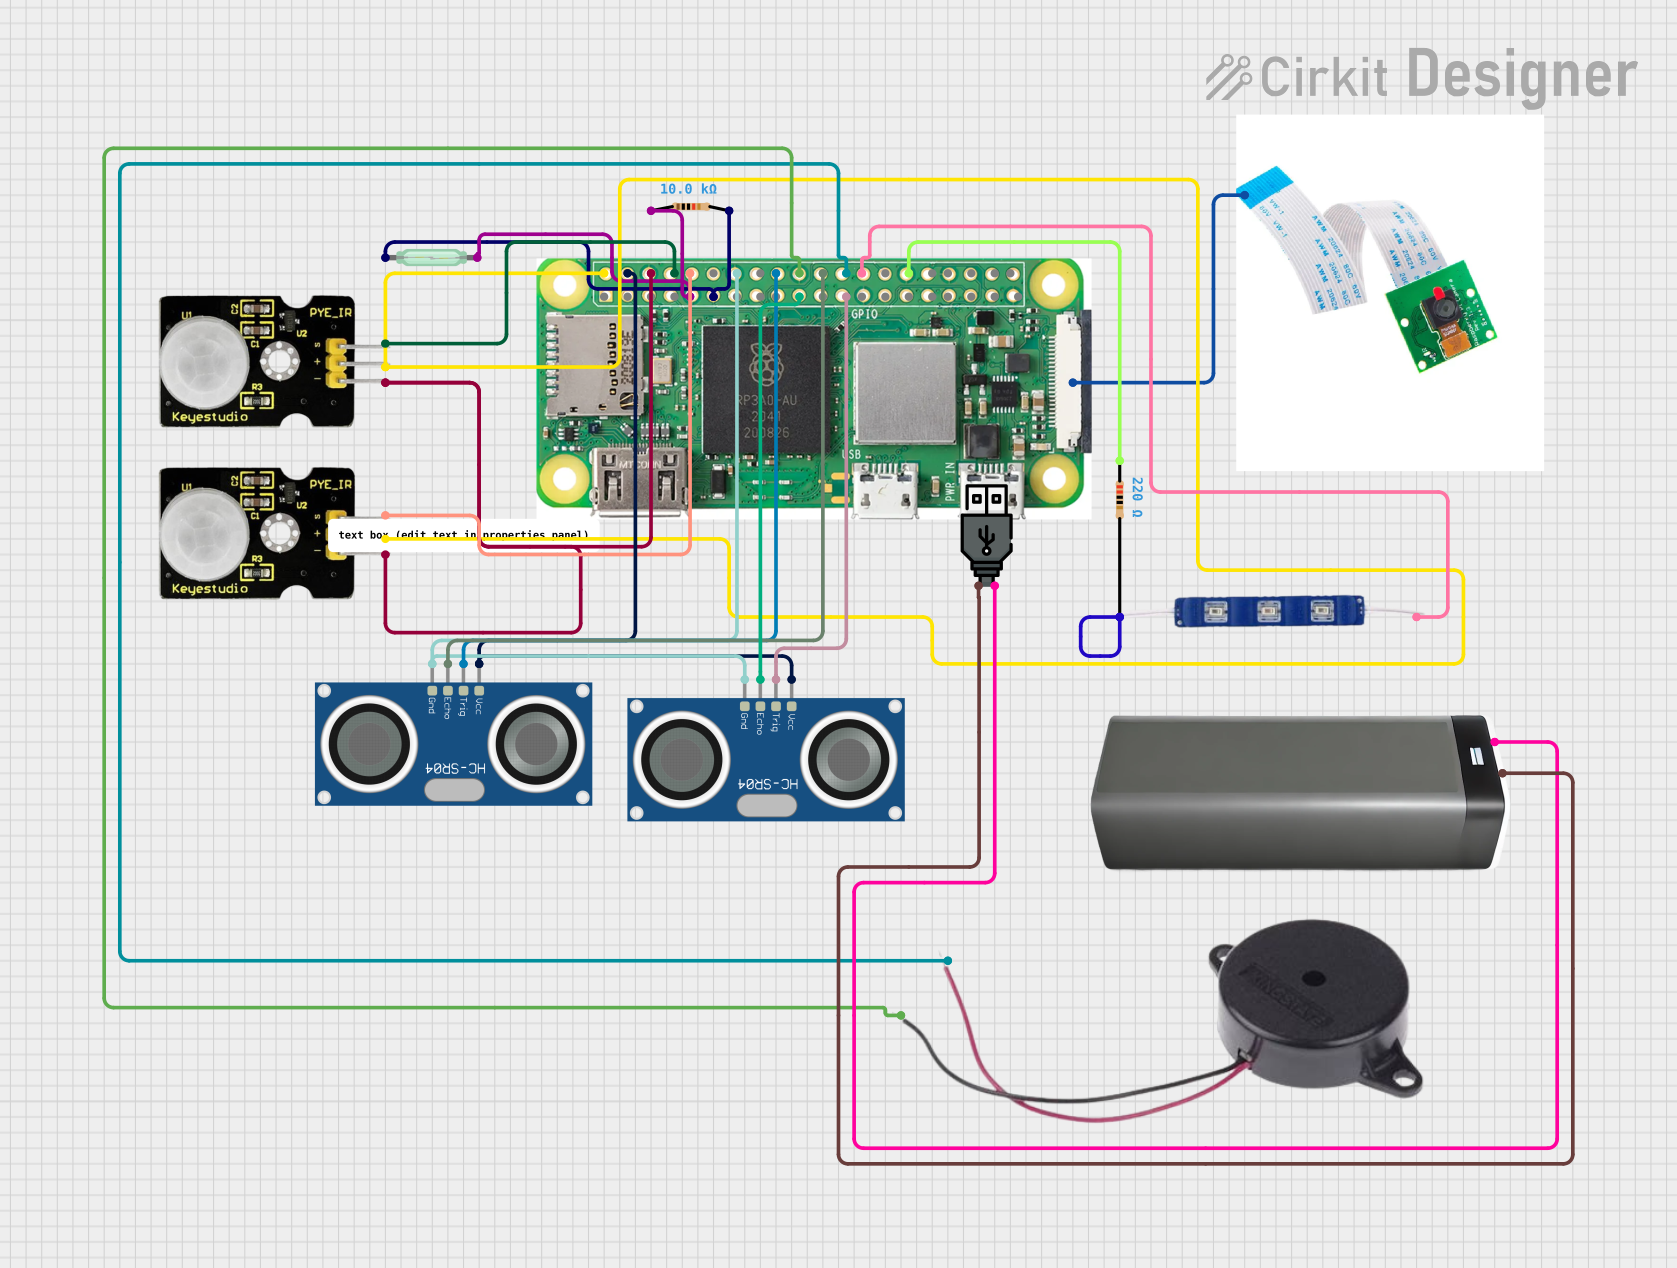
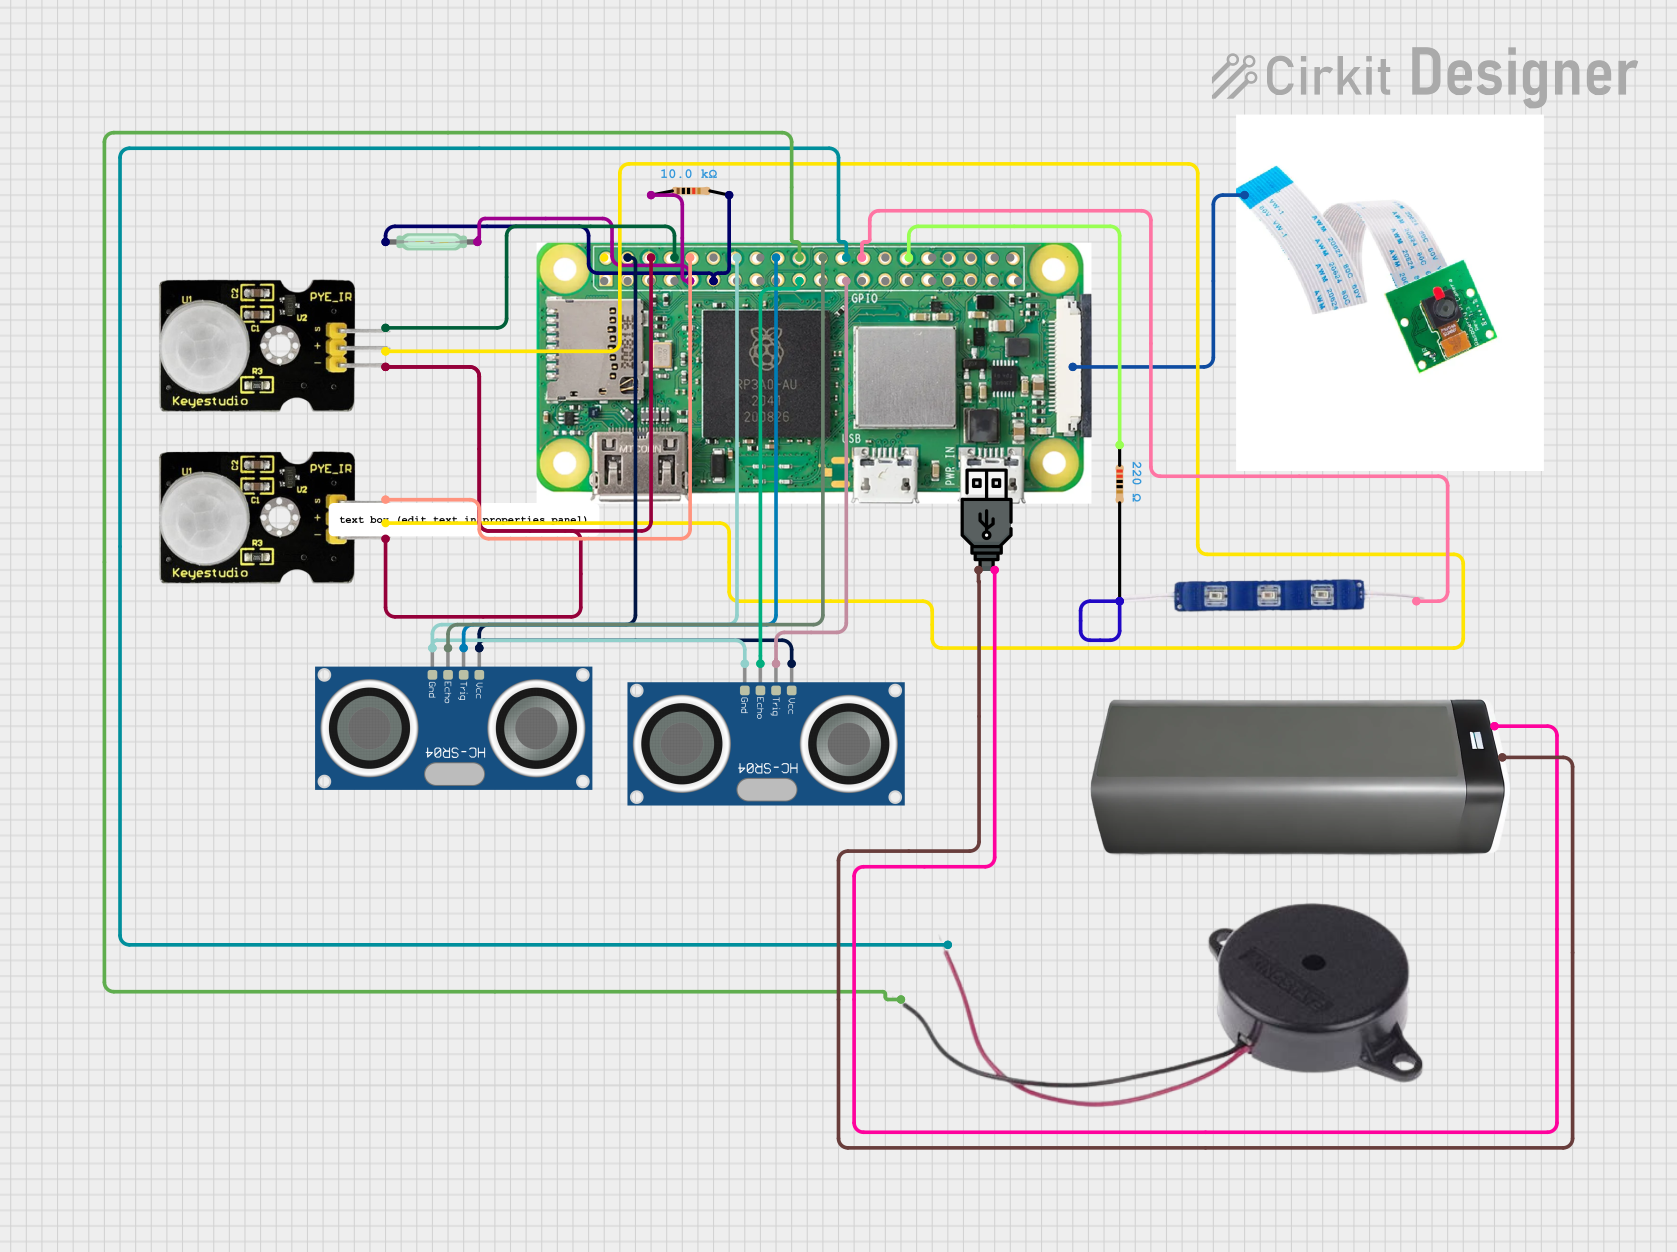
  4. GPIO Connections: Use the GPIO header for connecting sensors, actuators, or other modules. Be mindful of the voltage levels and current limitations.

  5. Wireless Setup: Configure the wireless LAN and Bluetooth through the Raspberry Pi OS's networking interfaces.

Important Considerations and Best Practices

  • Always handle the Raspberry Pi Zero W with care to avoid static discharge or physical damage.
  • Use a proper power supply to prevent undervoltage issues.
  • Consider using a case to protect the Raspberry Pi Zero W and prevent short circuits.
  • Keep the Raspberry Pi Zero W in a well-ventilated area to avoid overheating.
  • Regularly update the Raspberry Pi OS and firmware to ensure security and stability.

Troubleshooting and FAQs

Common Issues Users Might Face

  • Power Issues: If the Raspberry Pi Zero W fails to boot, check the power supply and micro USB cable for faults.
  • MicroSD Card Problems: Ensure the microSD card is properly formatted and contains the correct OS image.
  • Wireless Connectivity: If experiencing issues with Wi-Fi or Bluetooth, verify the network settings and ensure the antennas are not obstructed.

Solutions and Tips for Troubleshooting

  • Verify that all connections are secure and correct.
  • Check the Raspberry Pi Zero W's LEDs for status indications.
  • Consult the official Raspberry Pi forums and documentation for support.
  • Use a different power supply or microSD card if issues persist.

FAQs

Q: Can the Raspberry Pi Zero W run a full desktop environment? A: Yes, but it may be slower compared to more powerful Raspberry Pi models.

Q: How do I access the Raspberry Pi Zero W remotely? A: You can enable SSH or VNC through the Raspberry Pi configuration settings for remote access.

Q: Is it necessary to use a heatsink with the Raspberry Pi Zero W? A: For most applications, a heatsink is not required, but it can be beneficial for thermal management during intensive tasks.

Q: Can I power the Raspberry Pi Zero W from the GPIO pins? A: Yes, but it is recommended to use the micro USB port to ensure a stable power supply.

For more detailed information, refer to the official Raspberry Pi Zero W documentation.