How to Use Adafruit Circuit Playground Express 4-H: Examples, Pinouts, and Specs
Introduction
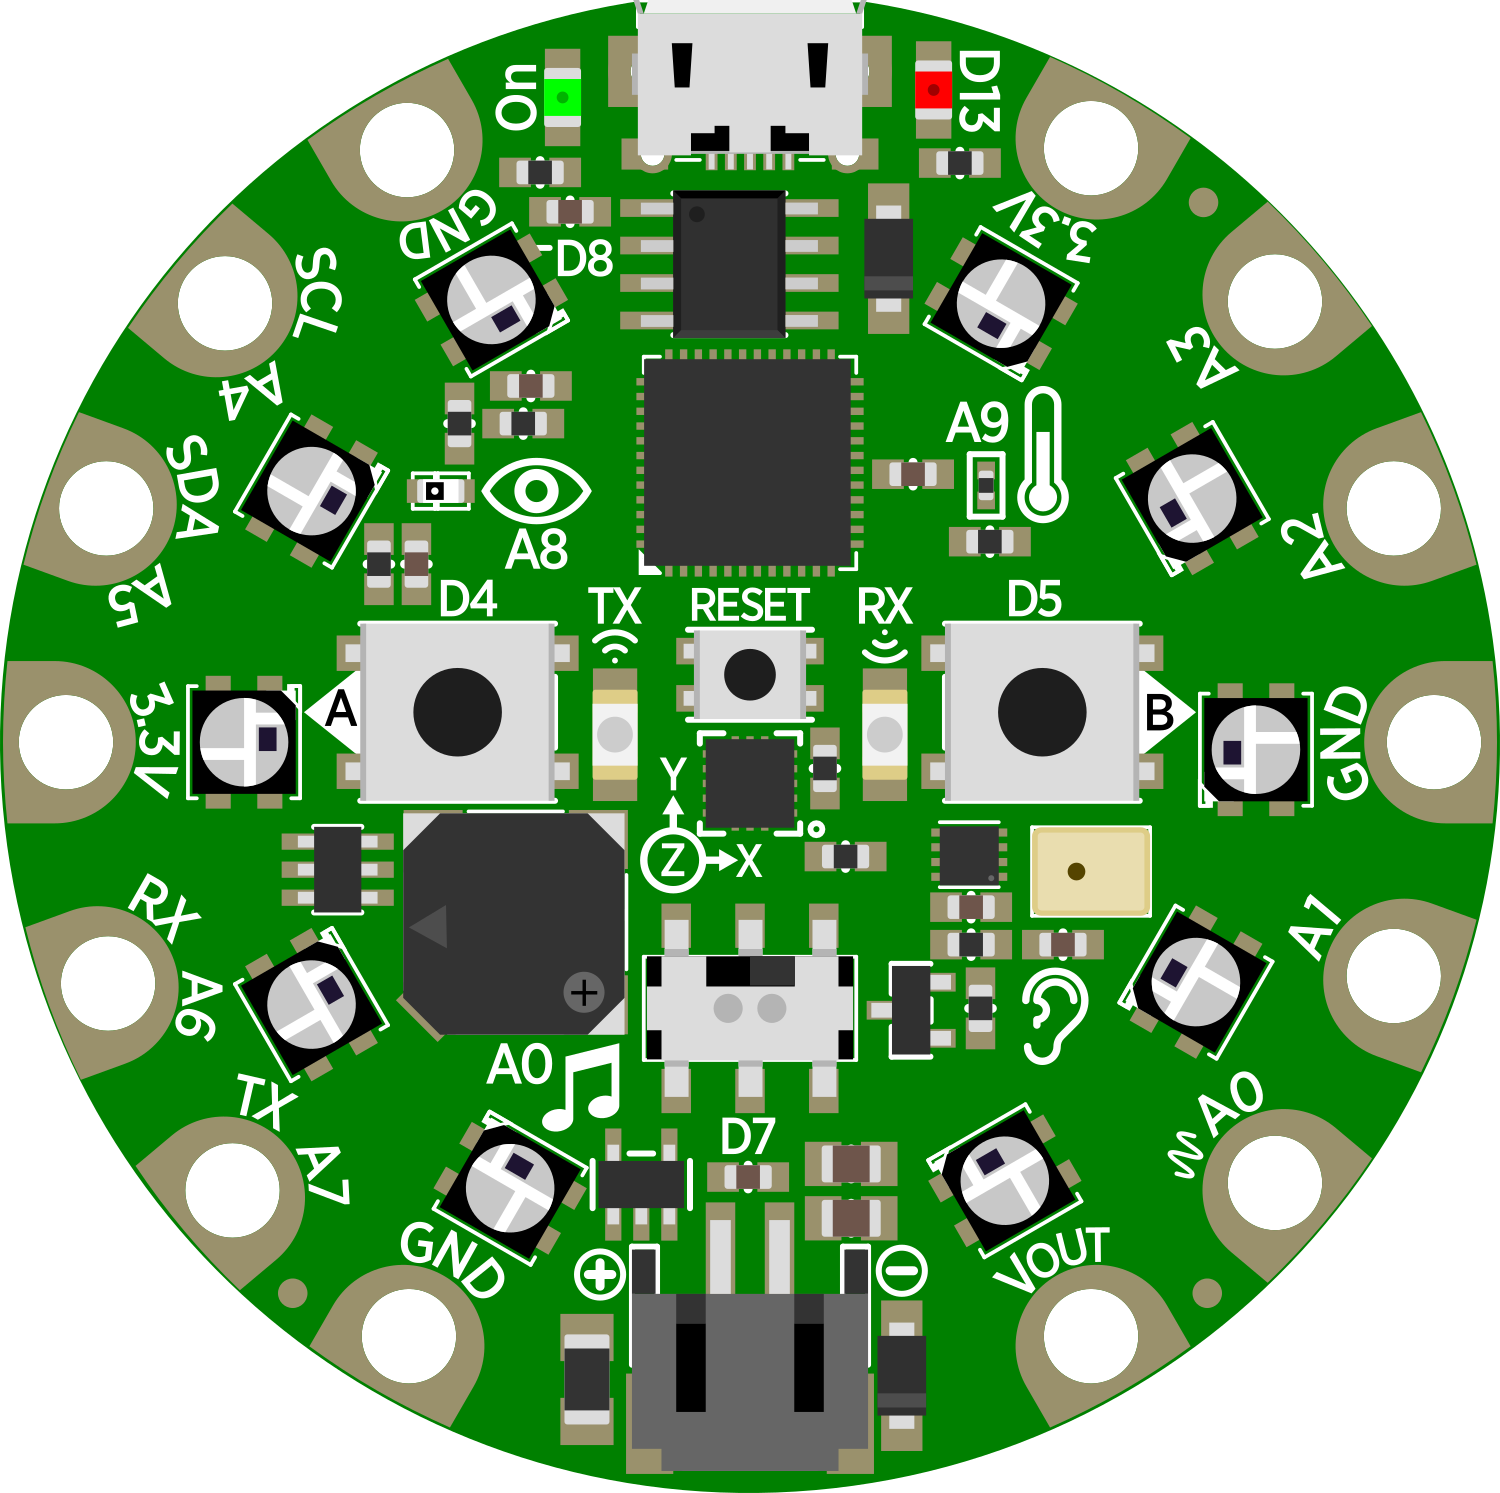
The Adafruit Circuit Playground Express 4-H is a versatile and user-friendly development board that integrates a multitude of sensors, input/output devices, and an ATmega32u4 microcontroller. This board is specifically tailored for educational environments, aiming to provide an engaging and accessible introduction to electronics and programming. It is suitable for a wide range of applications, from simple LED animations to complex sensor-based projects.
Common applications include:
- Educational projects and STEM learning
- Wearable electronics
- Interactive art installations
- Prototyping IoT devices
- Basic robotics
Explore Projects Built with Adafruit Circuit Playground Express 4-H
Explore Projects Built with Adafruit Circuit Playground Express 4-H
Technical Specifications
Key Technical Details
- Microcontroller: ATmega32u4
- Operating Voltage: 3.3V
- Input Voltage (recommended): 4.5V - 5.5V
- Digital I/O Pins: 14, with 6 PWM channels
- Analog Input Pins: 7
- Flash Memory: 32 KB (ATmega32u4) of which 4 KB used by bootloader
- SRAM: 2.5 KB (ATmega32u4)
- EEPROM: 1 KB (ATmega32u4)
- Clock Speed: 8 MHz
- Micro-USB port for programming and power
- Built-in components:
- 10x NeoPixels LEDs
- Light sensor
- Temperature sensor
- Motion sensor (accelerometer)
- Sound sensor (microphone)
- Mini speaker
- 2x Push buttons
- Slide switch
Pin Configuration and Descriptions
| Pin Number | Function | Description |
|---|---|---|
| A1 | Light Sensor | Analog input for measuring ambient light |
| A2 | Temperature | Analog input for measuring temperature |
| A3 | Microphone | Analog input for sound level |
| A4 | Accelerometer X | Analog input for X-axis acceleration |
| A5 | Accelerometer Y | Analog input for Y-axis acceleration |
| A6 | Accelerometer Z | Analog input for Z-axis acceleration |
| A7 | Unused | Reserved for future use |
| D1-D6 | Digital I/O | Digital input/output pins, PWM capable (D1-D6) |
| D7 | Slide Switch | Digital input for slide switch position |
| D8 | Left Button | Digital input for left button press |
| D9 | Right Button | Digital input for right button press |
| D10-D12 | NeoPixels | Control pins for built-in NeoPixel LEDs |
| D13 | Built-in LED | Digital output for onboard LED |
| RX/TX | Serial Comm | Receive/Transmit for serial communication |
Usage Instructions
Integrating with a Circuit
To use the Adafruit Circuit Playground Express 4-H in a circuit:
- Connect the board to a computer or power source using a micro-USB cable.
- Ensure that the slide switch is in the desired position for your application.
- Interact with the onboard sensors and components using the provided libraries and examples.
Important Considerations and Best Practices
- Always disconnect the board from power before making or altering connections.
- Use anti-static precautions to avoid damaging the board with electrostatic discharge.
- When programming, select the correct board and port in your development environment.
- Avoid exposing the board to extreme temperatures, moisture, or mechanical stress.
Troubleshooting and FAQs
Common Issues
- Board not recognized: Ensure the micro-USB cable is properly connected and the computer's USB port is functioning. Try a different cable or port if necessary.
- LEDs not lighting up: Verify that the code is correctly uploaded and that the NeoPixel library is properly included.
- Sensor readings are inaccurate: Check for any obstructions or sources of interference near the sensors.
Solutions and Tips for Troubleshooting
- Reset the board by pressing the onboard reset button.
- Double-check your code for errors and ensure all necessary libraries are installed.
- Consult the Adafruit forums or online communities for assistance with specific issues.
FAQs
Q: Can I power the Circuit Playground Express 4-H with a battery? A: Yes, you can use a 3.7V lithium polymer battery or 3x AAA batteries with a battery holder.
Q: How do I program the Circuit Playground Express 4-H? A: You can use the Arduino IDE, CircuitPython, or Microsoft MakeCode to program the board.
Q: What is the maximum current the NeoPixels can draw? A: Each NeoPixel can draw up to 60 mA at full brightness. With 10 NeoPixels, the maximum current is 600 mA.
Q: Are the components on the board replaceable if they get damaged? A: The onboard components are not designed to be user-replaceable. Care should be taken to avoid damaging them.
Example Code for Arduino UNO
Below is a simple example code that demonstrates how to blink the onboard LED using the Arduino IDE. This code is intended for educational purposes to get started with programming the Adafruit Circuit Playground Express 4-H.
#include <Adafruit_CircuitPlayground.h>

void setup() {
  // Initialize the Circuit Playground board.
  CircuitPlayground.begin();
}

void loop() {
  // Turn the onboard LED on.
  CircuitPlayground.setPixelColor(0, 255, 255, 255); // White color
  delay(500); // Wait for half a second

  // Turn the onboard LED off.
  CircuitPlayground.setPixelColor(0, 0, 0, 0); // No color (off)
  delay(500); // Wait for half a second
}
Remember to install the Adafruit Circuit Playground library in the Arduino IDE before uploading this code to the board. This example assumes that the first NeoPixel (index 0) is being used as the onboard LED.
For more advanced examples and tutorials, visit the Adafruit Learning System at https://learn.adafruit.com/.