Cirkit Designer Logo
Cirkit Designer
Your all-in-one circuit design IDE
Home / 
Component Documentation

How to Use emic-2 TTS module: Examples, Pinouts, and Specs

Image of emic-2 TTS module
Cirkit Designer LogoDesign with emic-2 TTS module in Cirkit Designer

Introduction

The Emic-2 Text-to-Speech (TTS) module is a compact and versatile device designed to convert text input into natural-sounding speech. It supports multiple languages, including English and Spanish, and offers adjustable speech parameters such as volume, pitch, and speaking rate. This module is ideal for applications in robotics, assistive technology, interactive kiosks, and other projects requiring audio output.

With its simple serial interface, the Emic-2 can be easily integrated into microcontroller-based systems, including Arduino, Raspberry Pi, and other platforms. Its high-quality speech synthesis makes it a popular choice for developers looking to add voice capabilities to their projects.

Explore Projects Built with emic-2 TTS module

Use Cirkit Designer to design, explore, and prototype these projects online. Some projects support real-time simulation. Click "Open Project" to start designing instantly!
ESP32-Based Voice Assistant with Battery-Powered Microphone and Speaker
Image of Minor: A project utilizing emic-2 TTS module in a practical application
This circuit is a voice-controlled system that uses an ESP32 microcontroller to process audio input from a microphone, send the data to a Gemini API for speech-to-text conversion, and output responses through a speaker. It includes an IR sensor for additional input, an LED for status indication, and a battery with a charging module for power management.
Cirkit Designer LogoOpen Project in Cirkit Designer
ESP32-Based GPS Tracker with Audio Input
Image of railmic: A project utilizing emic-2 TTS module in a practical application
This circuit features an ESP32 microcontroller connected to an INMP441 microphone and a GPS NEO 6M module. The ESP32 is configured to communicate with the INMP441 via I2S (Inter-IC Sound) using its D32, D33, and D25 pins for the clock, data, and word select lines, respectively. Additionally, the ESP32's TX2 and RX2 pins are used for UART communication with the GPS module, allowing the microcontroller to receive GPS data.
Cirkit Designer LogoOpen Project in Cirkit Designer
ESP32-Based Portable Smart Speaker with Audio Input Processing
Image of talkAI: A project utilizing emic-2 TTS module in a practical application
This circuit features two ESP32 microcontrollers configured for serial communication, with one ESP32's TX0 connected to the other's RX2, and vice versa. An INMP441 microphone is interfaced with one ESP32 for audio input, using I2S protocol with connections for serial clock (SCK), word select (WS), and serial data (SD). A Max98357 audio amplifier is connected to the other ESP32 to drive a loudspeaker, receiving I2S data (DIN), bit clock (BLCK), and left-right clock (LRC), and is powered by a lipo battery charger module.
Cirkit Designer LogoOpen Project in Cirkit Designer
ESP32-Based Audio Player with GPS and SD Card Storage
Image of Kidventure: A project utilizing emic-2 TTS module in a practical application
This circuit features an ESP32 microcontroller connected to a GPS NEO 6M module, an INMP441 microphone, a Max98357 audio amplifier, a MicroSD card breakout board, and a loudspeaker. The ESP32 is configured to communicate with the GPS module via serial connection, record audio through the microphone using I2S, play audio via the amplifier, and read/write data to the MicroSD card. The embedded code on the ESP32 is set up to use Google TTS (Text-To-Speech) to generate speech that is output through the loudspeaker.
Cirkit Designer LogoOpen Project in Cirkit Designer

Explore Projects Built with emic-2 TTS module

Use Cirkit Designer to design, explore, and prototype these projects online. Some projects support real-time simulation. Click "Open Project" to start designing instantly!
Image of Minor: A project utilizing emic-2 TTS module in a practical application
ESP32-Based Voice Assistant with Battery-Powered Microphone and Speaker
This circuit is a voice-controlled system that uses an ESP32 microcontroller to process audio input from a microphone, send the data to a Gemini API for speech-to-text conversion, and output responses through a speaker. It includes an IR sensor for additional input, an LED for status indication, and a battery with a charging module for power management.
Cirkit Designer LogoOpen Project in Cirkit Designer
Image of railmic: A project utilizing emic-2 TTS module in a practical application
ESP32-Based GPS Tracker with Audio Input
This circuit features an ESP32 microcontroller connected to an INMP441 microphone and a GPS NEO 6M module. The ESP32 is configured to communicate with the INMP441 via I2S (Inter-IC Sound) using its D32, D33, and D25 pins for the clock, data, and word select lines, respectively. Additionally, the ESP32's TX2 and RX2 pins are used for UART communication with the GPS module, allowing the microcontroller to receive GPS data.
Cirkit Designer LogoOpen Project in Cirkit Designer
Image of talkAI: A project utilizing emic-2 TTS module in a practical application
ESP32-Based Portable Smart Speaker with Audio Input Processing
This circuit features two ESP32 microcontrollers configured for serial communication, with one ESP32's TX0 connected to the other's RX2, and vice versa. An INMP441 microphone is interfaced with one ESP32 for audio input, using I2S protocol with connections for serial clock (SCK), word select (WS), and serial data (SD). A Max98357 audio amplifier is connected to the other ESP32 to drive a loudspeaker, receiving I2S data (DIN), bit clock (BLCK), and left-right clock (LRC), and is powered by a lipo battery charger module.
Cirkit Designer LogoOpen Project in Cirkit Designer
Image of Kidventure: A project utilizing emic-2 TTS module in a practical application
ESP32-Based Audio Player with GPS and SD Card Storage
This circuit features an ESP32 microcontroller connected to a GPS NEO 6M module, an INMP441 microphone, a Max98357 audio amplifier, a MicroSD card breakout board, and a loudspeaker. The ESP32 is configured to communicate with the GPS module via serial connection, record audio through the microphone using I2S, play audio via the amplifier, and read/write data to the MicroSD card. The embedded code on the ESP32 is set up to use Google TTS (Text-To-Speech) to generate speech that is output through the loudspeaker.
Cirkit Designer LogoOpen Project in Cirkit Designer

Technical Specifications

  • Input Voltage: 3.3V to 5.0V DC
  • Current Consumption: ~30mA (idle), ~50mA (speaking)
  • Communication Interface: Serial UART (9600 baud default)
  • Supported Languages: English and Spanish
  • Speech Parameters:
    • Volume: 0 (mute) to 15 (maximum)
    • Speaking Rate: 75 to 600 words per minute
    • Pitch: 0 (low) to 255 (high)
  • Audio Output: Mono audio signal (1V peak-to-peak) via 3.5mm audio jack
  • Dimensions: 1.25" x 1.0" (31.75mm x 25.4mm)

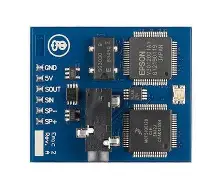
Pin Configuration and Descriptions

The Emic-2 module has a 6-pin header for interfacing. The pinout is as follows:

Pin Number Pin Name Description
1 VCC Power supply input (3.3V to 5.0V DC)
2 GND Ground connection
3 SOUT Serial data output (for debugging or feedback)
4 SIN Serial data input (for sending commands and text)
5 /RESET Active-low reset pin (pull low to reset the module)
6 NC Not connected (reserved for future use)

Usage Instructions

Connecting the Emic-2 to an Arduino UNO

To use the Emic-2 module with an Arduino UNO, follow these steps:

  1. Wiring:

    • Connect the VCC pin of the Emic-2 to the 5V pin on the Arduino.
    • Connect the GND pin of the Emic-2 to the GND pin on the Arduino.
    • Connect the SIN pin of the Emic-2 to the Arduino's digital pin 2 (TX).
    • Connect the SOUT pin of the Emic-2 to the Arduino's digital pin 3 (RX).
    • Optionally, connect the /RESET pin to a digital pin on the Arduino for manual resets.
  2. Arduino Code: Use the following example code to send text to the Emic-2 module and generate speech:

    #include <SoftwareSerial.h>
    
    // Define RX and TX pins for SoftwareSerial
    SoftwareSerial emicSerial(3, 2); // RX = pin 3, TX = pin 2
    
    void setup() {
      // Start the serial communication with the Emic-2 module
      emicSerial.begin(9600);
      delay(500); // Allow the module to initialize
    
      // Send a reset command to the Emic-2
      emicSerial.print('\n'); // Ensure the module is ready
      delay(100);
      emicSerial.print("R\n"); // Reset command
      delay(500); // Wait for the module to reset
    
      // Send a test message
      emicSerial.print("S Hello, I am the Emic-2 Text-to-Speech module.\n");
    }
    
    void loop() {
      // The loop is empty as this example only sends a single message
    }
    
  3. Audio Output:

    • Connect a speaker or headphones to the 3.5mm audio jack on the Emic-2 module.
    • Adjust the volume, pitch, and speaking rate using serial commands as needed.

Important Considerations

  • Power Supply: Ensure the module is powered within the specified voltage range (3.3V to 5.0V DC).
  • Serial Communication: Use a baud rate of 9600 for communication. Avoid sending commands too quickly; allow the module time to process each command.
  • Reset: If the module becomes unresponsive, use the /RESET pin or send the reset command (R\n) via serial.

Troubleshooting and FAQs

Common Issues

  1. No Audio Output:

    • Ensure the speaker or headphones are properly connected to the 3.5mm audio jack.
    • Verify that the volume is not set to 0 (mute). Use the V command to adjust the volume.
  2. Module Not Responding:

    • Check the wiring, especially the SIN and SOUT connections.
    • Ensure the baud rate is set to 9600 in your code.
    • Reset the module using the /RESET pin or the R\n command.
  3. Distorted or Low-Quality Audio:

    • Verify that the audio output is connected to a compatible speaker or amplifier.
    • Adjust the pitch and speaking rate to improve clarity.

FAQs

Q: Can the Emic-2 speak in different voices?
A: Yes, the Emic-2 supports multiple voices. Use the N command to select a voice. Refer to the module's user manual for a list of available voices.

Q: How do I change the language to Spanish?
A: Use the L command to switch languages. For example, send L1\n for Spanish and L0\n for English.

Q: Can I use the Emic-2 with a Raspberry Pi?
A: Yes, the Emic-2 can be connected to a Raspberry Pi using its UART pins. Ensure proper voltage level shifting if using the Pi's 3.3V logic.

By following this documentation, you can effectively integrate the Emic-2 TTS module into your projects and troubleshoot common issues.