How to Use Raspberry Pi AI HAT+ (26T): Examples, Pinouts, and Specs
Introduction
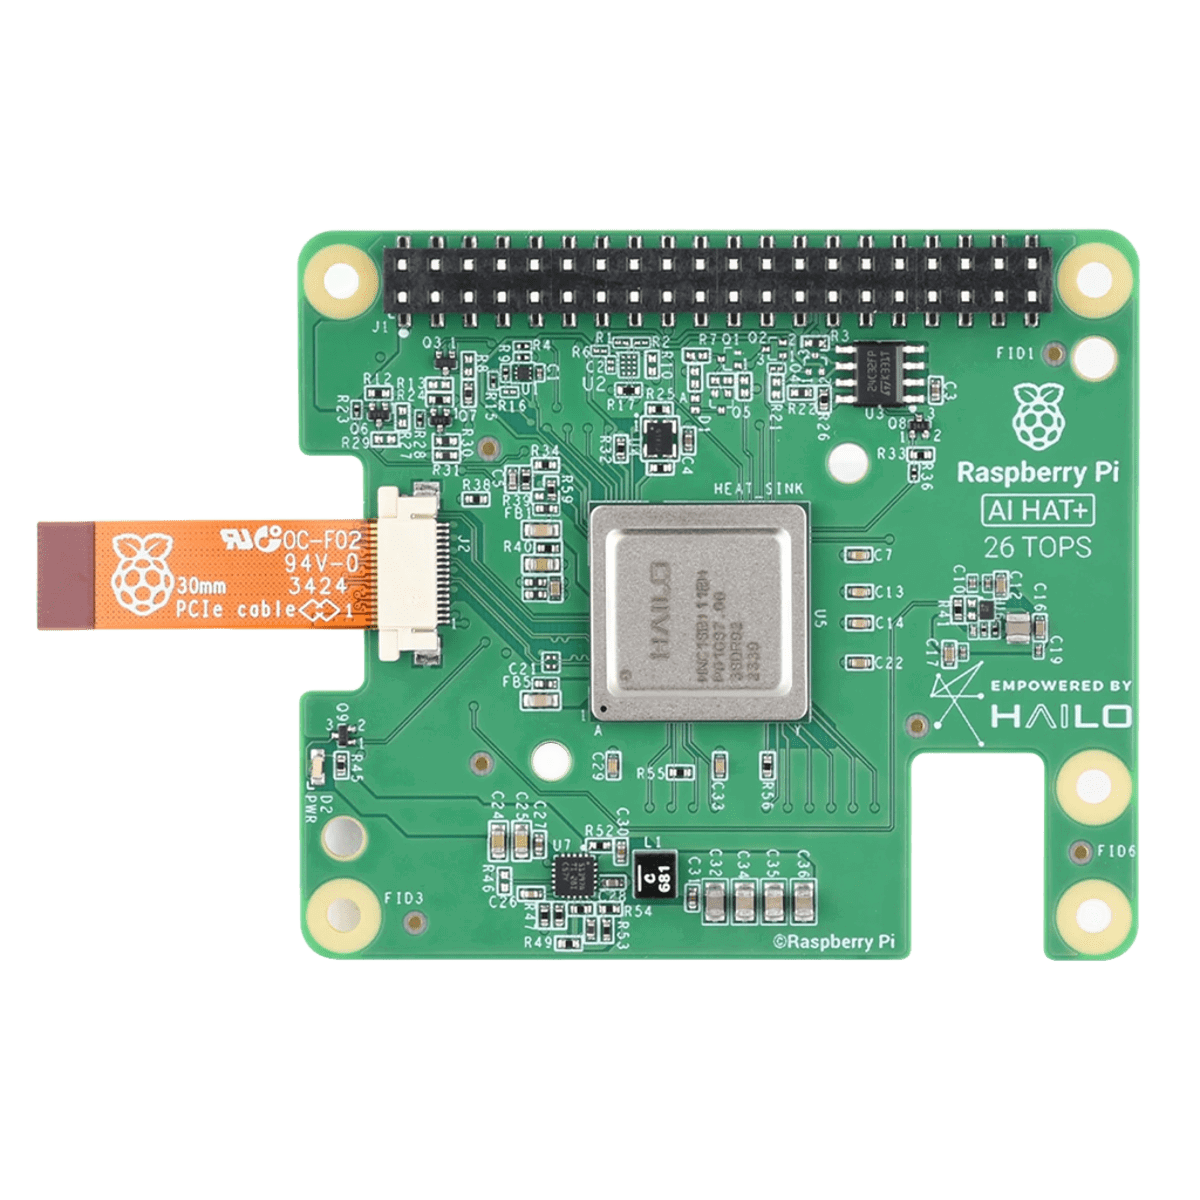
The Raspberry Pi AI HAT+ (26T) is an advanced add-on board designed to bring artificial intelligence (AI) capabilities to Raspberry Pi projects. Manufactured by Raspberry Pi, this HAT features a high-performance neural processing unit (NPU) optimized for machine learning tasks, enabling real-time AI inference on edge devices. It also includes GPIO pins for seamless integration with sensors, actuators, and other peripherals, making it ideal for AI-driven IoT applications.
Explore Projects Built with Raspberry Pi AI HAT+ (26T)


Explore Projects Built with Raspberry Pi AI HAT+ (26T)
Common Applications and Use Cases
- Image and Video Processing: Real-time object detection, facial recognition, and image classification.
- Natural Language Processing (NLP): Voice recognition and text-to-speech applications.
- Robotics: Autonomous navigation and decision-making for robots.
- IoT Devices: Smart home automation and edge AI applications.
- Industrial Automation: Predictive maintenance and quality control using AI.
Technical Specifications
The Raspberry Pi AI HAT+ (26T) is packed with features to support a wide range of AI and machine learning applications. Below are the key technical details:
General Specifications
| Parameter | Value |
|---|---|
| Manufacturer | Raspberry Pi |
| Part ID | AI HAT+ |
| Neural Processing Unit | 1 TOPS (Tera Operations Per Second) |
| GPIO Compatibility | 40-pin Raspberry Pi GPIO header |
| Power Supply | 5V DC (via Raspberry Pi GPIO or USB-C port) |
| Operating Temperature | -20°C to 70°C |
| Dimensions | 65mm x 56mm x 15mm |
Pin Configuration and Descriptions
The AI HAT+ connects to the Raspberry Pi via the standard 40-pin GPIO header. Below is the pin configuration for the HAT:
| Pin Number | Pin Name | Description |
|---|---|---|
| 1 | 3.3V Power | Power supply for the HAT |
| 2 | 5V Power | Main power input for the HAT |
| 3 | GPIO2 (SDA1) | I2C Data Line |
| 5 | GPIO3 (SCL1) | I2C Clock Line |
| 7 | GPIO4 | General-purpose input/output |
| 8 | GPIO14 (TXD) | UART Transmit |
| 10 | GPIO15 (RXD) | UART Receive |
| 12 | GPIO18 (PWM0) | Pulse-width modulation output |
| 16 | GPIO23 | General-purpose input/output |
| 18 | GPIO24 | General-purpose input/output |
| 20 | GND | Ground |
| 22 | GPIO25 | General-purpose input/output |
| 40 | GPIO21 (SDA3) | I2C Data Line (alternative) |
Usage Instructions
How to Use the AI HAT+ in a Circuit
- Attach the HAT to the Raspberry Pi: Align the 40-pin GPIO header on the HAT with the Raspberry Pi's GPIO pins and press gently to secure the connection.
- Power the Raspberry Pi: The HAT draws power directly from the Raspberry Pi. Ensure the Raspberry Pi is powered via its USB-C port.
- Install Required Software:
- Update the Raspberry Pi OS:
sudo apt update && sudo apt upgrade - Install the AI HAT+ drivers and SDK:
sudo apt install ai-hat-plus-sdk
- Update the Raspberry Pi OS:
- Connect Peripherals: Use the GPIO pins to connect sensors, cameras, or other devices as needed for your project.
- Run AI Models: Deploy pre-trained machine learning models using the HAT's NPU for real-time inference.
Important Considerations and Best Practices
- Cooling: The NPU generates heat during intensive tasks. Use a heatsink or fan for optimal performance.
- Power Supply: Ensure the Raspberry Pi's power supply can handle the additional load of the HAT.
- Software Compatibility: The AI HAT+ SDK supports TensorFlow Lite and ONNX models. Ensure your models are compatible.
- GPIO Usage: Avoid conflicts by checking the pin assignments of connected peripherals.
Example Code for Raspberry Pi
Below is an example Python script to perform object detection using the AI HAT+:
Import necessary libraries
from ai_hat_plus import AIHAT import cv2
Initialize the AI HAT+ object
ai_hat = AIHAT()
Load a pre-trained model (TensorFlow Lite format)
model_path = "/home/pi/models/object_detection.tflite" ai_hat.load_model(model_path)
Open the camera feed
camera = cv2.VideoCapture(0)
while True: # Capture a frame from the camera ret, frame = camera.read() if not ret: print("Failed to capture frame. Exiting...") break
# Perform object detection
results = ai_hat.run_inference(frame)

# Display results on the frame
for obj in results:
    # Draw bounding boxes and labels
    x, y, w, h = obj['bbox']
    label = obj['label']
    confidence = obj['confidence']
    cv2.rectangle(frame, (x, y), (x+w, y+h), (0, 255, 0), 2)
    cv2.putText(frame, f"{label} ({confidence:.2f})", (x, y-10),
                cv2.FONT_HERSHEY_SIMPLEX, 0.5, (0, 255, 0), 2)

# Display the frame
cv2.imshow("Object Detection", frame)

# Exit on pressing 'q'
if cv2.waitKey(1) & 0xFF == ord('q'):
    break
Release resources
camera.release() cv2.destroyAllWindows()
Troubleshooting and FAQs
Common Issues and Solutions
HAT Not Detected:
- Ensure the HAT is properly seated on the GPIO header.
- Verify that the AI HAT+ drivers are installed correctly.
High Temperature:
- Use a heatsink or fan to cool the HAT during intensive tasks.
- Avoid running the HAT in environments exceeding 70°C.
Model Incompatibility:
- Check that the model is in TensorFlow Lite or ONNX format.
- Use the AI HAT+ SDK to convert unsupported models.
Power Issues:
- Ensure the Raspberry Pi's power supply provides at least 3A at 5V.
FAQs
Q: Can I use the AI HAT+ with Raspberry Pi Zero?
A: Yes, but performance may be limited due to the lower processing power of the Raspberry Pi Zero.Q: What is the maximum model size supported?
A: The AI HAT+ supports models up to 512MB in size.Q: Does the HAT support multiple camera inputs?
A: No, the HAT supports a single camera input via the Raspberry Pi's camera interface.Q: Can I use the HAT for training models?
A: No, the HAT is designed for inference only. Use a more powerful system for training.
This concludes the documentation for the Raspberry Pi AI HAT+ (26T). For further assistance, refer to the official Raspberry Pi documentation or community forums.