Cirkit Designer Logo
Cirkit Designer
Your all-in-one circuit design IDE
Home / 
Component Documentation

How to Use Gravity BME680 environmental sensor: Examples, Pinouts, and Specs

Image of Gravity BME680 environmental sensor
Cirkit Designer LogoDesign with Gravity BME680 environmental sensor in Cirkit Designer

Introduction

The Gravity BME680 Environmental Sensor, manufactured by DFRobot, is a versatile and high-performance module designed to measure multiple environmental parameters. This sensor integrates temperature, humidity, barometric pressure, and gas (VOC - Volatile Organic Compounds) sensing capabilities into a single compact unit. It is ideal for applications requiring comprehensive environmental monitoring, such as indoor air quality assessment, weather stations, and IoT-based smart home systems.

Explore Projects Built with Gravity BME680 environmental sensor

Use Cirkit Designer to design, explore, and prototype these projects online. Some projects support real-time simulation. Click "Open Project" to start designing instantly!
Arduino UNO with Adafruit BME680 Sensor Data Logger
Image of Adafruit BME680 + Arduino UNO: A project utilizing Gravity BME680 environmental sensor in a practical application
This circuit connects an Adafruit BME680 sensor to an Arduino UNO for the purpose of measuring environmental data such as temperature, pressure, humidity, gas resistance, and altitude. The BME680 is interfaced with the Arduino over I2C, with power supplied from the Arduino's 5V pin. The embedded code on the Arduino reads the sensor data and outputs it to the serial monitor, allowing for real-time environmental monitoring.
Cirkit Designer LogoOpen Project in Cirkit Designer
Arduino Nano-Based Environmental Data Logger with Altitude Triggered MOSFET Control
Image of alpha 2: A project utilizing Gravity BME680 environmental sensor in a practical application
This circuit is designed for environmental data logging and altitude-triggered control. It uses an Arduino Nano to interface with a BME680 sensor for temperature, humidity, pressure, and gas resistance measurements, and an MPU6050 for acceleration and gyroscopic data. Data is logged to an SD card, and a MOSFET controlled by the Arduino triggers an external device when a certain altitude change is detected.
Cirkit Designer LogoOpen Project in Cirkit Designer
Arduino Uno and BME680 Sensor-Based Environmental Monitoring System
Image of BME680: A project utilizing Gravity BME680 environmental sensor in a practical application
This circuit consists of an Arduino Uno R3 connected to a BME680 environmental sensor. The Arduino reads temperature, pressure, humidity, and gas resistance data from the BME680 via I2C communication and outputs the data to the Serial Monitor every 2 seconds.
Cirkit Designer LogoOpen Project in Cirkit Designer
ESP8266-Based Environmental Monitoring System
Image of Stacja_Pogodowa1: A project utilizing Gravity BME680 environmental sensor in a practical application
This circuit is designed to collect environmental data using an ESP-8266 microcontroller connected to a BMP180 barometric pressure sensor, a GY-30 BH1750FVI digital light intensity sensor, and a DHT11 temperature and humidity sensor. The sensors are interfaced with the ESP-8266 via I2C (SCL and SDA lines) and digital IO pins, and they share a common power supply (3.3V) and ground. The circuit is likely intended for weather monitoring or home automation applications, with capabilities to measure temperature, humidity, barometric pressure, and light intensity.
Cirkit Designer LogoOpen Project in Cirkit Designer

Explore Projects Built with Gravity BME680 environmental sensor

Use Cirkit Designer to design, explore, and prototype these projects online. Some projects support real-time simulation. Click "Open Project" to start designing instantly!
Image of Adafruit BME680 + Arduino UNO: A project utilizing Gravity BME680 environmental sensor in a practical application
Arduino UNO with Adafruit BME680 Sensor Data Logger
This circuit connects an Adafruit BME680 sensor to an Arduino UNO for the purpose of measuring environmental data such as temperature, pressure, humidity, gas resistance, and altitude. The BME680 is interfaced with the Arduino over I2C, with power supplied from the Arduino's 5V pin. The embedded code on the Arduino reads the sensor data and outputs it to the serial monitor, allowing for real-time environmental monitoring.
Cirkit Designer LogoOpen Project in Cirkit Designer
Image of alpha 2: A project utilizing Gravity BME680 environmental sensor in a practical application
Arduino Nano-Based Environmental Data Logger with Altitude Triggered MOSFET Control
This circuit is designed for environmental data logging and altitude-triggered control. It uses an Arduino Nano to interface with a BME680 sensor for temperature, humidity, pressure, and gas resistance measurements, and an MPU6050 for acceleration and gyroscopic data. Data is logged to an SD card, and a MOSFET controlled by the Arduino triggers an external device when a certain altitude change is detected.
Cirkit Designer LogoOpen Project in Cirkit Designer
Image of BME680: A project utilizing Gravity BME680 environmental sensor in a practical application
Arduino Uno and BME680 Sensor-Based Environmental Monitoring System
This circuit consists of an Arduino Uno R3 connected to a BME680 environmental sensor. The Arduino reads temperature, pressure, humidity, and gas resistance data from the BME680 via I2C communication and outputs the data to the Serial Monitor every 2 seconds.
Cirkit Designer LogoOpen Project in Cirkit Designer
Image of Stacja_Pogodowa1: A project utilizing Gravity BME680 environmental sensor in a practical application
ESP8266-Based Environmental Monitoring System
This circuit is designed to collect environmental data using an ESP-8266 microcontroller connected to a BMP180 barometric pressure sensor, a GY-30 BH1750FVI digital light intensity sensor, and a DHT11 temperature and humidity sensor. The sensors are interfaced with the ESP-8266 via I2C (SCL and SDA lines) and digital IO pins, and they share a common power supply (3.3V) and ground. The circuit is likely intended for weather monitoring or home automation applications, with capabilities to measure temperature, humidity, barometric pressure, and light intensity.
Cirkit Designer LogoOpen Project in Cirkit Designer

Common Applications and Use Cases

  • Indoor air quality monitoring
  • Weather stations and environmental data logging
  • Smart home automation systems
  • IoT devices for environmental sensing
  • HVAC (Heating, Ventilation, and Air Conditioning) optimization

Technical Specifications

The Gravity BME680 sensor is based on Bosch's BME680 chip and is designed for easy integration with microcontrollers, including Arduino and Raspberry Pi. Below are the key technical details:

Key Technical Details

Parameter Specification
Supply Voltage 3.3V - 5V
Operating Current < 3mA
Temperature Range -40°C to +85°C
Humidity Range 0% to 100% RH
Pressure Range 300 hPa to 1100 hPa
Gas Measurement VOC (Volatile Organic Compounds)
Communication Interface I2C
Dimensions 30mm x 22mm

Pin Configuration and Descriptions

Pin Name Description
VCC Power supply input (3.3V - 5V)
GND Ground connection
SDA I2C data line
SCL I2C clock line

Usage Instructions

The Gravity BME680 sensor is straightforward to use and can be easily connected to microcontrollers like the Arduino UNO. Below are the steps to integrate and use the sensor in a circuit:

Connecting the Sensor

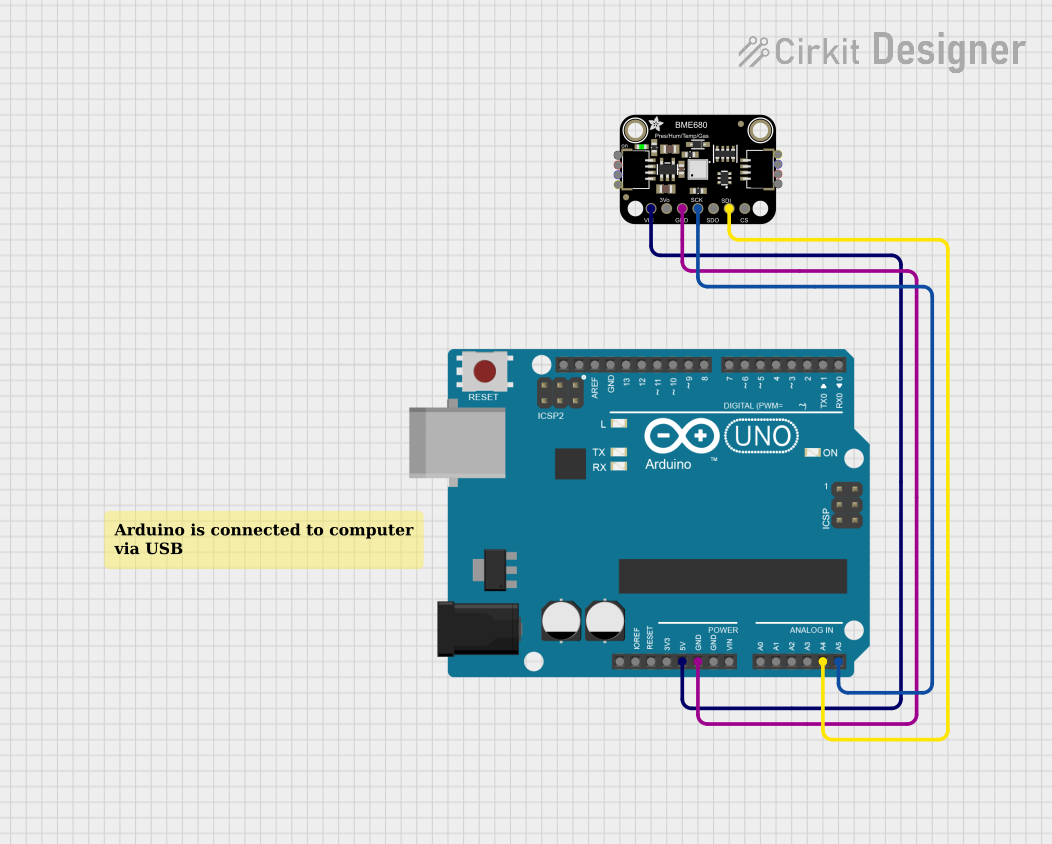
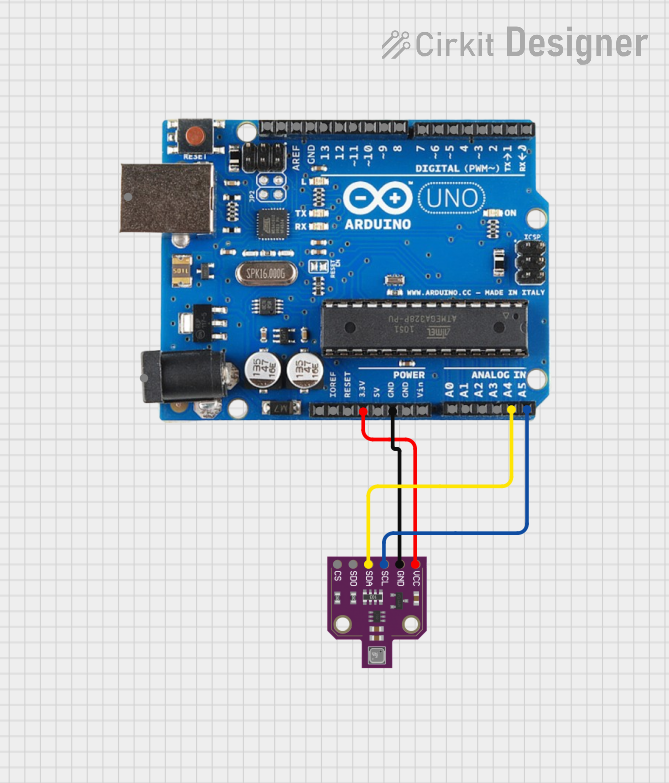
  1. Power Supply: Connect the VCC pin to the 3.3V or 5V pin of the microcontroller and the GND pin to the ground.
  2. I2C Communication: Connect the SDA pin to the Arduino's A4 pin and the SCL pin to the A5 pin (for Arduino UNO). For other boards, refer to their I2C pinout.
  3. Pull-up Resistors: Ensure that the I2C lines (SDA and SCL) have pull-up resistors (typically 4.7kΩ). Some breakout boards include these resistors by default.

Arduino Code Example

Below is an example Arduino sketch to read data from the Gravity BME680 sensor using the DFRobot BME680 library:

#include <Wire.h>
#include "DFRobot_BME680.h"

// Create a BME680 object
DFRobot_BME680 bme680;

// Setup function
void setup() {
  Serial.begin(9600); // Initialize serial communication
  Wire.begin();       // Initialize I2C communication

  // Initialize the BME680 sensor
  if (!bme680.begin()) {
    Serial.println("Failed to initialize BME680 sensor!");
    while (1); // Halt execution if initialization fails
  }

  Serial.println("BME680 sensor initialized successfully.");
}

// Loop function
void loop() {
  // Read temperature, humidity, pressure, and gas data
  float temperature = bme680.readTemperature();
  float humidity = bme680.readHumidity();
  float pressure = bme680.readPressure();
  float gas = bme680.readGasResistance();

  // Print the sensor data to the Serial Monitor
  Serial.print("Temperature: ");
  Serial.print(temperature);
  Serial.println(" °C");

  Serial.print("Humidity: ");
  Serial.print(humidity);
  Serial.println(" %");

  Serial.print("Pressure: ");
  Serial.print(pressure);
  Serial.println(" hPa");

  Serial.print("Gas Resistance: ");
  Serial.print(gas);
  Serial.println(" ohms");

  delay(2000); // Wait for 2 seconds before the next reading
}

Important Considerations and Best Practices

  • Power Supply: Ensure the sensor is powered within the specified voltage range (3.3V - 5V).
  • I2C Address: The default I2C address of the BME680 is 0x77. If multiple I2C devices are connected, ensure there are no address conflicts.
  • Calibration: Allow the sensor to stabilize for a few minutes after powering on for accurate gas measurements.
  • Ventilation: Place the sensor in a well-ventilated area for reliable VOC readings.

Troubleshooting and FAQs

Common Issues and Solutions

  1. Sensor Not Detected

    • Cause: Incorrect wiring or I2C address mismatch.
    • Solution: Double-check the connections and ensure the correct I2C address is used in the code.
  2. Inaccurate Readings

    • Cause: Insufficient stabilization time or poor ventilation.
    • Solution: Allow the sensor to stabilize for 5-10 minutes after powering on. Ensure the sensor is placed in an open area.
  3. Gas Resistance Always Zero

    • Cause: Faulty sensor or incorrect library usage.
    • Solution: Verify the library and code implementation. Replace the sensor if the issue persists.

FAQs

Q: Can the BME680 measure CO2 levels?
A: No, the BME680 measures VOCs, which are indicative of air quality but not specific CO2 levels.

Q: Can I use the BME680 with a 3.3V microcontroller?
A: Yes, the sensor supports both 3.3V and 5V power supplies, making it compatible with a wide range of microcontrollers.

Q: How do I reduce noise in the sensor readings?
A: Use averaging techniques in your code to smooth out fluctuations in the data.

Q: Is the sensor waterproof?
A: No, the BME680 is not waterproof. Avoid exposing it to water or high humidity for extended periods.

By following this documentation, you can effectively integrate and utilize the Gravity BME680 Environmental Sensor in your projects.