Cirkit Designer Logo
Cirkit Designer
Your all-in-one circuit design IDE
Home / 
Component Documentation

How to Use 4 Digit 7-Segment Display Module TM1637: Examples, Pinouts, and Specs

Image of 4 Digit 7-Segment Display Module TM1637
Cirkit Designer LogoDesign with 4 Digit 7-Segment Display Module TM1637 in Cirkit Designer

Introduction

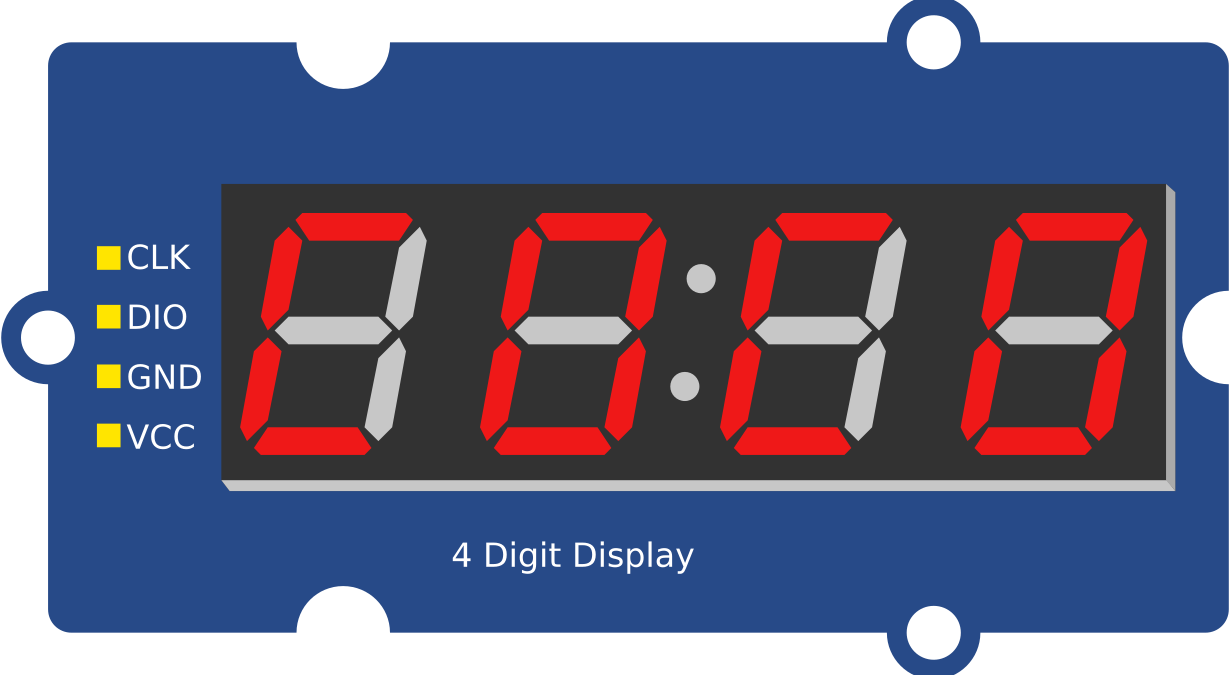
The 4 Digit 7-Segment Display Module TM1637 is a compact and efficient digital display module designed for numerical output. It features four 7-segment displays capable of showing digits, symbols, or characters. The module is controlled via a simple two-wire interface (CLK and DIO), making it easy to integrate into microcontroller-based projects.

This module is widely used in applications such as:

  • Digital clocks
  • Timers and counters
  • Temperature and humidity displays
  • Scoreboards
  • DIY electronics projects requiring numerical output

Its simplicity and versatility make it a popular choice for hobbyists and professionals alike.

Explore Projects Built with 4 Digit 7-Segment Display Module TM1637

Use Cirkit Designer to design, explore, and prototype these projects online. Some projects support real-time simulation. Click "Open Project" to start designing instantly!
Arduino Nano and TM1637 Real-Time Clock Display
Image of test: A project utilizing 4 Digit 7-Segment Display Module TM1637 in a practical application
This circuit uses an Arduino Nano to control a TM1637 4-digit 7-segment display module, displaying the current time. The Arduino reads the time from an RTC (Real-Time Clock) module and updates the display every second.
Cirkit Designer LogoOpen Project in Cirkit Designer
Arduino Nano 33 BLE Battery-Powered Display Interface
Image of senior design 1: A project utilizing 4 Digit 7-Segment Display Module TM1637 in a practical application
This circuit features a Nano 33 BLE microcontroller interfaced with a TM1637 4-digit 7-segment display for information output, powered by a 3.7V battery managed by a TP4056 charging module. The microcontroller communicates with the display to present data, while the TP4056 ensures the battery is charged safely and provides power to the system.
Cirkit Designer LogoOpen Project in Cirkit Designer
Raspberry Pi 3B Controlled TM1637 Digital Display Interface
Image of clock: A project utilizing 4 Digit 7-Segment Display Module TM1637 in a practical application
This circuit connects a TM1637 display module to a Raspberry Pi 3B. The Raspberry Pi controls the display via GPIO pins 20 and 21 for data and clock signals, respectively. The TM1637 is powered by the Raspberry Pi's 5V supply, and both devices share a common ground.
Cirkit Designer LogoOpen Project in Cirkit Designer
Arduino UNO-Based Interactive LED Game with 8x8 Matrix and TM1637 Display
Image of Gra_na_refleks: A project utilizing 4 Digit 7-Segment Display Module TM1637 in a practical application
This circuit is a game system controlled by an Arduino UNO, featuring an 8x8 LED matrix, a 4x4 keypad, and a TM1637 4-digit display. The user interacts with the game via the keypad, and the game state is displayed on the LED matrix and the TM1637 display, with power supplied by a 9V battery.
Cirkit Designer LogoOpen Project in Cirkit Designer

Explore Projects Built with 4 Digit 7-Segment Display Module TM1637

Use Cirkit Designer to design, explore, and prototype these projects online. Some projects support real-time simulation. Click "Open Project" to start designing instantly!
Image of test: A project utilizing 4 Digit 7-Segment Display Module TM1637 in a practical application
Arduino Nano and TM1637 Real-Time Clock Display
This circuit uses an Arduino Nano to control a TM1637 4-digit 7-segment display module, displaying the current time. The Arduino reads the time from an RTC (Real-Time Clock) module and updates the display every second.
Cirkit Designer LogoOpen Project in Cirkit Designer
Image of senior design 1: A project utilizing 4 Digit 7-Segment Display Module TM1637 in a practical application
Arduino Nano 33 BLE Battery-Powered Display Interface
This circuit features a Nano 33 BLE microcontroller interfaced with a TM1637 4-digit 7-segment display for information output, powered by a 3.7V battery managed by a TP4056 charging module. The microcontroller communicates with the display to present data, while the TP4056 ensures the battery is charged safely and provides power to the system.
Cirkit Designer LogoOpen Project in Cirkit Designer
Image of clock: A project utilizing 4 Digit 7-Segment Display Module TM1637 in a practical application
Raspberry Pi 3B Controlled TM1637 Digital Display Interface
This circuit connects a TM1637 display module to a Raspberry Pi 3B. The Raspberry Pi controls the display via GPIO pins 20 and 21 for data and clock signals, respectively. The TM1637 is powered by the Raspberry Pi's 5V supply, and both devices share a common ground.
Cirkit Designer LogoOpen Project in Cirkit Designer
Image of Gra_na_refleks: A project utilizing 4 Digit 7-Segment Display Module TM1637 in a practical application
Arduino UNO-Based Interactive LED Game with 8x8 Matrix and TM1637 Display
This circuit is a game system controlled by an Arduino UNO, featuring an 8x8 LED matrix, a 4x4 keypad, and a TM1637 4-digit display. The user interacts with the game via the keypad, and the game state is displayed on the LED matrix and the TM1637 display, with power supplied by a 9V battery.
Cirkit Designer LogoOpen Project in Cirkit Designer

Technical Specifications

  • Operating Voltage: 3.3V to 5V DC
  • Current Consumption: ~80mA (varies with brightness settings)
  • Interface: 2-wire (CLK and DIO)
  • Display Type: 4-digit 7-segment LED
  • Brightness Control: Adjustable via software
  • Driver IC: TM1637
  • Dimensions: ~42mm x 24mm x 12mm

Pin Configuration and Descriptions

The module has a 4-pin interface, as described in the table below:

Pin Name Description Connection to Microcontroller
VCC Power supply (3.3V to 5V) Connect to 3.3V or 5V pin
GND Ground Connect to GND
DIO Data input/output Connect to a digital I/O pin
CLK Clock signal Connect to a digital I/O pin

Usage Instructions

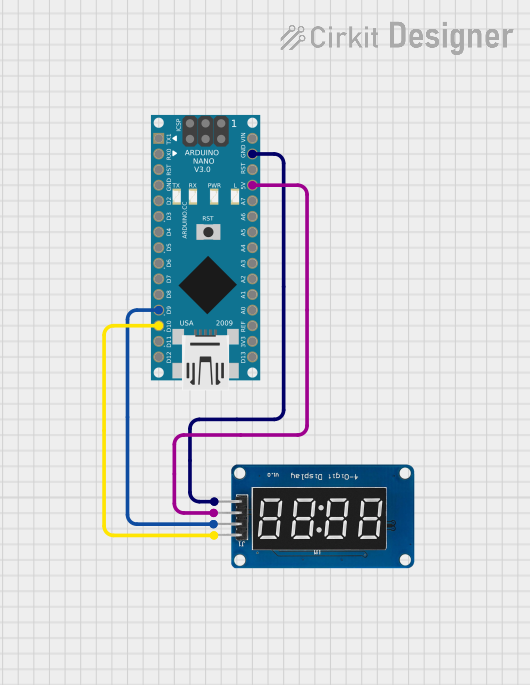
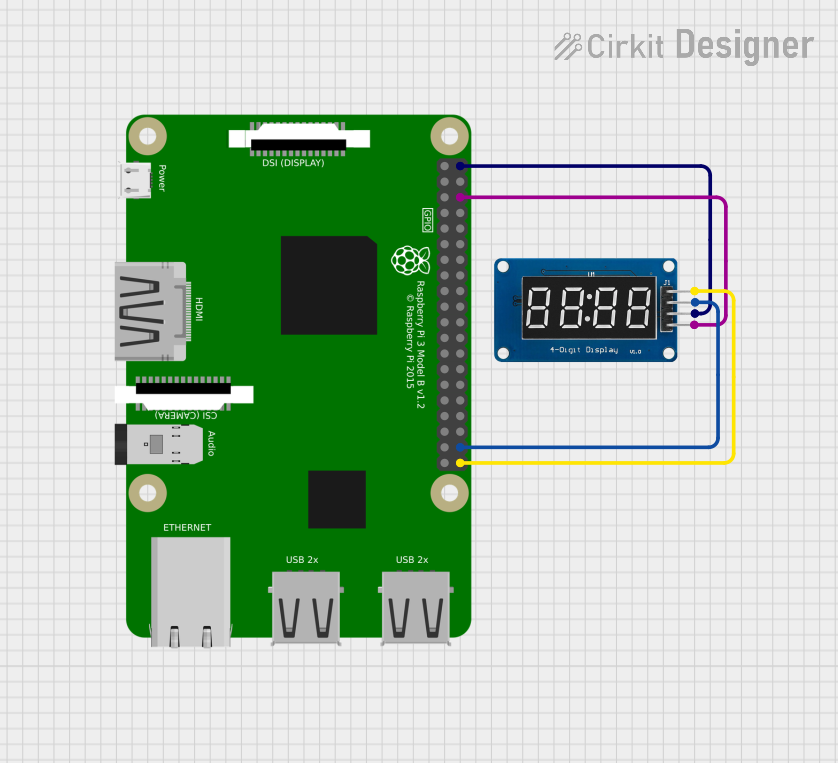
Connecting the TM1637 to a Microcontroller

To use the TM1637 module, connect it to a microcontroller (e.g., Arduino UNO) as follows:

  1. Connect the VCC pin to the 5V pin on the Arduino.
  2. Connect the GND pin to the GND pin on the Arduino.
  3. Connect the DIO pin to a digital I/O pin (e.g., D2).
  4. Connect the CLK pin to another digital I/O pin (e.g., D3).

Example Code for Arduino UNO

Below is an example Arduino sketch to display numbers on the TM1637 module. This code uses the TM1637Display library, which simplifies communication with the module.

#include <TM1637Display.h>

// Define the CLK and DIO pins connected to the TM1637 module
#define CLK 3  // Clock pin
#define DIO 2  // Data pin

// Initialize the TM1637 display object
TM1637Display display(CLK, DIO);

void setup() {
  // Set the brightness of the display (0 to 7)
  display.setBrightness(5);

  // Display a test pattern (e.g., "1234")
  display.showNumberDec(1234);
}

void loop() {
  // Example: Display a counter that increments every second
  for (int i = 0; i <= 9999; i++) {
    display.showNumberDec(i);  // Display the number
    delay(1000);               // Wait for 1 second
  }
}

Important Considerations

  • Ensure the module is powered within its operating voltage range (3.3V to 5V).
  • Use appropriate pull-up resistors if the microcontroller's I/O pins require them.
  • Avoid exceeding the maximum current rating to prevent damage to the module.
  • Adjust the brightness setting to balance visibility and power consumption.

Troubleshooting and FAQs

Common Issues and Solutions

  1. No display or incorrect output:

    • Verify all connections (VCC, GND, DIO, CLK) are secure and correct.
    • Ensure the module is powered with the correct voltage (3.3V to 5V).
    • Check the code for errors, especially pin assignments.
  2. Flickering or dim display:

    • Reduce the brightness setting in the code.
    • Ensure the power supply can provide sufficient current (~80mA).
  3. Module not responding to commands:

    • Confirm the TM1637Display library is installed correctly.
    • Double-check the CLK and DIO pin connections and assignments in the code.
  4. Display shows random or garbled characters:

    • Ensure the microcontroller's I/O pins are not being used by other peripherals.
    • Verify the data and clock signals are not affected by noise or interference.

FAQs

Q: Can I use the TM1637 module with a 3.3V microcontroller?
A: Yes, the module supports 3.3V operation. Ensure all connections are compatible with the microcontroller's voltage levels.

Q: How do I display a decimal point or colon?
A: The TM1637Display library provides functions to control individual segments, including the decimal point and colon. Refer to the library documentation for details.

Q: Can I connect multiple TM1637 modules to one microcontroller?
A: Yes, but each module will require its own CLK and DIO pins. Alternatively, you can use multiplexing techniques.

By following this documentation, you can effectively integrate and use the TM1637 4-digit 7-segment display module in your projects.