Cirkit Designer Logo
Cirkit Designer
Your all-in-one circuit design IDE
Home / 
Component Documentation

How to Use Adafruit MagTag 2.9in: Examples, Pinouts, and Specs

Image of Adafruit MagTag 2.9in
Cirkit Designer LogoDesign with Adafruit MagTag 2.9in in Cirkit Designer

Introduction

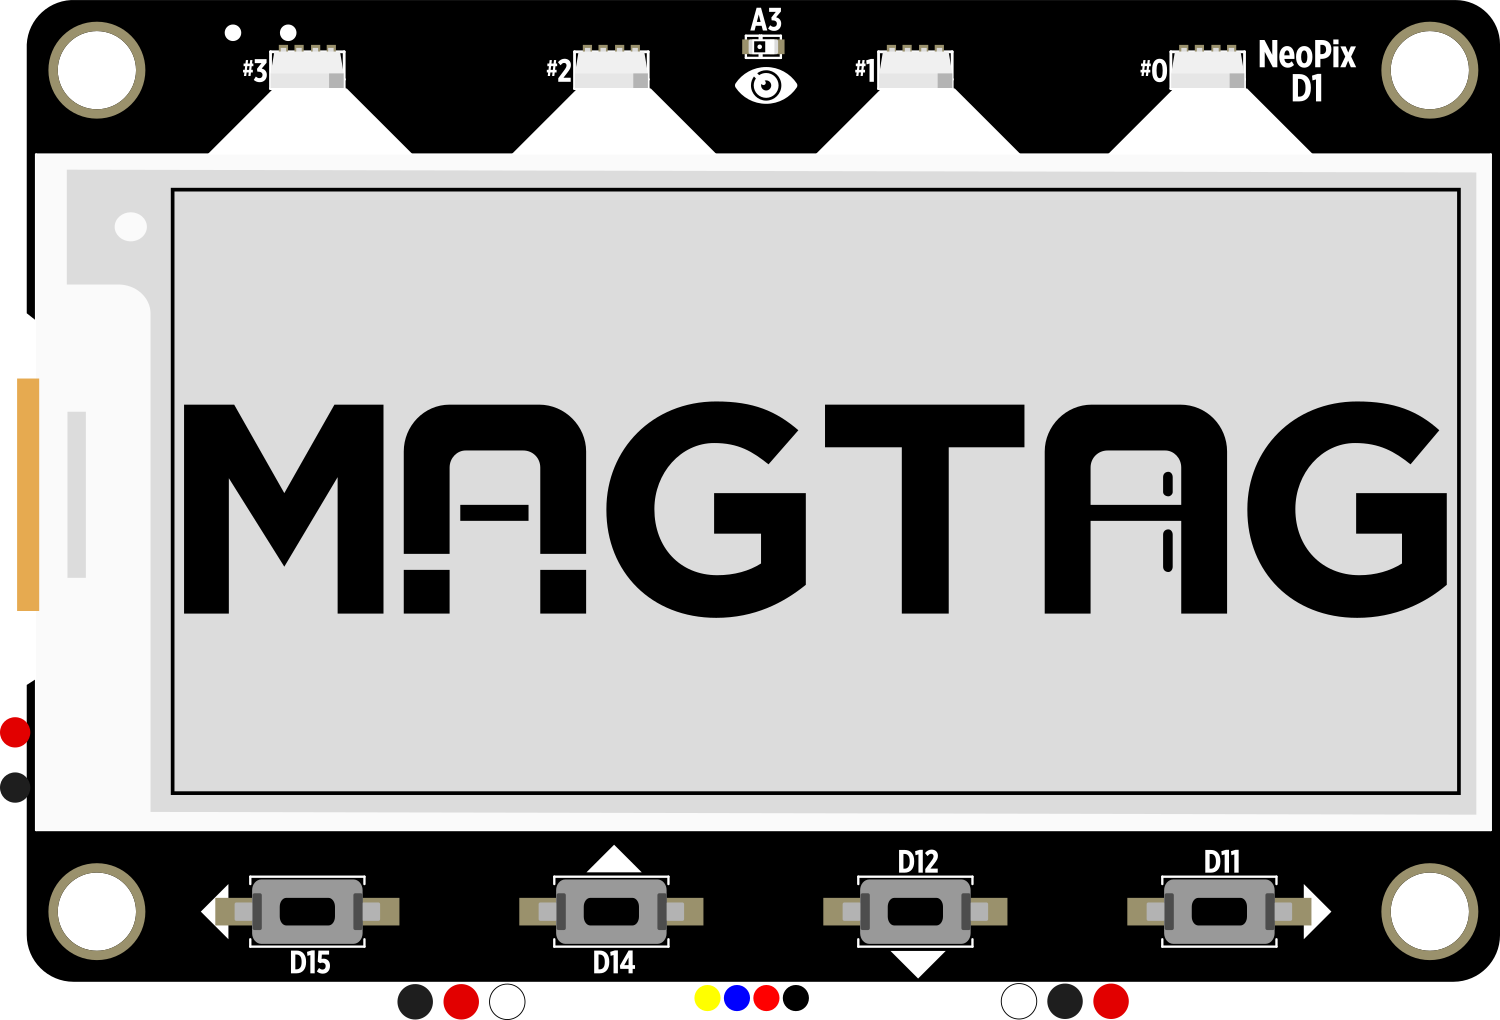
The Adafruit MagTag 2.9in is an innovative e-paper display module that combines a 2.9-inch grayscale e-ink display with an ESP32-S2 Wi-Fi microcontroller. This component is designed for creating low-power, wireless Internet of Things (IoT) projects that require visual data representation without the need for constant power. Common applications include digital price tags, information boards, schedule displays, and any project where remote updating of a static display is beneficial.

Explore Projects Built with Adafruit MagTag 2.9in

Use Cirkit Designer to design, explore, and prototype these projects online. Some projects support real-time simulation. Click "Open Project" to start designing instantly!
ATmega328P-Based Sensor Hub with OLED Display and LIDAR
Image of TILTPCB: A project utilizing Adafruit MagTag 2.9in in a practical application
This circuit features an Mtiny Uno ATmega328P microcontroller as its central processing unit, interfacing with a variety of sensors and peripherals. It includes a 0.96" OLED display and an MPU6050 accelerometer/gyroscope for user interface and motion sensing, respectively. The circuit also integrates a TF LUNA LIDAR for distance measurement, a DHT11 sensor for temperature and humidity readings, and uses a 9V battery with a 7805 voltage regulator for power management. Communication with a computer for programming and data exchange is facilitated by an Adafruit FTDI Friend module.
Cirkit Designer LogoOpen Project in Cirkit Designer
Battery-Powered Sensor Hub with Adafruit QT Py RP2040 and OLED Display
Image of 512: A project utilizing Adafruit MagTag 2.9in in a practical application
This circuit features an Adafruit QT Py RP2040 microcontroller interfacing with an MPU-6050 accelerometer, an Adafruit APDS-9960 sensor, and a 0.96" OLED display via I2C communication. It is powered by a 3.7V LiPo battery and includes a green LED with a current-limiting resistor connected to an analog pin of the microcontroller.
Cirkit Designer LogoOpen Project in Cirkit Designer
Battery-Powered Arduino Nano Weather Station with LoRa and SD Card Storage
Image of CanSat: A project utilizing Adafruit MagTag 2.9in in a practical application
This circuit is a multi-sensor data acquisition system powered by an 18650 Li-ion battery and managed by two Arduino Nano microcontrollers. It includes various sensors such as BMP280, ADXL345, AMG8833, MAG3110, and OV7670 for environmental and motion data, as well as a LoRa module for wireless communication, an SD card module for data storage, and LEDs and a piezo buzzer for status indication.
Cirkit Designer LogoOpen Project in Cirkit Designer
Battery-Powered Smart Sensor Hub with Adafruit QT Py RP2040
Image of wearable final: A project utilizing Adafruit MagTag 2.9in in a practical application
This circuit features an Adafruit QT Py RP2040 microcontroller interfaced with an APDS9960 proximity sensor, an MPU6050 accelerometer and gyroscope, and an OLED display via I2C communication. It also includes a buzzer controlled by the microcontroller and is powered by a 3.7V LiPo battery with a toggle switch for power control.
Cirkit Designer LogoOpen Project in Cirkit Designer

Explore Projects Built with Adafruit MagTag 2.9in

Use Cirkit Designer to design, explore, and prototype these projects online. Some projects support real-time simulation. Click "Open Project" to start designing instantly!
Image of TILTPCB: A project utilizing Adafruit MagTag 2.9in in a practical application
ATmega328P-Based Sensor Hub with OLED Display and LIDAR
This circuit features an Mtiny Uno ATmega328P microcontroller as its central processing unit, interfacing with a variety of sensors and peripherals. It includes a 0.96" OLED display and an MPU6050 accelerometer/gyroscope for user interface and motion sensing, respectively. The circuit also integrates a TF LUNA LIDAR for distance measurement, a DHT11 sensor for temperature and humidity readings, and uses a 9V battery with a 7805 voltage regulator for power management. Communication with a computer for programming and data exchange is facilitated by an Adafruit FTDI Friend module.
Cirkit Designer LogoOpen Project in Cirkit Designer
Image of 512: A project utilizing Adafruit MagTag 2.9in in a practical application
Battery-Powered Sensor Hub with Adafruit QT Py RP2040 and OLED Display
This circuit features an Adafruit QT Py RP2040 microcontroller interfacing with an MPU-6050 accelerometer, an Adafruit APDS-9960 sensor, and a 0.96" OLED display via I2C communication. It is powered by a 3.7V LiPo battery and includes a green LED with a current-limiting resistor connected to an analog pin of the microcontroller.
Cirkit Designer LogoOpen Project in Cirkit Designer
Image of CanSat: A project utilizing Adafruit MagTag 2.9in in a practical application
Battery-Powered Arduino Nano Weather Station with LoRa and SD Card Storage
This circuit is a multi-sensor data acquisition system powered by an 18650 Li-ion battery and managed by two Arduino Nano microcontrollers. It includes various sensors such as BMP280, ADXL345, AMG8833, MAG3110, and OV7670 for environmental and motion data, as well as a LoRa module for wireless communication, an SD card module for data storage, and LEDs and a piezo buzzer for status indication.
Cirkit Designer LogoOpen Project in Cirkit Designer
Image of wearable final: A project utilizing Adafruit MagTag 2.9in in a practical application
Battery-Powered Smart Sensor Hub with Adafruit QT Py RP2040
This circuit features an Adafruit QT Py RP2040 microcontroller interfaced with an APDS9960 proximity sensor, an MPU6050 accelerometer and gyroscope, and an OLED display via I2C communication. It also includes a buzzer controlled by the microcontroller and is powered by a 3.7V LiPo battery with a toggle switch for power control.
Cirkit Designer LogoOpen Project in Cirkit Designer

Technical Specifications

Key Technical Details

  • Display: 2.9-inch grayscale e-ink display
  • Resolution: 296x128 pixels
  • Wireless Connectivity: Wi-Fi (802.11b/g/n)
  • Microcontroller: ESP32-S2
  • Flash Memory: 4 MB
  • PSRAM: 2 MB
  • GPIO Pins: 21 with several capable of PWM, I2C, SPI
  • Battery Charging: Built-in Li-Poly battery charging via USB-C
  • Additional Features: Neopixel LED, Buzzer, 4 x Front Panel Buttons
  • Operating Voltage: 3.3V logic and power

Pin Configuration and Descriptions

Pin Number Name Description
1 GND Ground
2 3V 3.3V power
3 EN Enable pin
... ... ...
n IO21 GPIO pin 21

Note: This is a simplified representation. Refer to the actual datasheet for complete pinout information.

Usage Instructions

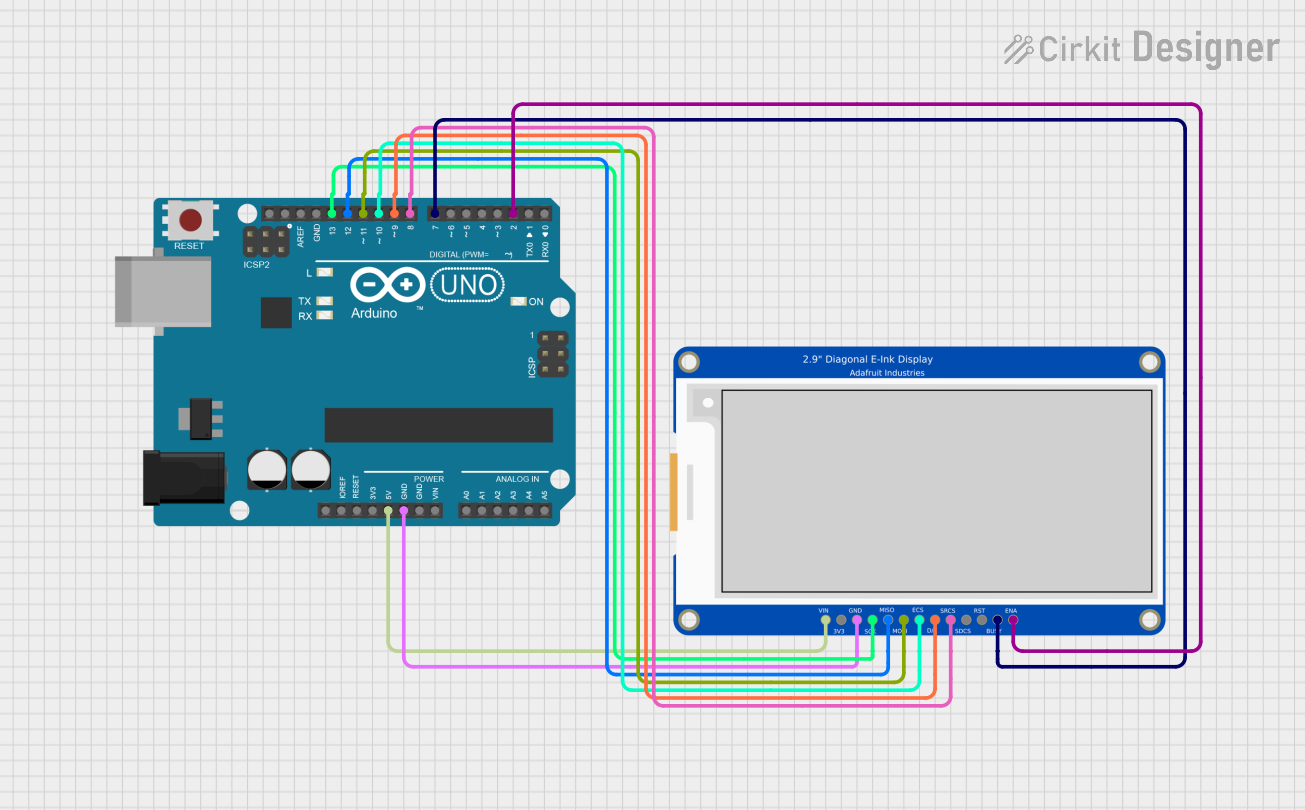
Integrating with a Circuit

To use the Adafruit MagTag 2.9in in a circuit:

  1. Connect the GND pin to the ground of your power supply.
  2. Connect the 3V pin to a 3.3V power source.
  3. Interface with the GPIO pins as required for your application.

Best Practices

  • Ensure that the power supply is stable and does not exceed the recommended voltage.
  • When programming the device, use the provided libraries from Adafruit to simplify development.
  • Avoid physical stress on the display as e-ink screens are fragile.
  • Keep the MagTag updated with the latest firmware to ensure optimal performance.

Example Code for Arduino UNO

#include <Adafruit_MagTag.h>
#include <WiFi.h>

// Replace with your network credentials
const char* ssid = "your_SSID";
const char* password = "your_PASSWORD";

Adafruit_MagTag magtag;

void setup() {
  // Initialize serial communication for debugging
  Serial.begin(115200);

  // Initialize MagTag and connect to Wi-Fi
  magtag.begin();
  WiFi.begin(ssid, password);
  while (WiFi.status() != WL_CONNECTED) {
    delay(500);
    Serial.print(".");
  }
  Serial.println("Connected to Wi-Fi!");
}

void loop() {
  // Clear the buffer
  magtag.clearBuffer();

  // Write text to the buffer
  magtag.print("Hello, MagTag!");

  // Display the buffer on the screen
  magtag.display();

  // Deep sleep to save power
  magtag.deepSleep();
}

Note: This example assumes the use of an ESP32-based board compatible with the MagTag library. The Arduino UNO does not natively support Wi-Fi or the MagTag library.

Troubleshooting and FAQs

Common Issues

  • Display not updating: Ensure that the battery is charged and the power supply is correctly connected.
  • Wi-Fi not connecting: Check your SSID and password, and ensure the MagTag is within range of the router.
  • Code not running: Verify that the correct board and port are selected in your IDE.

Solutions and Tips

  • If the display is not refreshing, try resetting the MagTag or re-uploading the code.
  • For Wi-Fi issues, ensure that the antenna is not obstructed and that you are using the correct Wi-Fi band (2.4 GHz for the ESP32-S2).
  • Always use the latest version of the Adafruit MagTag library to ensure compatibility.

FAQs

Q: Can the MagTag be powered by a battery? A: Yes, the MagTag includes a connector for a Li-Poly battery and has built-in charging circuitry.

Q: Is the display sunlight-readable? A: Yes, e-ink displays are excellent for readability in direct sunlight.

Q: How often can the display be updated? A: The display can be updated as often as needed, but frequent updates will consume more power.

For further assistance, consult the Adafruit forums or the detailed MagTag guides available on the Adafruit website.