How to Use Adafruit DPS310 Precision Barometric Pressure and Altitude Sensor: Examples, Pinouts, and Specs
Introduction
The Adafruit DPS310 Precision Barometric Pressure and Altitude Sensor is a high-accuracy environmental sensor designed to measure barometric pressure and altitude. It is based on the DPS310 sensor from Infineon, which features a capacitive pressure sensor and a high-resolution ADC for precise measurements. This sensor is ideal for applications such as weather monitoring, altitude tracking, and environmental data logging. Its compact size and I2C/SPI communication interfaces make it easy to integrate into a wide range of projects.
Explore Projects Built with Adafruit DPS310 Precision Barometric Pressure and Altitude Sensor

Explore Projects Built with Adafruit DPS310 Precision Barometric Pressure and Altitude Sensor
Common Applications
- Weather stations and environmental monitoring
- Altitude tracking for drones and aviation
- Indoor navigation and positioning systems
- IoT devices requiring pressure or altitude data
- Scientific experiments and data logging
Technical Specifications
The following table outlines the key technical details of the Adafruit DPS310 sensor:
| Parameter | Value |
|---|---|
| Operating Voltage | 1.7V to 3.6V |
| Logic Level Compatibility | 3.3V and 5V (via onboard regulator) |
| Pressure Measurement Range | 300 hPa to 1200 hPa |
| Pressure Resolution | 0.002 hPa |
| Altitude Resolution | ±0.5 meters |
| Operating Temperature Range | -40°C to +85°C |
| Communication Interfaces | I2C, SPI |
| I2C Address (Default) | 0x77 |
| Dimensions | 16mm x 16mm x 2mm |
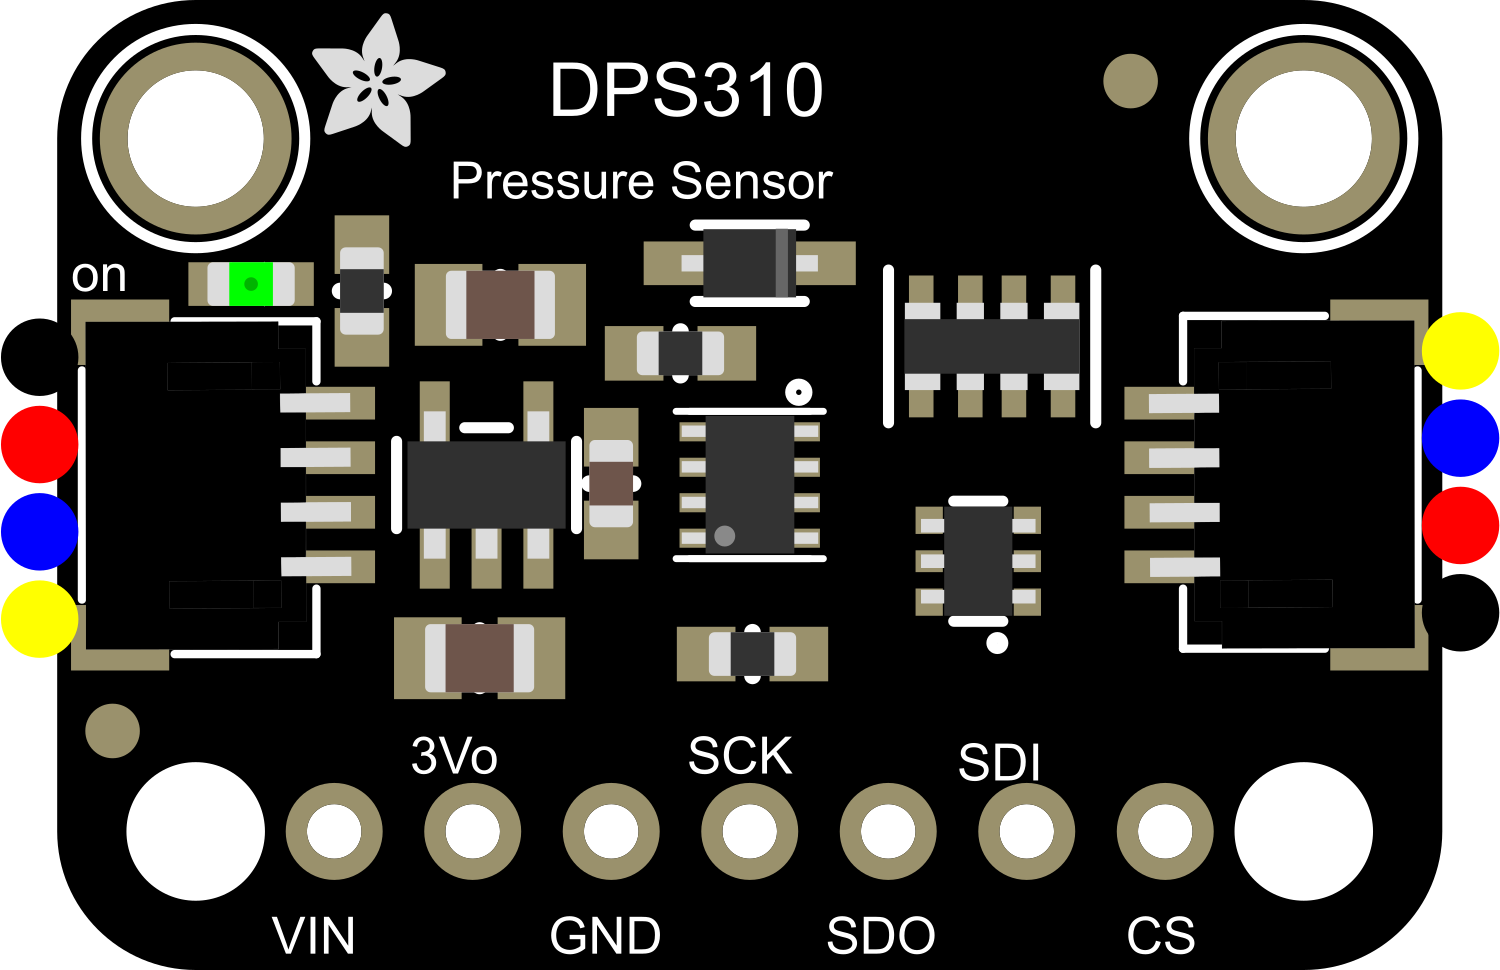
Pin Configuration
The Adafruit DPS310 sensor breakout board has the following pin layout:
| Pin | Name | Description |
|---|---|---|
| 1 | VIN | Power input (3.3V or 5V). Powers the onboard voltage regulator. |
| 2 | GND | Ground connection. |
| 3 | SCL | I2C clock line. Connect to the SCL pin of your microcontroller. |
| 4 | SDA | I2C data line. Connect to the SDA pin of your microcontroller. |
| 5 | CS | Chip Select for SPI communication. Leave unconnected for I2C mode. |
| 6 | SDO | SPI Data Out (MISO). Leave unconnected for I2C mode. |
| 7 | SDI | SPI Data In (MOSI). Leave unconnected for I2C mode. |
| 8 | INT | Interrupt pin. Can be used for event-driven applications. |
Usage Instructions
Connecting the Sensor
- Power the Sensor: Connect the VIN pin to a 3.3V or 5V power source and the GND pin to ground.
- I2C Communication:
- Connect the SCL pin to the SCL pin of your microcontroller.
- Connect the SDA pin to the SDA pin of your microcontroller.
- Ensure pull-up resistors (typically 4.7kΩ) are present on the I2C lines if not already included.
- SPI Communication (optional):
- Connect the CS, SDO, and SDI pins to the corresponding SPI pins on your microcontroller.
- Leave the SDA and SCL pins unconnected.
Using with Arduino UNO
The Adafruit DPS310 sensor is compatible with the Arduino platform. To get started:
- Install the Adafruit DPS310 Library from the Arduino Library Manager.
- Connect the sensor to the Arduino UNO as follows:
- VIN → 5V
- GND → GND
- SCL → A5 (I2C clock)
- SDA → A4 (I2C data)
- Use the following example code to read pressure and altitude data:
#include <Wire.h>
#include <Adafruit_Sensor.h>
#include "Adafruit_DPS310.h"

// Create an instance of the DPS310 sensor
Adafruit_DPS310 dps310;

void setup() {
  Serial.begin(9600);
  while (!Serial); // Wait for Serial Monitor to open

  // Initialize the DPS310 sensor
  if (!dps310.begin_I2C()) {
    Serial.println("Failed to find DPS310 sensor! Check wiring.");
    while (1); // Halt execution if sensor is not found
  }
  Serial.println("DPS310 sensor initialized successfully.");
}

void loop() {
  // Read pressure in hPa
  float pressure = dps310.readPressure();
  // Read altitude in meters
  float altitude = dps310.readAltitude();

  // Print the readings to the Serial Monitor
  Serial.print("Pressure: ");
  Serial.print(pressure);
  Serial.println(" hPa");

  Serial.print("Altitude: ");
  Serial.print(altitude);
  Serial.println(" meters");

  delay(1000); // Wait 1 second before the next reading
}
Best Practices
- Use short, high-quality wires to minimize noise in I2C or SPI communication.
- Avoid exposing the sensor to extreme temperatures or humidity beyond its operating range.
- Calibrate the altitude readings by providing a reference sea-level pressure value if needed.
- Use proper decoupling capacitors near the power supply pins to ensure stable operation.
Troubleshooting and FAQs
Common Issues
Sensor Not Detected:
- Ensure the wiring is correct and matches the pin configuration.
- Verify that the I2C address (default: 0x77) is not conflicting with other devices on the bus.
- Check for loose connections or damaged wires.
Incorrect Readings:
- Ensure the sensor is not exposed to rapid temperature changes or vibrations.
- Verify that the power supply voltage is within the specified range (1.7V to 3.6V).
- Check for proper calibration of altitude readings.
Communication Errors:
- Ensure pull-up resistors are present on the I2C lines if required.
- Verify that the correct communication protocol (I2C or SPI) is selected in the code.
FAQs
Q: Can the DPS310 measure temperature?
A: Yes, the DPS310 includes an integrated temperature sensor for compensation purposes. You can also read the temperature data directly.
Q: How accurate is the altitude measurement?
A: The altitude resolution is ±0.5 meters, but accuracy depends on the stability of the pressure readings and environmental conditions.
Q: Can I use the DPS310 with a 5V microcontroller?
A: Yes, the onboard voltage regulator and level shifters allow the sensor to work with 5V logic.
Q: What is the maximum I2C clock speed supported?
A: The DPS310 supports I2C clock speeds up to 400 kHz (Fast Mode).
By following this documentation, you can effectively integrate the Adafruit DPS310 Precision Barometric Pressure and Altitude Sensor into your projects for accurate environmental data measurements.