How to Use ESP32 CAM: Examples, Pinouts, and Specs
Introduction
The ESP32-CAM is a small-sized, low-power camera module that combines an ESP32-S chip and a 2MP camera. It allows for the creation of Internet of Things (IoT) applications with camera functionality, such as surveillance cameras, facial recognition systems, and home automation. The module supports both Wi-Fi and Bluetooth connectivity, making it versatile for wireless communication.
Explore Projects Built with ESP32 CAM


Explore Projects Built with ESP32 CAM
Technical Specifications
Key Technical Details
- Microcontroller: ESP32-D0WDQ6
- Operating Voltage: 3.3V
- Digital I/O Pins: 17
- Analog Input Pins: 0 (Only digital pins)
- Clock Frequency: Up to 240MHz
- RAM: 520 KB SRAM
- Flash Memory: 4MB
- Wi-Fi: 802.11 b/g/n
- Bluetooth: v4.2 BR/EDR and BLE
- Camera: OV2640 2MP
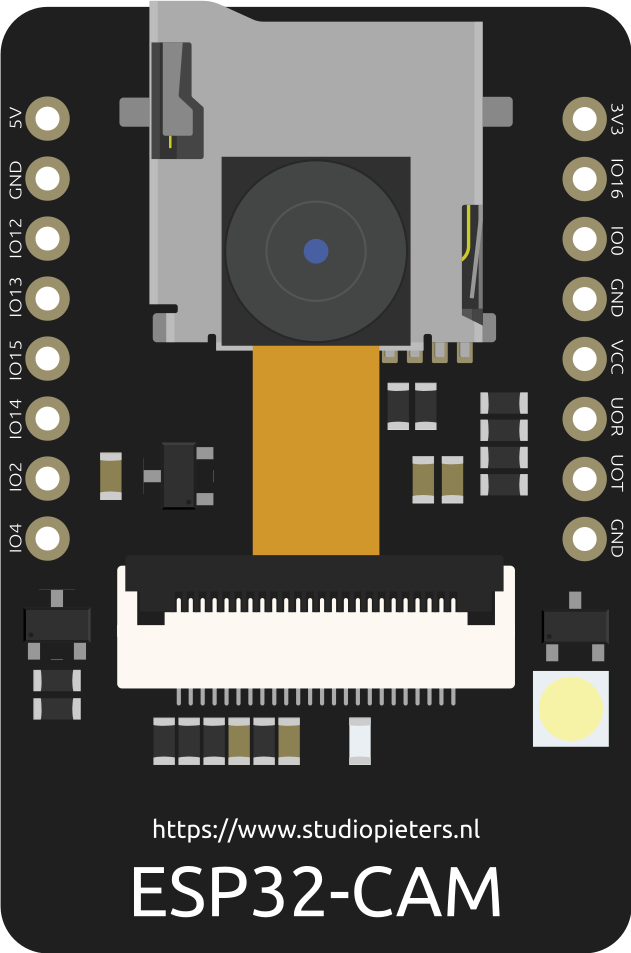
Pin Configuration and Descriptions
| Pin Number | Functionality | Description |
|---|---|---|
| 1 | GND | Ground |
| 2 | 3V3 | 3.3V power supply |
| 3 | U0TXD | UART0 Transmit |
| 4 | U0RXD | UART0 Receive |
| 5 | IO2 | General purpose IO, often used for Flash LED |
| 6 | IO14 | General purpose IO |
| 7 | IO15 | General purpose IO |
| 8 | IO13 | General purpose IO |
| 9 | SD2 | SPI Data |
| 10 | SD3 | SPI Data |
| 11 | CMD | SPI Command |
| 12 | CLK | SPI Clock |
| 13 | SD0 | SPI Data |
| 14 | SD1 | SPI Data |
| 15 | IO0 | Boot mode selection, general purpose IO |
| 16 | IO4 | General purpose IO |
| 17 | IO5 | General purpose IO |
Usage Instructions
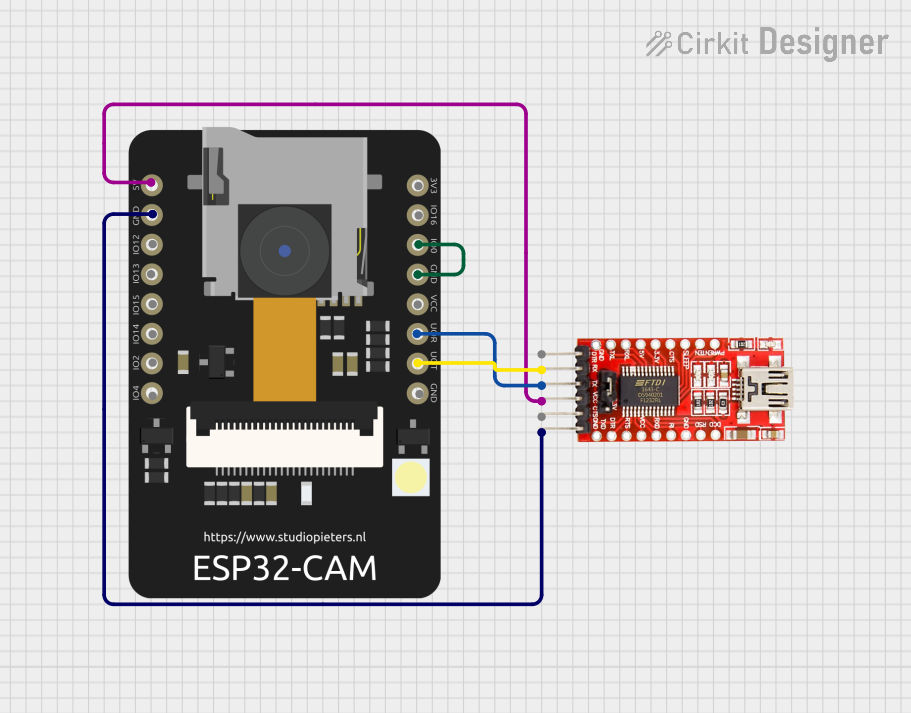
Integrating ESP32-CAM into a Circuit
- Power Supply: Connect a stable 3.3V power source to the 3V3 and GND pins.
- Programming: To program the ESP32-CAM, a separate USB to UART converter is required.
- Camera Connection: Ensure the camera is properly connected to the camera interface.
- GPIO Access: Utilize the GPIO pins for custom functionality as needed.
Important Considerations and Best Practices
- Power Requirements: The ESP32-CAM requires a stable power supply, as fluctuations can cause the module to reset or malfunction.
- Antenna Selection: For better Wi-Fi performance, use an external antenna if the onboard antenna does not provide sufficient range.
- Heat Dissipation: The ESP32-CAM can generate heat during operation. Ensure proper ventilation or heat sinks if used intensively.
- Firmware Updates: Keep the ESP32-CAM firmware up to date for the latest features and security patches.
Example Code for Arduino UNO
#include "esp_camera.h"
#include <WiFi.h>

// Replace with your network credentials
const char* ssid = "YOUR_SSID";
const char* password = "YOUR_PASSWORD";

void setup() {
  Serial.begin(115200);
  // Camera configuration
  camera_config_t config;
  config.ledc_channel = LEDC_CHANNEL_0;
  config.ledc_timer = LEDC_TIMER_0;
  config.pin_d0 = Y2_GPIO_NUM;
  config.pin_d1 = Y3_GPIO_NUM;
  // ... (additional camera pin configuration)
  config.pin_xclk = XCLK_GPIO_NUM;
  config.pin_pclk = PCLK_GPIO_NUM;
  config.xclk_freq_hz = 20000000;
  config.pixel_format = PIXFORMAT_JPEG;
  // ... (additional camera configuration parameters)

  // Initialize the camera
  esp_err_t err = esp_camera_init(&config);
  if (err != ESP_OK) {
    Serial.printf("Camera init failed with error 0x%x", err);
    return;
  }

  // Connect to Wi-Fi
  WiFi.begin(ssid, password);
  while (WiFi.status() != WL_CONNECTED) {
    delay(500);
    Serial.print(".");
  }
  Serial.println("");
  Serial.println("WiFi connected");
}

void loop() {
  // Capture a photo
  camera_fb_t * fb = esp_camera_fb_get();
  if (!fb) {
    Serial.println("Camera capture failed");
    return;
  }
  // Use 'fb->buf' and 'fb->len' for the image data and length
  esp_camera_fb_return(fb);

  // Implement your image processing logic here
}
Troubleshooting and FAQs
Common Issues
- Camera Not Working: Ensure the camera is correctly connected and selected in the software.
- Wi-Fi Connection Issues: Verify the SSID and password are correct. Check the signal strength and the power supply stability.
- Unexpected Resets: This can be caused by power supply issues. Ensure that the power source can deliver sufficient current.
Solutions and Tips for Troubleshooting
- Power Supply: Use a dedicated 3.3V regulator capable of supplying at least 500mA.
- Firmware Flashing: If the module is not responding, reflash the firmware using the appropriate tools and settings.
- Serial Output: Use the serial output for debugging messages to understand what the module is doing at any point.
FAQs
Q: Can I use the ESP32-CAM with batteries? A: Yes, but ensure the batteries can provide a stable 3.3V and sufficient current.
Q: How do I update the firmware? A: Firmware can be updated using the Arduino IDE or other ESP32 flashing tools, with the module connected to a computer via a USB to UART bridge.
Q: What is the maximum image resolution? A: The maximum resolution supported by the OV2640 camera is 1600x1200 pixels.
Q: Can the ESP32-CAM be used for real-time video streaming? A: Yes, the ESP32-CAM can stream video over Wi-Fi, but the frame rate and quality depend on the network conditions and resolution settings.