
How to Use TFT LCD ST7735: Examples, Pinouts, and Specs
 Design with TFT LCD ST7735 in Cirkit Designer
Introduction
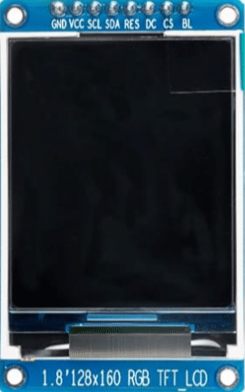
The TFT LCD ST7735 is a compact color display module powered by the ST7735 driver from Sitronix Technology Corp. This module, identified as Adafruit 1.8" SPI Color TFT Display, is widely used in embedded systems for displaying graphics, text, and images. With a resolution of 128x160 pixels and support for 18-bit color depth, it provides vibrant and detailed visuals in a small form factor.
Explore Projects Built with TFT LCD ST7735
 Open Project in Cirkit Designer
 Open Project in Cirkit Designer
 Open Project in Cirkit Designer
 Open Project in Cirkit Designer
Explore Projects Built with TFT LCD ST7735
Open Project in Cirkit DesignerOpen Project in Cirkit DesignerOpen Project in Cirkit DesignerOpen Project in Cirkit DesignerCommon Applications and Use Cases
- Portable devices and handheld electronics
- DIY projects and prototyping with microcontrollers
- Graphical user interfaces (GUIs) for embedded systems
- Real-time data visualization (e.g., sensor readings, waveforms)
- Gaming and animation displays in small-scale projects
Technical Specifications
Below are the key technical details of the TFT LCD ST7735 module:
| Parameter | Value |
|---|---|
| Display Type | TFT LCD |
| Driver IC | ST7735 |
| Resolution | 128x160 pixels |
| Color Depth | 18-bit (262,144 colors) |
| Interface | SPI (Serial Peripheral Interface) |
| Operating Voltage | 3.3V (logic level) |
| Backlight Voltage | 3.0V to 3.3V |
| Current Consumption | ~50mA (with backlight on) |
| Dimensions | 1.8 inches (diagonal) |
| Viewing Angle | ~160° |
Pin Configuration and Descriptions
The module has an 8-pin interface for communication and power. Below is the pinout:
| Pin | Name | Description |
|---|---|---|
| 1 | GND | Ground connection |
| 2 | VCC | Power supply (3.3V) |
| 3 | SCL | Serial Clock (SPI clock input) |
| 4 | SDA | Serial Data (SPI data input) |
| 5 | RES | Reset pin (active low) |
| 6 | DC | Data/Command control pin (High = Data, Low = Command) |
| 7 | CS | Chip Select (active low) |
| 8 | BL | Backlight control (connect to 3.3V for always-on backlight or PWM for dimming) |
Usage Instructions
How to Use the Component in a Circuit
- Power Supply: Connect the VCC pin to a 3.3V power source and the GND pin to ground.
- SPI Communication: Connect the SCL (clock) and SDA (data) pins to the corresponding SPI pins on your microcontroller.
- Control Pins:
- Connect the RES pin to a GPIO pin for resetting the display.
- Use the DC pin to toggle between data and command modes.
- Connect the CS pin to a GPIO pin to enable or disable the display.
- Backlight: Connect the BL pin to 3.3V for a constant backlight or to a PWM pin for brightness control.
Important Considerations and Best Practices
- Voltage Levels: Ensure all logic signals are at 3.3V. If using a 5V microcontroller (e.g., Arduino UNO), use a level shifter to avoid damaging the display.
- SPI Speed: Use an SPI clock speed of up to 15 MHz for optimal performance.
- Initialization: The display requires proper initialization commands to configure the ST7735 driver. Use a library (e.g., Adafruit GFX) to simplify this process.
- Backlight Control: For energy efficiency, use PWM to adjust the backlight brightness as needed.
Example Code for Arduino UNO
Below is an example of how to use the TFT LCD ST7735 with an Arduino UNO using the Adafruit GFX and Adafruit ST7735 libraries:
#include <Adafruit_GFX.h>    // Core graphics library
#include <Adafruit_ST7735.h> // ST7735 driver library
#include <SPI.h>             // SPI library

// Define pin connections
#define TFT_CS     10  // Chip Select pin
#define TFT_RST    9   // Reset pin
#define TFT_DC     8   // Data/Command pin

// Initialize the display object
Adafruit_ST7735 tft = Adafruit_ST7735(TFT_CS, TFT_DC, TFT_RST);

void setup() {
  // Initialize serial communication for debugging
  Serial.begin(9600);
  Serial.println("TFT LCD ST7735 Test");

  // Initialize the display
  tft.initR(INITR_BLACKTAB); // Use INITR_BLACKTAB for this display
  tft.fillScreen(ST77XX_BLACK); // Clear the screen with black color

  // Display a message
  tft.setTextColor(ST77XX_WHITE); // Set text color to white
  tft.setTextSize(2);             // Set text size
  tft.setCursor(10, 10);          // Set cursor position
  tft.println("Hello, World!");   // Print text
}

void loop() {
  // Add your code here for dynamic updates
}
Notes:
- Install the Adafruit GFX and Adafruit ST7735 libraries via the Arduino Library Manager before running the code.
- Adjust the pin definitions (
TFT_CS,TFT_RST,TFT_DC) to match your wiring.
Troubleshooting and FAQs
Common Issues and Solutions
No Display Output:
- Verify all connections, especially power (VCC and GND) and SPI pins.
- Ensure the display is properly initialized in the code.
- Check for loose wires or poor solder joints.
Flickering or Distorted Graphics:
- Reduce the SPI clock speed if running at high frequencies.
- Ensure proper grounding to avoid noise interference.
Backlight Not Turning On:
- Confirm the BL pin is connected to 3.3V or a PWM signal.
- Check the backlight voltage and current requirements.
Display Stuck on White Screen:
- Ensure the RES pin is properly connected and toggled during initialization.
- Verify the initialization sequence in the code matches the ST7735 datasheet.
FAQs
Q: Can I use this display with a 5V microcontroller?
A: Yes, but you must use level shifters to convert 5V logic signals to 3.3V to avoid damaging the display.
Q: What is the maximum SPI clock speed supported?
A: The ST7735 supports SPI clock speeds up to 15 MHz. However, lower speeds may be required for longer wires or noisy environments.
Q: Can I use this display in portrait and landscape modes?
A: Yes, the ST7735 driver supports rotation. Use the setRotation() function in the Adafruit GFX library to change orientation.
Q: How do I display images on the screen?
A: Convert the image to a compatible format (e.g., BMP) and use the Adafruit GFX library's drawBitmap() function to render it.
By following this documentation, you can effectively integrate the TFT LCD ST7735 into your projects and troubleshoot common issues with ease.