Cirkit Designer Logo
Cirkit Designer
Your all-in-one circuit design IDE
Home / 
Component Documentation

How to Use Adafruit NeoTrellis 4x4: Examples, Pinouts, and Specs

Image of Adafruit NeoTrellis 4x4
Cirkit Designer LogoDesign with Adafruit NeoTrellis 4x4 in Cirkit Designer

Introduction

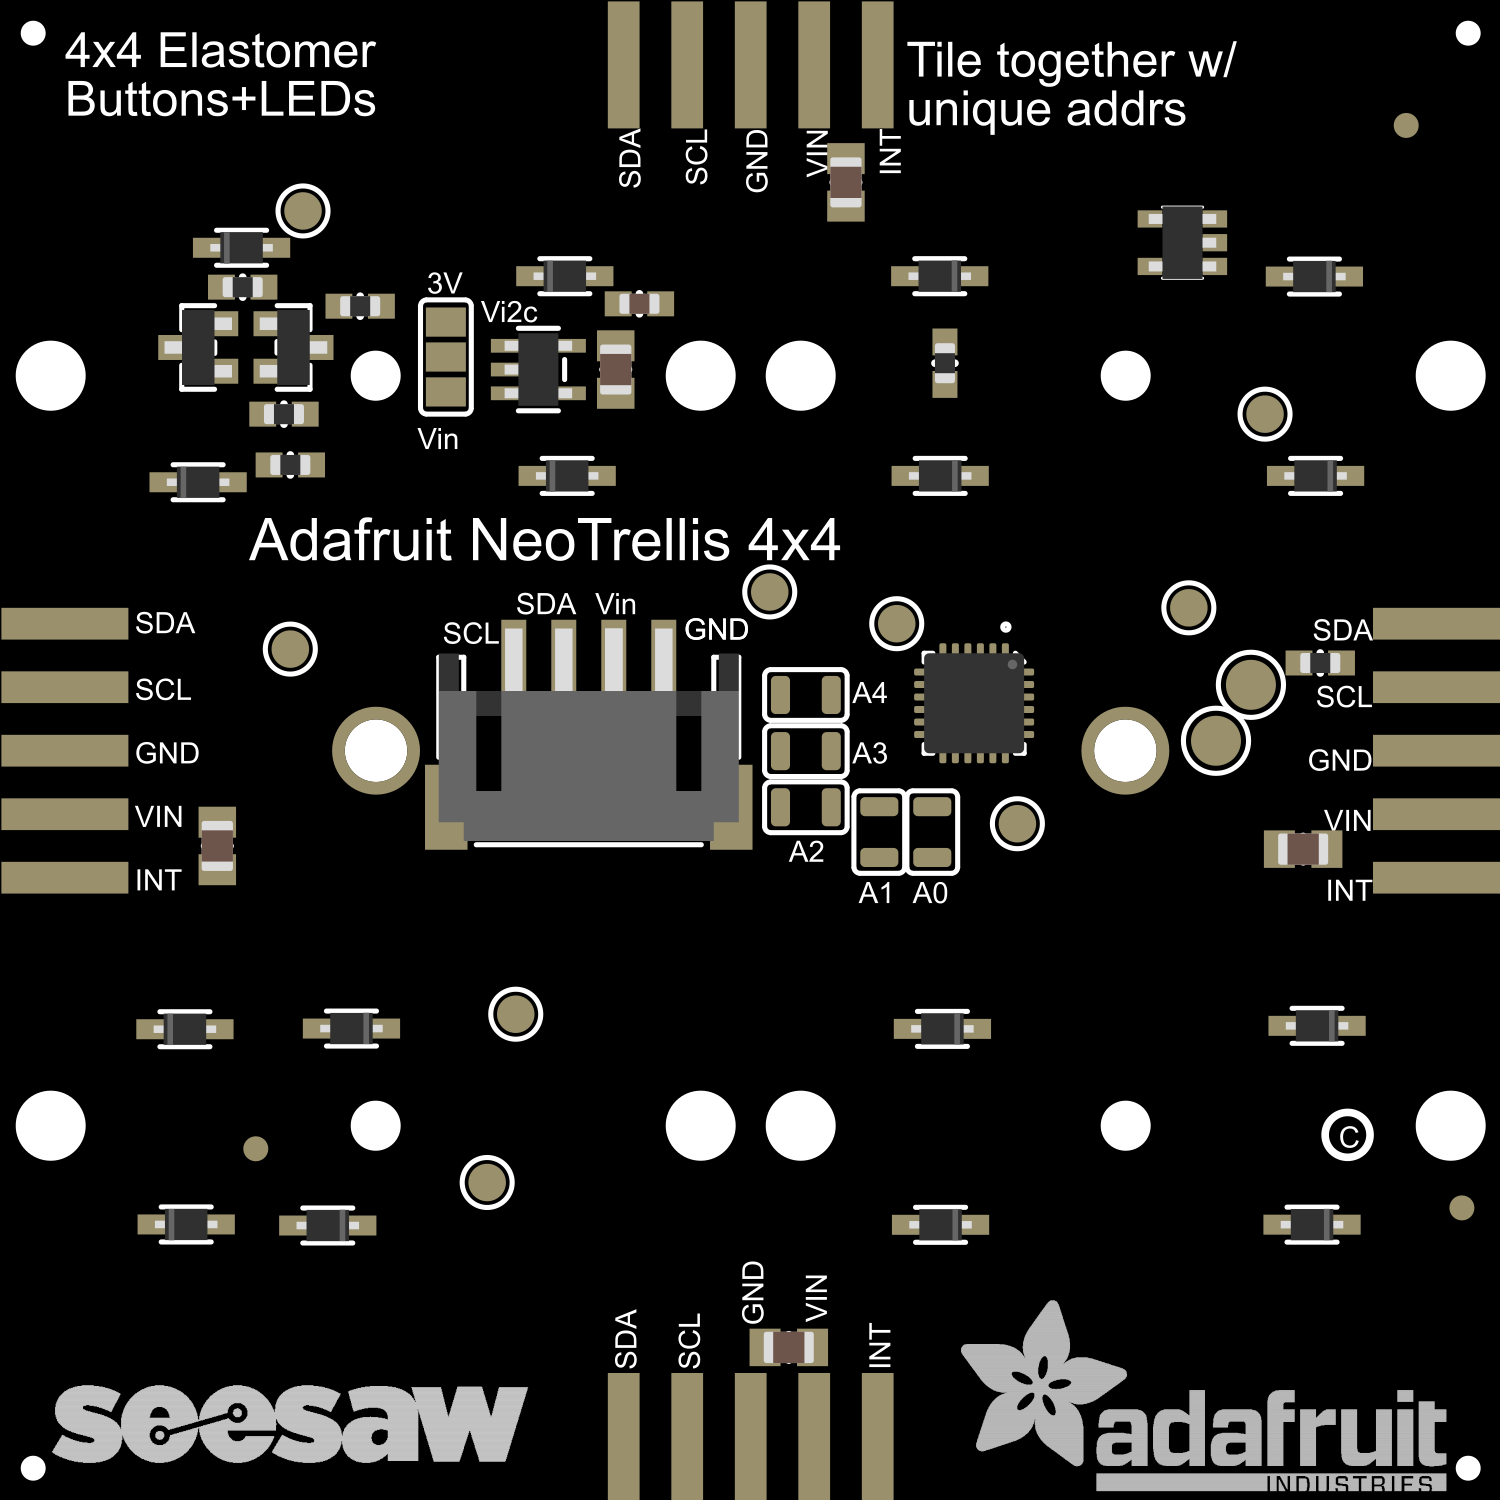
The Adafruit NeoTrellis 4x4 is a programmable keypad with a built-in RGB LED for each button. This interactive and visually appealing component is perfect for creating custom user interfaces, musical instruments, and gaming controls. Its versatility allows it to be used in a wide range of projects, from simple educational tools to complex interactive installations.

Explore Projects Built with Adafruit NeoTrellis 4x4

Use Cirkit Designer to design, explore, and prototype these projects online. Some projects support real-time simulation. Click "Open Project" to start designing instantly!
Battery-Powered Adafruit Flora RGB NeoPixel Light Show
Image of FloraTest: A project utilizing Adafruit NeoTrellis 4x4 in a practical application
This circuit consists of an Adafruit Flora v3 microcontroller connected to a Breadboard-friendly RGB Smart NeoPixel and powered by a 3xAAA battery pack. The microcontroller runs code to control the NeoPixel, displaying various colors and patterns.
Cirkit Designer LogoOpen Project in Cirkit Designer
Arduino Mega-Nano Hybrid Control Panel with Wireless Communication and LED Displays
Image of Bombuska na airsoft: A project utilizing Adafruit NeoTrellis 4x4 in a practical application
This is a multifunctional interactive system featuring an Arduino Mega 2560 and an Arduino Nano for control. It includes user input components (pushbuttons, keypad), visual output (OLED displays, LED matrices, NeoPixel rings/jewels), audio output (DFPlayer MINI with loudspeakers), and wireless communication (433MHz RF transmitter). The system is designed for user interaction, feedback display, and wireless control, with placeholder code for future development.
Cirkit Designer LogoOpen Project in Cirkit Designer
Arduino Mega 2560-Based Keypad and LCD Interface with Adjustable Contrast
Image of KEYPAD DISPLAY: A project utilizing Adafruit NeoTrellis 4x4 in a practical application
This circuit features an Arduino Mega 2560 microcontroller interfaced with a 4x4 keypad and a 16x2 LCD display. The keypad allows user input, which can be displayed on the LCD, with a trimmer potentiometer used to adjust the LCD contrast.
Cirkit Designer LogoOpen Project in Cirkit Designer
Arduino UNO WiFi-Controlled LED Matrix Display
Image of SMD2121 Led screen - r4: A project utilizing Adafruit NeoTrellis 4x4 in a practical application
This circuit consists of an Arduino UNO R4 WiFi microcontroller connected to a 64x32 LED matrix. The Arduino controls the LED matrix by sending signals to various pins to display different colors and patterns, as defined in the embedded code.
Cirkit Designer LogoOpen Project in Cirkit Designer

Explore Projects Built with Adafruit NeoTrellis 4x4

Use Cirkit Designer to design, explore, and prototype these projects online. Some projects support real-time simulation. Click "Open Project" to start designing instantly!
Image of FloraTest: A project utilizing Adafruit NeoTrellis 4x4 in a practical application
Battery-Powered Adafruit Flora RGB NeoPixel Light Show
This circuit consists of an Adafruit Flora v3 microcontroller connected to a Breadboard-friendly RGB Smart NeoPixel and powered by a 3xAAA battery pack. The microcontroller runs code to control the NeoPixel, displaying various colors and patterns.
Cirkit Designer LogoOpen Project in Cirkit Designer
Image of Bombuska na airsoft: A project utilizing Adafruit NeoTrellis 4x4 in a practical application
Arduino Mega-Nano Hybrid Control Panel with Wireless Communication and LED Displays
This is a multifunctional interactive system featuring an Arduino Mega 2560 and an Arduino Nano for control. It includes user input components (pushbuttons, keypad), visual output (OLED displays, LED matrices, NeoPixel rings/jewels), audio output (DFPlayer MINI with loudspeakers), and wireless communication (433MHz RF transmitter). The system is designed for user interaction, feedback display, and wireless control, with placeholder code for future development.
Cirkit Designer LogoOpen Project in Cirkit Designer
Image of KEYPAD DISPLAY: A project utilizing Adafruit NeoTrellis 4x4 in a practical application
Arduino Mega 2560-Based Keypad and LCD Interface with Adjustable Contrast
This circuit features an Arduino Mega 2560 microcontroller interfaced with a 4x4 keypad and a 16x2 LCD display. The keypad allows user input, which can be displayed on the LCD, with a trimmer potentiometer used to adjust the LCD contrast.
Cirkit Designer LogoOpen Project in Cirkit Designer
Image of SMD2121 Led screen - r4: A project utilizing Adafruit NeoTrellis 4x4 in a practical application
Arduino UNO WiFi-Controlled LED Matrix Display
This circuit consists of an Arduino UNO R4 WiFi microcontroller connected to a 64x32 LED matrix. The Arduino controls the LED matrix by sending signals to various pins to display different colors and patterns, as defined in the embedded code.
Cirkit Designer LogoOpen Project in Cirkit Designer

Common Applications and Use Cases

  • Musical instruments (e.g., MIDI controllers)
  • Gaming controllers
  • Custom keyboards
  • Interactive LED displays
  • Educational projects and learning platforms

Technical Specifications

Key Technical Details

  • Voltage: 2.5V to 5.5V
  • Current: 100 mA for LEDs at full brightness
  • Communication: I2C interface
  • LEDs: 16 RGB LEDs, one for each button
  • Buttons: 16 momentary push buttons
  • Dimensions: 60mm x 60mm x 4.6mm

Pin Configuration and Descriptions

Pin Description
VDD Power supply (2.5V to 5.5V)
GND Ground
SCL I2C clock line
SDA I2C data line
INT Interrupt output (active low)
RST Reset input (active low)

Usage Instructions

How to Use the Component in a Circuit

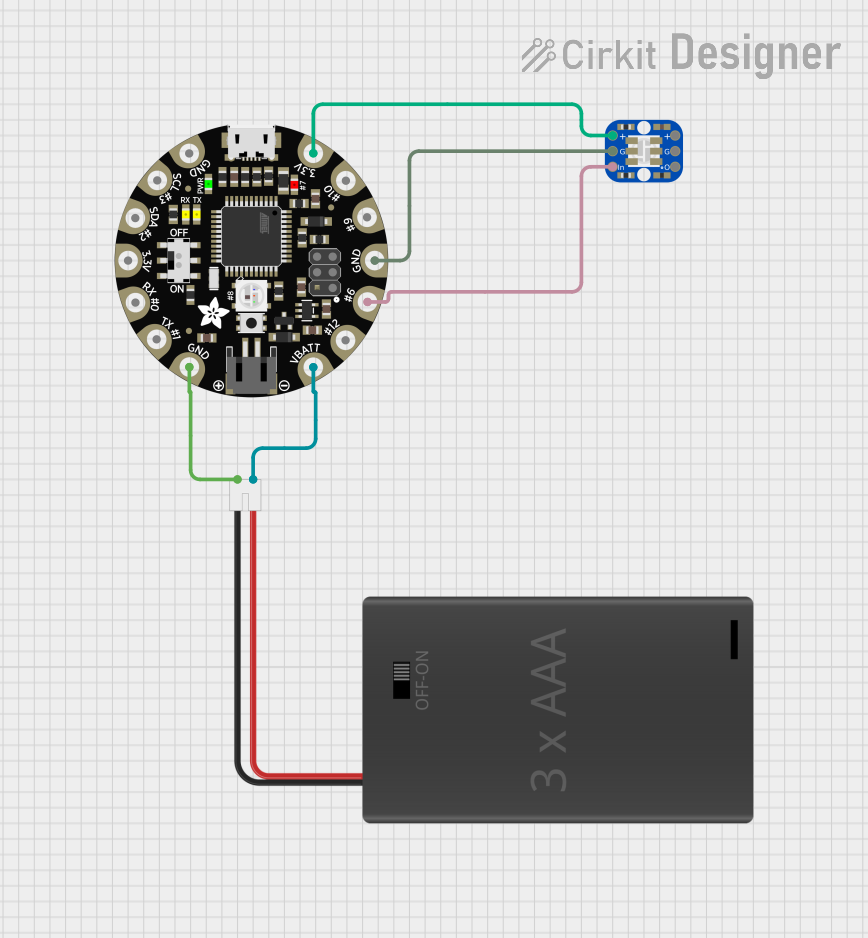
  1. Powering the NeoTrellis: Connect the VDD pin to a 2.5V to 5.5V power supply and the GND pin to the ground.
  2. I2C Communication: Connect the SCL and SDA pins to the I2C clock and data lines on your microcontroller (e.g., Arduino UNO).
  3. Interrupts (Optional): The INT pin can be connected to an interrupt-capable pin on your microcontroller to handle button press events.
  4. Reset (Optional): The RST pin can be connected to a digital pin on your microcontroller if you wish to reset the NeoTrellis programmatically.

Important Considerations and Best Practices

  • Ensure that the power supply voltage is within the specified range to prevent damage.
  • Use pull-up resistors on the I2C lines if they are not already present on your microcontroller board.
  • To reduce power consumption, manage the brightness of the LEDs appropriately.
  • When daisy-chaining multiple NeoTrellis boards, ensure that the I2C addresses are set correctly to avoid conflicts.

Example Code for Arduino UNO

#include <Wire.h>
#include "Adafruit_NeoTrellis.h"

Adafruit_NeoTrellis trellis;

void setup() {
  Wire.begin();
  trellis.begin();
  // Activate all keys and LEDs for the NeoTrellis
  for (int i = 0; i < 16; i++) {
    trellis.activateKey(i, SEESAW_KEYPAD_EDGE_RISING, true);
    trellis.setPixelColor(i, 0x000000); // Start with all LEDs off
  }
  trellis.show();
}

void loop() {
  // If available, read key event
  if (trellis.available()) {
    keypadEvent e = trellis.read();
    if (e.bit.EDGE == SEESAW_KEYPAD_EDGE_RISING) {
      trellis.setPixelColor(e.bit.NUM, 0xFFFFFF); // Turn on LED when button is pressed
      trellis.show();
    }
  }
}

Troubleshooting and FAQs

Common Issues

  • LEDs not lighting up: Ensure that the NeoTrellis is properly powered and that the I2C communication is correctly established.
  • Buttons not responding: Check the connections and ensure that the interrupt and reset lines are correctly configured if used.
  • Multiple NeoTrellis boards not working together: Verify that each NeoTrellis has a unique I2C address and that the addresses are correctly set in your code.

Solutions and Tips for Troubleshooting

  • Double-check wiring, especially the I2C lines and power connections.
  • Use the I2C scanner sketch to confirm that the NeoTrellis is detected on the I2C bus.
  • Ensure that the Adafruit NeoTrellis library is correctly installed in your Arduino IDE.
  • Check the Adafruit NeoTrellis guide and forums for additional support and resources.

FAQs

Q: Can I connect multiple NeoTrellis boards together? A: Yes, you can daisy-chain multiple boards using the I2C bus. Make sure to configure unique I2C addresses for each board.

Q: How do I change the color of an LED? A: Use the setPixelColor function with the button number and desired RGB color value.

Q: What is the maximum number of NeoTrellis boards I can chain together? A: The maximum number is limited by the I2C address space and the power supply capability. Typically, you can chain several boards without issues.

Q: Can I use the NeoTrellis with platforms other than Arduino? A: Yes, the NeoTrellis can be used with any microcontroller that supports I2C communication. Adjust the code accordingly for your platform.