Cirkit Designer
Your all-in-one circuit design IDE
Home /
Component Documentation
How to Use LVD: Examples, Pinouts, and Specs
Introduction
- A Low Voltage Disconnect (LVD) is a protective device designed to disconnect a battery from its load when the battery voltage falls below a preset threshold. This prevents the battery from over-discharging, which can lead to permanent damage or reduced lifespan.
- Common applications include solar power systems, uninterruptible power supplies (UPS), automotive systems, and other battery-powered devices where maintaining battery health is critical.
Explore Projects Built with LVD
LDR-Controlled LED Lighting System
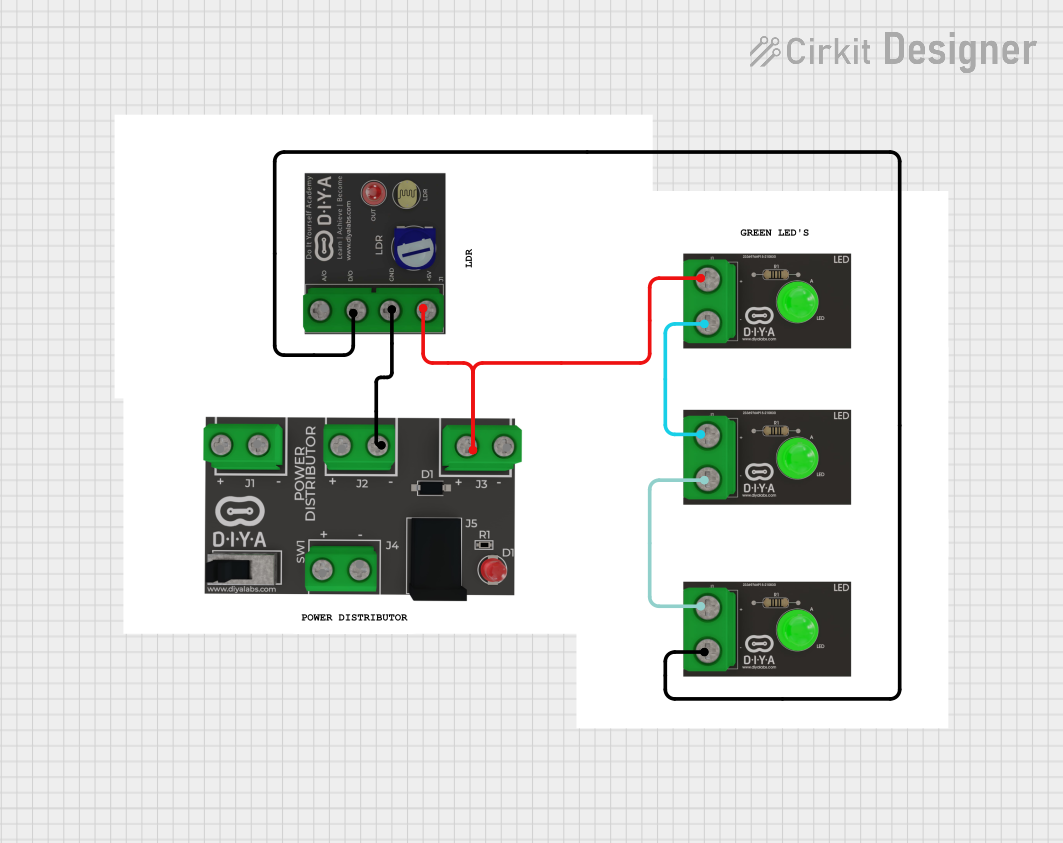
This circuit appears to be a simple light-detection system that uses an LDR (Light Dependent Resistor) to control the state of multiple green LEDs. The LDR's analog output (AO) is not connected, suggesting that the circuit uses the digital output (DO) to directly drive one LED, while the other LEDs are wired in parallel to the LDR's power supply (Vcc). The Pd (presumably a power distribution component) provides the necessary voltage levels to the LDR and LEDs.
LilyPad Arduino and Accelerometer-Based Wearable Fitness Tracker with Heart Rate Monitoring

This circuit is designed for wearable applications, featuring a LilyPad Arduino USB microcontroller that controls a chain of LED Pixel Boards and reads data from a Heart Pulse Sensor and a three-axis Accelerometer. It is capable of interactive LED displays synchronized with motion and heart rate data, suitable for dynamic wearable projects.
NodeMCU ESP8266-Based Smart Lift System with IR Sensors and Voice Commands

This circuit is an IoT-based smart lift system designed for blind and disabled individuals. It uses IR sensors, pushbuttons, an LCD screen, a DFPlayer module, and a VC-02 module to detect floor selection via finger presence or voice commands, and announces the selected floor through a speaker while displaying it on the LCD.
ESP8266-Based Health Monitoring System with MAX30102 and LM35 Sensors
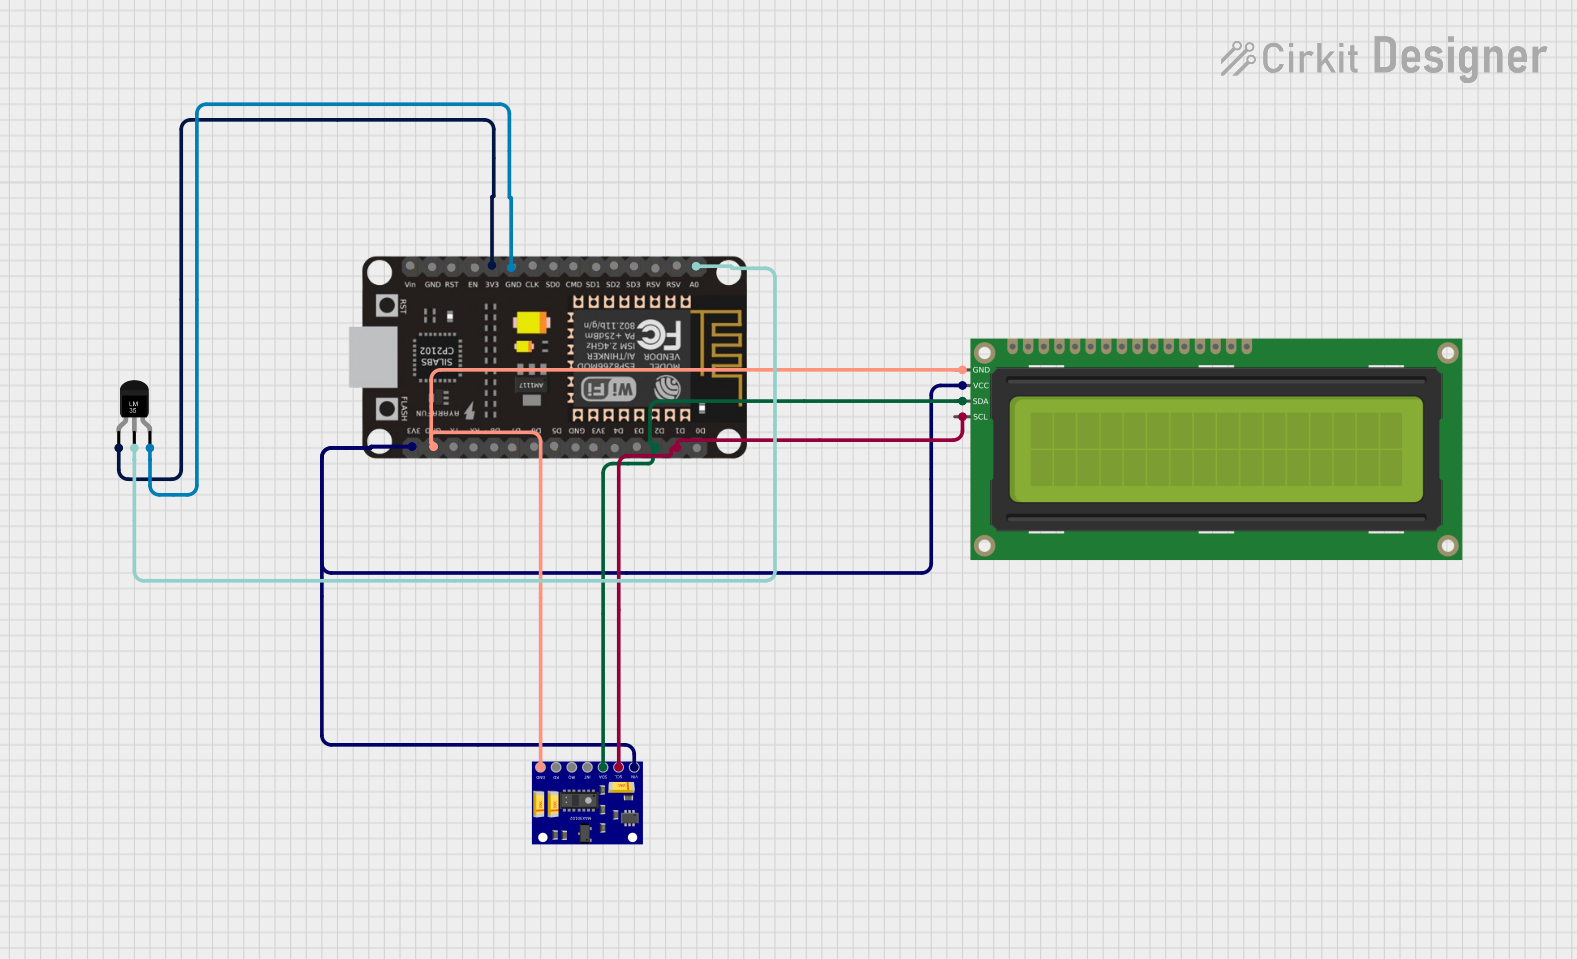
This circuit is a patient health monitoring system that uses an ESP8266 microcontroller to read data from a MAX30102 heart rate and oxygen sensor and an LM35 temperature sensor. The collected data is displayed on a 16x2 I2C LCD and sent to the Blynk app for remote monitoring.
Explore Projects Built with LVD
LDR-Controlled LED Lighting System
This circuit appears to be a simple light-detection system that uses an LDR (Light Dependent Resistor) to control the state of multiple green LEDs. The LDR's analog output (AO) is not connected, suggesting that the circuit uses the digital output (DO) to directly drive one LED, while the other LEDs are wired in parallel to the LDR's power supply (Vcc). The Pd (presumably a power distribution component) provides the necessary voltage levels to the LDR and LEDs.
LilyPad Arduino and Accelerometer-Based Wearable Fitness Tracker with Heart Rate Monitoring
This circuit is designed for wearable applications, featuring a LilyPad Arduino USB microcontroller that controls a chain of LED Pixel Boards and reads data from a Heart Pulse Sensor and a three-axis Accelerometer. It is capable of interactive LED displays synchronized with motion and heart rate data, suitable for dynamic wearable projects.
NodeMCU ESP8266-Based Smart Lift System with IR Sensors and Voice Commands
This circuit is an IoT-based smart lift system designed for blind and disabled individuals. It uses IR sensors, pushbuttons, an LCD screen, a DFPlayer module, and a VC-02 module to detect floor selection via finger presence or voice commands, and announces the selected floor through a speaker while displaying it on the LCD.
ESP8266-Based Health Monitoring System with MAX30102 and LM35 Sensors
This circuit is a patient health monitoring system that uses an ESP8266 microcontroller to read data from a MAX30102 heart rate and oxygen sensor and an LM35 temperature sensor. The collected data is displayed on a 16x2 I2C LCD and sent to the Blynk app for remote monitoring.
Technical Specifications
- Operating Voltage Range: 6V to 48V (varies by model)
- Disconnect Voltage Threshold: Typically adjustable, e.g., 10.5V for a 12V system
- Reconnect Voltage Threshold: Typically adjustable, e.g., 12.5V for a 12V system
- Maximum Load Current: 10A to 100A (depending on the model)
- Power Consumption: < 10mA in standby mode
- Operating Temperature: -40°C to +85°C
- Hysteresis: Adjustable or fixed, typically 1-2V
Pin Configuration and Descriptions
| Pin Name | Description |
|---|---|
BAT+ |
Positive terminal for battery connection. |
BAT- |
Negative terminal for battery connection. |
LOAD+ |
Positive terminal for load connection. |
LOAD- |
Negative terminal for load connection. |
CTRL |
Optional control pin for external enable/disable or threshold adjustment input. |
Usage Instructions
Connecting the LVD:
- Connect the
BAT+andBAT-terminals to the positive and negative terminals of the battery, respectively. - Connect the
LOAD+andLOAD-terminals to the positive and negative terminals of the load. - Ensure all connections are secure and use appropriately rated wires for the current.
- Connect the
Adjusting Voltage Thresholds:
- If the LVD supports adjustable thresholds, use the provided potentiometer or external control pin (
CTRL) to set the desired disconnect and reconnect voltages. - Refer to the manufacturer's datasheet for specific adjustment procedures.
- If the LVD supports adjustable thresholds, use the provided potentiometer or external control pin (
Important Considerations:
- Always verify the voltage and current ratings of the LVD to ensure compatibility with your system.
- Avoid exceeding the maximum load current rating to prevent damage to the LVD.
- Place the LVD in a well-ventilated area to prevent overheating during operation.
Using with an Arduino UNO:
- The
CTRLpin can be connected to an Arduino UNO to enable or disable the LVD programmatically. Below is an example code snippet:
- The
// Example code to control an LVD using an Arduino UNO
// Connect the CTRL pin of the LVD to pin 7 on the Arduino UNO

const int lvdControlPin = 7; // Pin connected to the LVD CTRL pin

void setup() {
  pinMode(lvdControlPin, OUTPUT); // Set the pin as an output
  digitalWrite(lvdControlPin, LOW); // Ensure LVD is initially disabled
}

void loop() {
  // Example: Enable the LVD for 10 seconds, then disable it for 5 seconds
  digitalWrite(lvdControlPin, HIGH); // Enable the LVD
  delay(10000); // Wait for 10 seconds
  digitalWrite(lvdControlPin, LOW); // Disable the LVD
  delay(5000); // Wait for 5 seconds
}
Troubleshooting and FAQs
Common Issues
LVD does not disconnect the load when the voltage drops:
- Ensure the disconnect voltage threshold is set correctly.
- Verify that the battery voltage is below the threshold.
- Check for loose or incorrect wiring.
LVD disconnects prematurely:
- Verify the battery voltage with a multimeter to ensure it matches the LVD's reading.
- Adjust the disconnect threshold if necessary.
LVD overheats during operation:
- Ensure the load current does not exceed the LVD's maximum rating.
- Check for proper ventilation around the LVD.
CTRL pin does not respond to Arduino signals:
- Verify the Arduino pin configuration and connections.
- Ensure the Arduino output voltage matches the LVD's control input requirements.
FAQs
Can I use an LVD with a lithium-ion battery?
- Yes, but ensure the disconnect and reconnect thresholds are appropriate for the specific lithium-ion battery chemistry.
What happens if the LVD fails?
- Most LVDs are designed to fail in a disconnected state to protect the battery. However, always use a fuse or circuit breaker for additional safety.
Can I use the LVD in reverse polarity?
- No, connecting the LVD in reverse polarity can damage the device. Always double-check the polarity before connecting.