How to Use 15.6" Display Monitor (1920x1080): Examples, Pinouts, and Specs

Introduction
The WGK 15.6" Display Monitor is a high-resolution display component designed to provide clear and detailed visual output. With a resolution of 1920x1080 pixels, this monitor is ideal for a variety of applications, including computer displays, embedded systems, and multimedia projects. Its compact size and high-definition capabilities make it a versatile choice for both hobbyists and professionals.
Explore Projects Built with 15.6" Display Monitor (1920x1080)


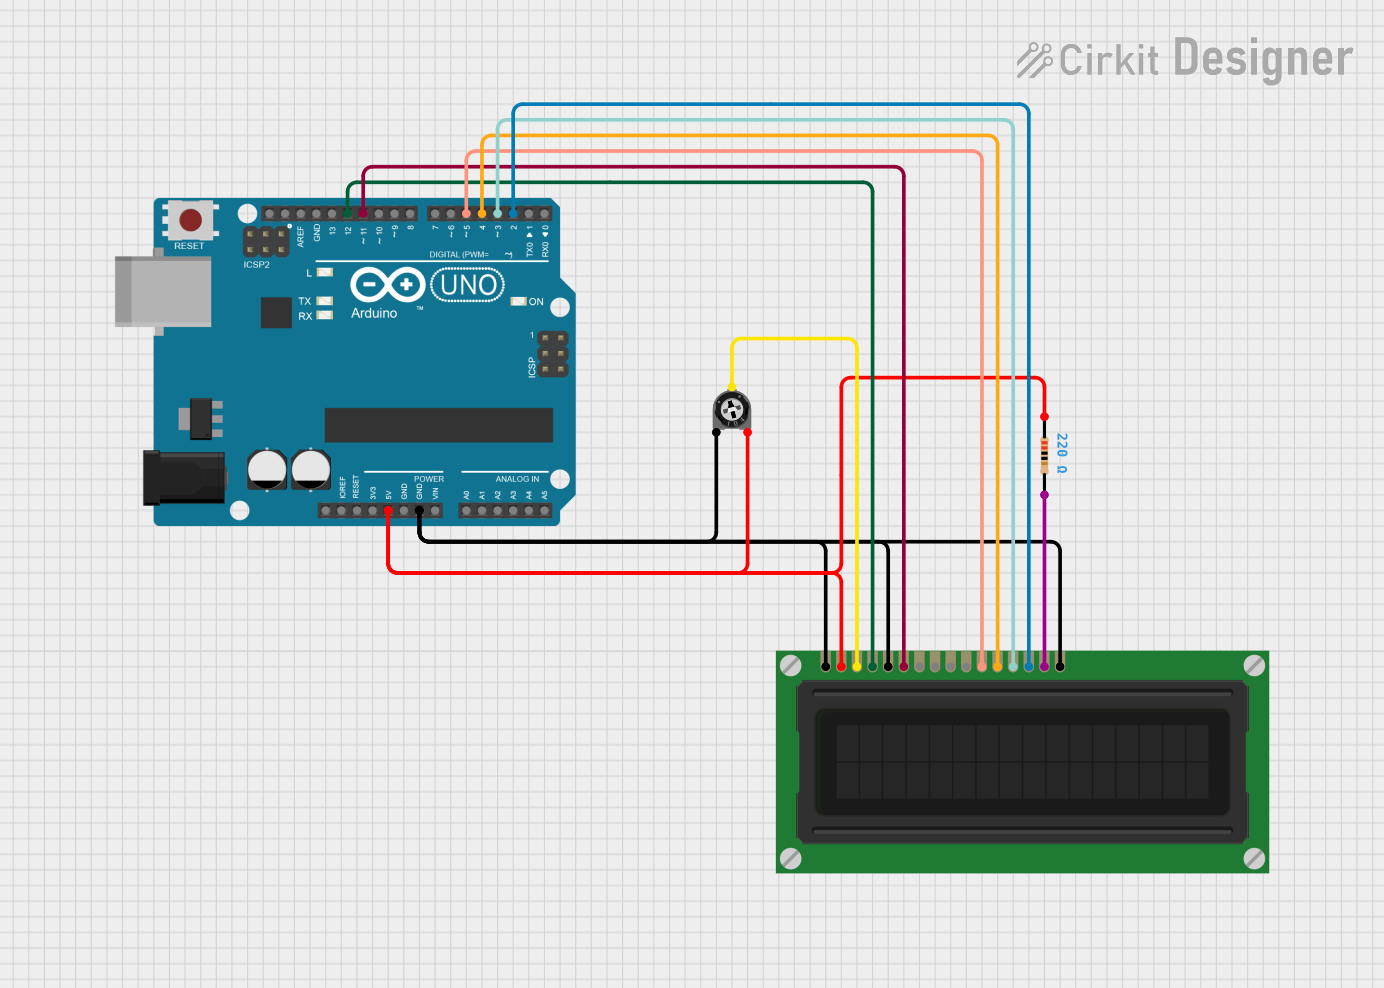
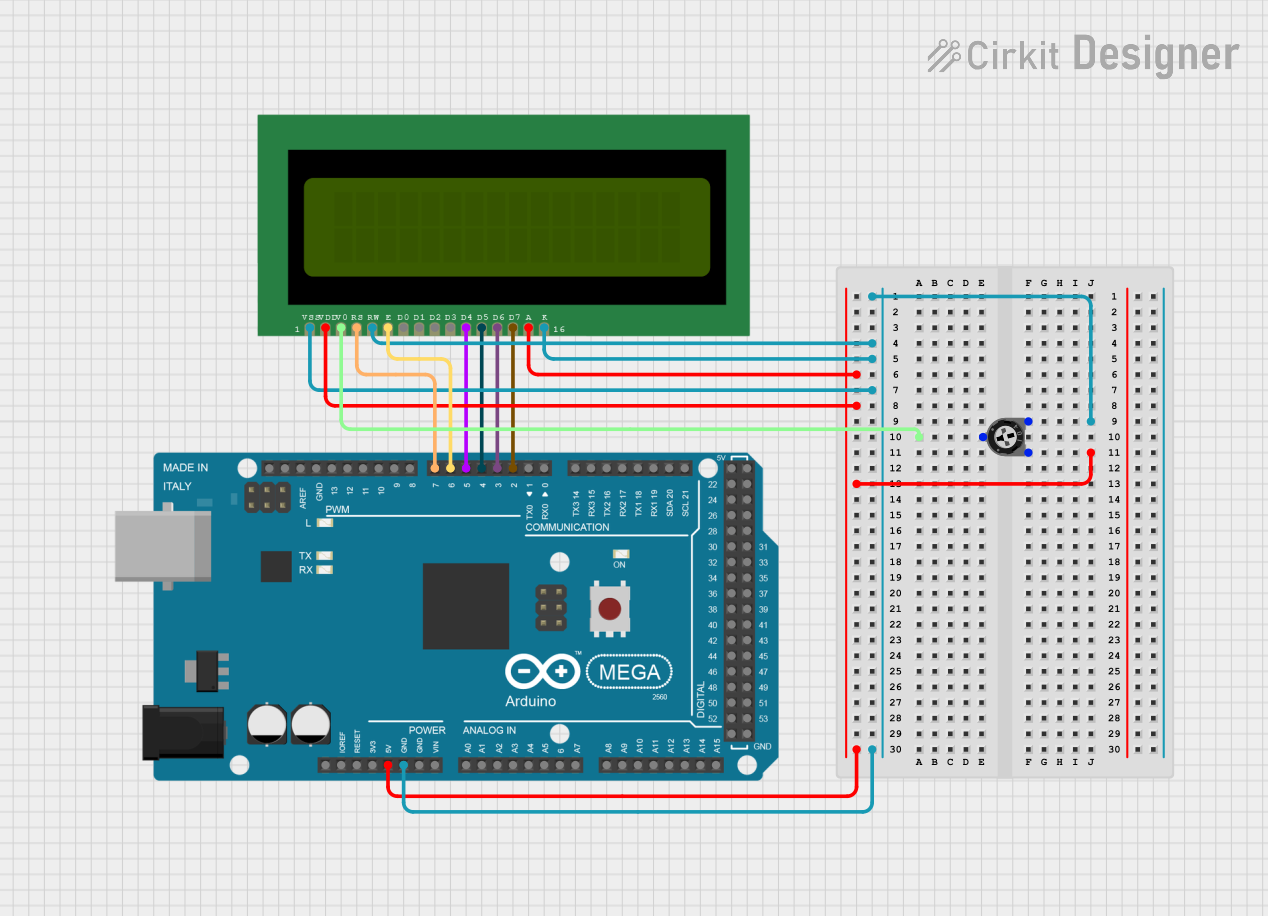
Explore Projects Built with 15.6" Display Monitor (1920x1080)
Common Applications and Use Cases
- Computer Monitors: Ideal for desktop setups requiring a clear and detailed display.
- Embedded Systems: Suitable for integration into custom hardware projects.
- Multimedia Projects: Perfect for video playback and graphical displays.
- Prototyping: Useful for testing and development in various electronic projects.
Technical Specifications
Key Technical Details
| Specification | Value |
|---|---|
| Screen Size | 15.6 inches |
| Resolution | 1920x1080 pixels |
| Aspect Ratio | 16:9 |
| Brightness | 250 cd/m² |
| Contrast Ratio | 1000:1 |
| Viewing Angle | 178° (H) / 178° (V) |
| Response Time | 5 ms |
| Input Voltage | 12V DC |
| Power Consumption | 15W |
| Connector Type | HDMI, VGA, and USB-C |
Pin Configuration and Descriptions
HDMI Connector
| Pin | Description |
|---|---|
| 1 | TMDS Data2+ |
| 2 | TMDS Data2 Shield |
| 3 | TMDS Data2- |
| 4 | TMDS Data1+ |
| 5 | TMDS Data1 Shield |
| 6 | TMDS Data1- |
| 7 | TMDS Data0+ |
| 8 | TMDS Data0 Shield |
| 9 | TMDS Data0- |
| 10 | TMDS Clock+ |
| 11 | TMDS Clock Shield |
| 12 | TMDS Clock- |
| 13 | CEC |
| 14 | Reserved (N.C.) |
| 15 | SCL |
| 16 | SDA |
| 17 | DDC/CEC Ground |
| 18 | +5V Power |
| 19 | Hot Plug Detect |
VGA Connector
| Pin | Description |
|---|---|
| 1 | Red Video |
| 2 | Green Video |
| 3 | Blue Video |
| 4 | ID2/Reserved |
| 5 | Ground |
| 6 | Red Ground |
| 7 | Green Ground |
| 8 | Blue Ground |
| 9 | Key/Plug Detect |
| 10 | Sync Ground |
| 11 | ID0/Reserved |
| 12 | ID1/SDA |
| 13 | Horizontal Sync |
| 14 | Vertical Sync |
| 15 | ID3/SCL |
Usage Instructions
How to Use the Component in a Circuit
- Power Supply: Connect the 12V DC power supply to the monitor's power input.
- Signal Input: Use an HDMI, VGA, or USB-C cable to connect the monitor to your video source.
- Configuration: Adjust the monitor settings using the on-screen display (OSD) menu to match your requirements.
Important Considerations and Best Practices
- Power Supply: Ensure that the power supply provides a stable 12V DC output to avoid damage.
- Cable Quality: Use high-quality cables to ensure a clear and stable signal.
- Ventilation: Ensure proper ventilation around the monitor to prevent overheating.
- Mounting: Use appropriate mounting hardware to secure the monitor in place.
Troubleshooting and FAQs
Common Issues and Solutions
No Display Output:
- Solution: Check the power connection and ensure the monitor is turned on. Verify that the video cable is securely connected to both the monitor and the video source.
Flickering Screen:
- Solution: Ensure that the video cable is not damaged and is properly connected. Try using a different cable or video source to isolate the issue.
Incorrect Resolution:
- Solution: Adjust the resolution settings on your video source to match the monitor's native resolution of 1920x1080 pixels.
No Sound (if applicable):
- Solution: Ensure that the audio output settings on your video source are correctly configured to send audio through the HDMI cable.
FAQs
Q1: Can I use this monitor with an Arduino UNO?
- A1: The Arduino UNO does not natively support video output. However, you can use an external video shield or adapter to interface with the monitor.
Q2: What is the recommended viewing distance?
- A2: The recommended viewing distance is approximately 1.5 to 2 times the diagonal screen size, which is around 24 to 32 inches.
Q3: How do I clean the monitor screen?
- A3: Use a soft, lint-free cloth slightly dampened with water or a screen cleaning solution. Avoid using harsh chemicals or abrasive materials.
Q4: Can I use this monitor in a vertical orientation?
- A4: Yes, the monitor can be used in both horizontal and vertical orientations. Ensure that the mounting hardware supports the desired orientation.
Conclusion
The WGK 15.6" Display Monitor is a versatile and high-quality component suitable for a wide range of applications. By following the usage instructions and best practices outlined in this documentation, you can ensure optimal performance and longevity of the monitor. For any additional support or inquiries, please refer to the manufacturer's website or contact their customer service.