Cirkit Designer Logo
Cirkit Designer
Your all-in-one circuit design IDE
Home / 
Component Documentation

How to Use PVT422+2R: Examples, Pinouts, and Specs

Image of PVT422+2R
Cirkit Designer LogoDesign with PVT422+2R in Cirkit Designer

Introduction

The PVT422+2R is a high-performance voltage regulator designed to provide a stable output voltage with low noise and high efficiency. It is an essential component in power supply circuits, ensuring reliable operation of electronic devices by maintaining consistent voltage levels. Its compact design and robust performance make it suitable for a wide range of applications, including consumer electronics, industrial equipment, and embedded systems.

Explore Projects Built with PVT422+2R

Use Cirkit Designer to design, explore, and prototype these projects online. Some projects support real-time simulation. Click "Open Project" to start designing instantly!
PT100 Temperature Sensor with Rocker Switch and Resettable Fuse
Image of soldering iron: A project utilizing PVT422+2R in a practical application
This circuit is a basic power control system that uses a rocker switch to control the flow of 220V power through a resettable fuse and a PT100 temperature sensor. The switch allows the user to turn the power on or off, while the fuse provides overcurrent protection and the PT100 sensor can be used for temperature monitoring.
Cirkit Designer LogoOpen Project in Cirkit Designer
Battery-Powered LED Control Circuit with Potentiometer and Transistors
Image of STROBE LIGHTS: A project utilizing PVT422+2R in a practical application
This circuit is a regulated power supply with a 12V battery input, a 7805 voltage regulator providing a 5V output, and a potentiometer for adjustable voltage control. It includes transistors and resistors for current regulation and an LED indicator to show the operational status.
Cirkit Designer LogoOpen Project in Cirkit Designer
High Voltage Generator with Push Switch Activation
Image of Women Safety Device : A project utilizing PVT422+2R in a practical application
This circuit features a high voltage generator connected to a terminal PCB for output, with its power supply controlled by a 2-pin push switch. The high voltage generator's VCC is connected through the switch, allowing the user to turn the high voltage output on and off. The circuit is powered by a 7.4V battery, with the positive terminal connected to the switch and the negative terminal connected to the generator's ground.
Cirkit Designer LogoOpen Project in Cirkit Designer
Cellular-Enabled IoT Device with Real-Time Clock and Power Management
Image of LRCM PHASE 2 BASIC: A project utilizing PVT422+2R in a practical application
This circuit features a LilyGo-SIM7000G module for cellular communication and GPS functionality, interfaced with an RTC DS3231 for real-time clock capabilities. It includes voltage sensing through two voltage sensor modules, and uses an 8-channel opto-coupler for isolating different parts of the circuit. Power management is handled by a buck converter connected to a DC power source and batteries, with a fuse for protection and a rocker switch for on/off control. Additionally, there's an LED for indication purposes.
Cirkit Designer LogoOpen Project in Cirkit Designer

Explore Projects Built with PVT422+2R

Use Cirkit Designer to design, explore, and prototype these projects online. Some projects support real-time simulation. Click "Open Project" to start designing instantly!
Image of soldering iron: A project utilizing PVT422+2R in a practical application
PT100 Temperature Sensor with Rocker Switch and Resettable Fuse
This circuit is a basic power control system that uses a rocker switch to control the flow of 220V power through a resettable fuse and a PT100 temperature sensor. The switch allows the user to turn the power on or off, while the fuse provides overcurrent protection and the PT100 sensor can be used for temperature monitoring.
Cirkit Designer LogoOpen Project in Cirkit Designer
Image of STROBE LIGHTS: A project utilizing PVT422+2R in a practical application
Battery-Powered LED Control Circuit with Potentiometer and Transistors
This circuit is a regulated power supply with a 12V battery input, a 7805 voltage regulator providing a 5V output, and a potentiometer for adjustable voltage control. It includes transistors and resistors for current regulation and an LED indicator to show the operational status.
Cirkit Designer LogoOpen Project in Cirkit Designer
Image of Women Safety Device : A project utilizing PVT422+2R in a practical application
High Voltage Generator with Push Switch Activation
This circuit features a high voltage generator connected to a terminal PCB for output, with its power supply controlled by a 2-pin push switch. The high voltage generator's VCC is connected through the switch, allowing the user to turn the high voltage output on and off. The circuit is powered by a 7.4V battery, with the positive terminal connected to the switch and the negative terminal connected to the generator's ground.
Cirkit Designer LogoOpen Project in Cirkit Designer
Image of LRCM PHASE 2 BASIC: A project utilizing PVT422+2R in a practical application
Cellular-Enabled IoT Device with Real-Time Clock and Power Management
This circuit features a LilyGo-SIM7000G module for cellular communication and GPS functionality, interfaced with an RTC DS3231 for real-time clock capabilities. It includes voltage sensing through two voltage sensor modules, and uses an 8-channel opto-coupler for isolating different parts of the circuit. Power management is handled by a buck converter connected to a DC power source and batteries, with a fuse for protection and a rocker switch for on/off control. Additionally, there's an LED for indication purposes.
Cirkit Designer LogoOpen Project in Cirkit Designer

Common Applications and Use Cases

  • Power supply circuits for microcontrollers and sensors
  • Voltage regulation in battery-powered devices
  • Noise-sensitive applications such as audio equipment
  • Industrial automation systems
  • Embedded systems requiring stable power delivery

Technical Specifications

The PVT422+2R is designed to meet the demands of modern electronic systems. Below are its key technical specifications:

Parameter Value
Input Voltage Range 4.5V to 18V
Output Voltage Range 1.2V to 12V (adjustable)
Output Current Up to 2A
Efficiency Up to 95%
Output Noise < 50 µV RMS
Operating Temperature -40°C to +85°C
Package Type SOT-223

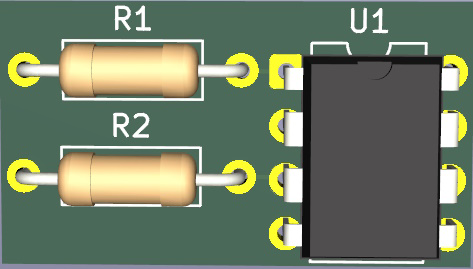
Pin Configuration and Descriptions

The PVT422+2R features a simple pinout for easy integration into circuits. Below is the pin configuration:

Pin Number Pin Name Description
1 VIN Input voltage pin. Connect to the unregulated power source.
2 GND Ground pin. Connect to the circuit ground.
3 VOUT Regulated output voltage pin. Connect to the load.
4 ADJ Adjustment pin. Used to set the output voltage with an external resistor divider.

Usage Instructions

The PVT422+2R is straightforward to use in a circuit. Follow the steps below to ensure proper operation:

  1. Input Voltage Connection: Connect the VIN pin to a power source within the specified input voltage range (4.5V to 18V). Use a decoupling capacitor (e.g., 10 µF) close to the VIN pin to reduce input noise.

  2. Output Voltage Adjustment: Use a resistor divider network connected to the ADJ pin to set the desired output voltage. The output voltage can be calculated using the formula: [ V_{OUT} = V_{REF} \times \left(1 + \frac{R1}{R2}\right) ] where ( V_{REF} ) is the internal reference voltage (1.25V), and ( R1 ) and ( R2 ) are the resistors in the divider.

  3. Output Connection: Connect the VOUT pin to the load. Place a capacitor (e.g., 22 µF) close to the VOUT pin to stabilize the output voltage and minimize noise.

  4. Ground Connection: Connect the GND pin to the circuit ground.

Important Considerations and Best Practices

  • Ensure the input voltage is always higher than the desired output voltage by at least 1.5V for proper regulation.
  • Use low ESR capacitors for input and output filtering to improve stability and reduce noise.
  • Avoid exceeding the maximum output current (2A) to prevent overheating or damage.
  • If the component operates in a high-temperature environment, consider adding a heatsink or improving airflow around the regulator.

Example: Using PVT422+2R with Arduino UNO

The PVT422+2R can be used to power an Arduino UNO by providing a stable 5V output. Below is an example circuit and Arduino code:

Circuit Setup

  • Connect a 9V battery to the VIN pin of the PVT422+2R.
  • Set the output voltage to 5V using a resistor divider (e.g., R1 = 4.7 kΩ, R2 = 1.2 kΩ).
  • Connect the VOUT pin to the 5V pin of the Arduino UNO.
  • Connect the GND pin of the PVT422+2R to the Arduino's GND.

Arduino Code Example

// Example code to blink an LED using Arduino UNO powered by PVT422+2R
const int ledPin = 13; // Pin connected to the onboard LED

void setup() {
  pinMode(ledPin, OUTPUT); // Set the LED pin as an output
}

void loop() {
  digitalWrite(ledPin, HIGH); // Turn the LED on
  delay(1000);                // Wait for 1 second
  digitalWrite(ledPin, LOW);  // Turn the LED off
  delay(1000);                // Wait for 1 second
}

Troubleshooting and FAQs

Common Issues and Solutions

  1. No Output Voltage:

    • Cause: Input voltage is below the minimum required (4.5V).
    • Solution: Verify the input voltage and ensure it is within the specified range.
  2. Output Voltage is Unstable:

    • Cause: Insufficient input or output filtering.
    • Solution: Add low ESR capacitors (e.g., 10 µF on VIN and 22 µF on VOUT).
  3. Overheating:

    • Cause: Excessive load current or poor heat dissipation.
    • Solution: Reduce the load current or improve cooling (e.g., add a heatsink).
  4. Incorrect Output Voltage:

    • Cause: Incorrect resistor values in the voltage divider.
    • Solution: Recalculate and verify the resistor values using the output voltage formula.

FAQs

Q1: Can the PVT422+2R be used with a 3.3V system?
A1: Yes, the PVT422+2R can be configured to output 3.3V by adjusting the resistor divider network.

Q2: What is the maximum input voltage the PVT422+2R can handle?
A2: The maximum input voltage is 18V. Exceeding this value may damage the component.

Q3: Is the PVT422+2R suitable for battery-powered applications?
A3: Yes, its high efficiency (up to 95%) makes it ideal for battery-powered devices.

Q4: Can I use the PVT422+2R without an external resistor divider?
A4: No, an external resistor divider is required to set the desired output voltage.