How to Use Seeed Studio 6x10 RGB MATRIX for XIAO : Examples, Pinouts, and Specs
Introduction
The Seeed Studio 6x10 RGB MATRIX for XIAO is a compact and versatile RGB LED matrix display designed specifically for the Seeed Studio XIAO microcontroller series. It features a 6x10 grid of individually addressable RGB LEDs, allowing users to create vibrant visual effects, animations, and dynamic displays. Its small form factor makes it ideal for portable and space-constrained projects.
Explore Projects Built with Seeed Studio 6x10 RGB MATRIX for XIAO


Explore Projects Built with Seeed Studio 6x10 RGB MATRIX for XIAO
Common Applications and Use Cases
- Visual indicators and status displays
- Animations and colorful effects for creative projects
- Miniature games and interactive displays
- Educational tools for learning about LED matrices and programming
- IoT devices with visual feedback
Technical Specifications
Key Technical Details
- Matrix Dimensions: 6 rows x 10 columns (60 RGB LEDs)
- LED Type: WS2812B (individually addressable RGB LEDs)
- Input Voltage: 3.3V or 5V (powered via XIAO microcontroller)
- Communication Protocol: Single-wire data (WS2812B protocol)
- Power Consumption: Up to 3.6W (when all LEDs are at full brightness)
- Dimensions: 30mm x 30mm
- Connector: 7-pin header for direct connection to XIAO
Pin Configuration and Descriptions
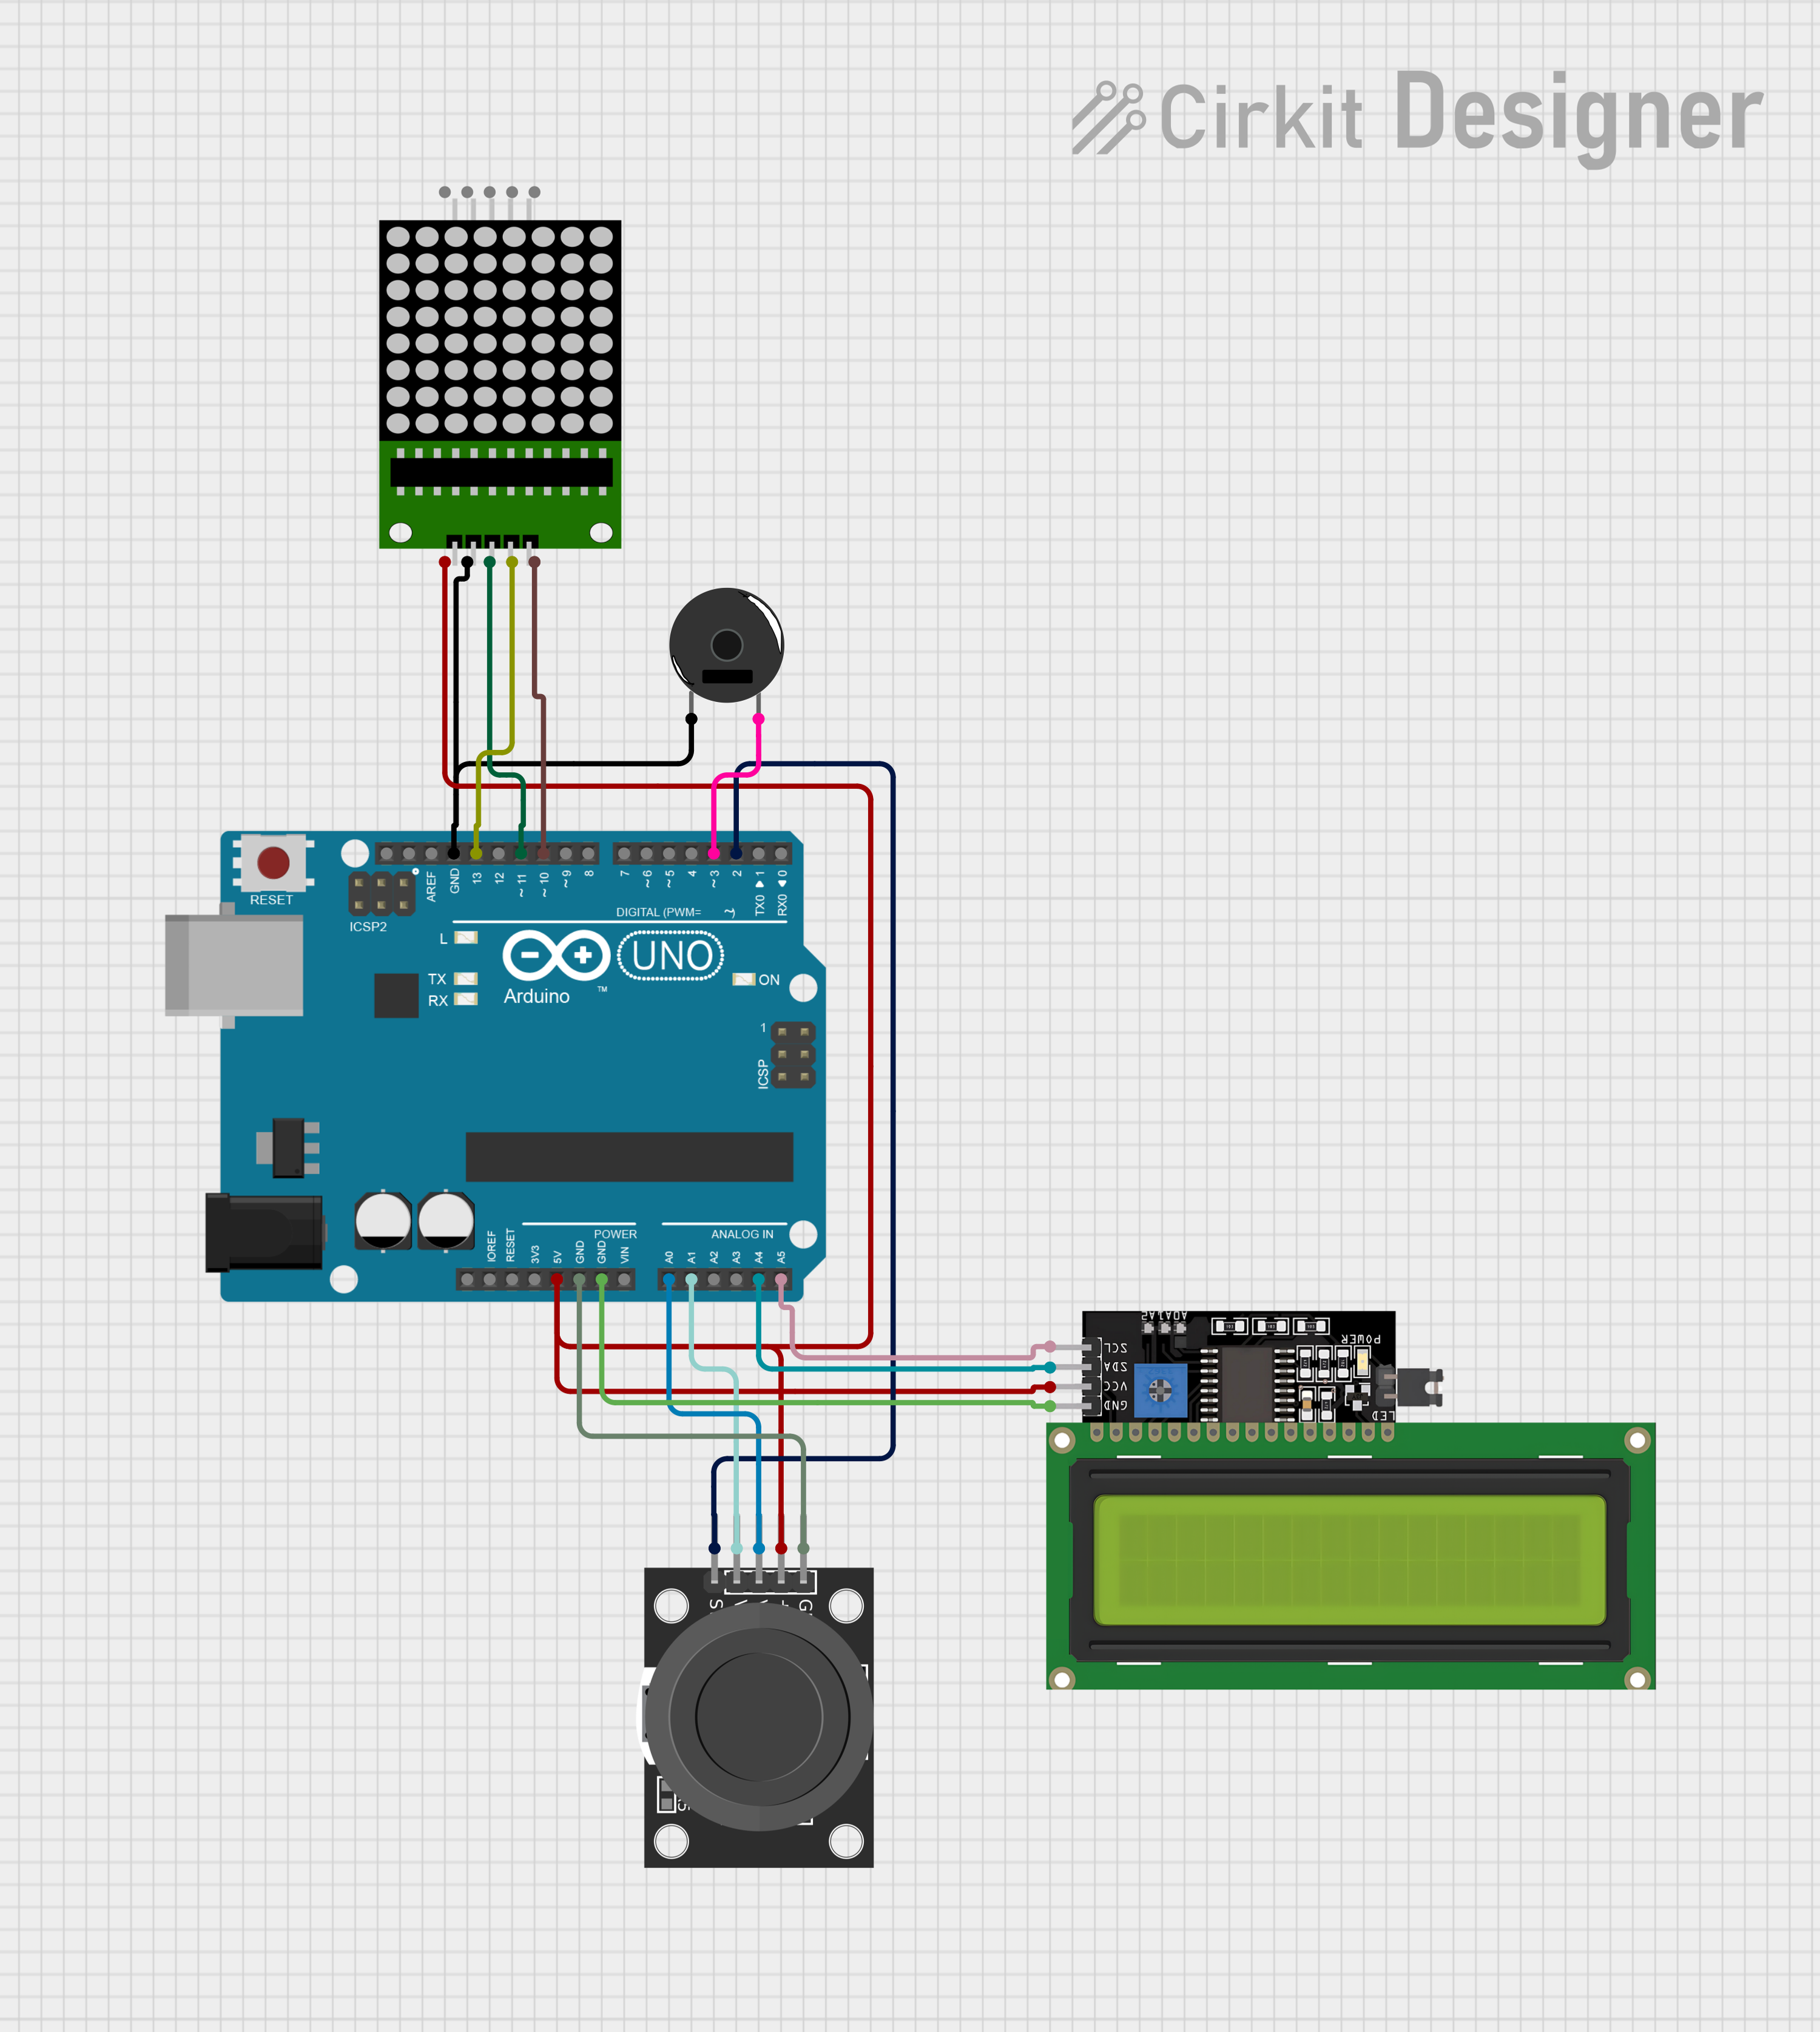
The 6x10 RGB MATRIX connects directly to the Seeed Studio XIAO microcontroller via a 7-pin header. Below is the pin configuration:
| Pin | Name | Description |
|---|---|---|
| 1 | VCC | Power supply input (3.3V or 5V) |
| 2 | GND | Ground connection |
| 3 | DOUT | Data output for chaining additional LED matrices |
| 4 | DIN | Data input for controlling the LED matrix |
| 5 | NC | Not connected |
| 6 | NC | Not connected |
| 7 | GND | Additional ground connection for stability |
Usage Instructions
How to Use the Component in a Circuit
Connect the Matrix to the XIAO Microcontroller:
- Align the 7-pin header of the RGB MATRIX with the corresponding pins on the XIAO.
- Ensure proper orientation to avoid damage to the components.
Power the Circuit:
- Supply power to the XIAO via USB or an external power source.
- The RGB MATRIX will draw power directly from the XIAO.
Program the XIAO:
- Use the Arduino IDE or another compatible development environment to program the XIAO.
- Install the
Adafruit_NeoPixellibrary to control the WS2812B LEDs.
Write and Upload Code:
- Create a program to control the RGB MATRIX, specifying colors, animations, or patterns.
- Upload the code to the XIAO via USB.
Important Considerations and Best Practices
- Power Supply: Ensure the power source can handle the current requirements of the RGB MATRIX, especially when all LEDs are at full brightness.
- Heat Management: Avoid running all LEDs at maximum brightness for extended periods to prevent overheating.
- Data Line: Use a resistor (330Ω recommended) on the data line to protect the LEDs from voltage spikes.
- Capacitor: Place a 1000µF capacitor across the VCC and GND pins to stabilize the power supply.
Example Code for Arduino UNO (Compatible with XIAO)
#include <Adafruit_NeoPixel.h>

// Define the number of LEDs in the matrix
#define NUM_LEDS 60

// Define the data pin connected to the RGB MATRIX
#define DATA_PIN 3

// Create a NeoPixel object
Adafruit_NeoPixel matrix = Adafruit_NeoPixel(NUM_LEDS, DATA_PIN, NEO_GRB + NEO_KHZ800);

void setup() {
  // Initialize the NeoPixel library
  matrix.begin();
  matrix.show(); // Turn off all LEDs initially
}

void loop() {
  // Example: Create a rainbow animation
  rainbowCycle(10); // Adjust the speed of the animation
}

// Function to display a rainbow animation
void rainbowCycle(uint8_t wait) {
  uint16_t i, j;

  for (j = 0; j < 256 * 5; j++) { // 5 cycles of all colors
    for (i = 0; i < matrix.numPixels(); i++) {
      // Generate rainbow colors across the matrix
      matrix.setPixelColor(i, Wheel(((i * 256 / matrix.numPixels()) + j) & 255));
    }
    matrix.show(); // Update the display
    delay(wait);
  }
}

// Helper function to generate rainbow colors
uint32_t Wheel(byte WheelPos) {
  WheelPos = 255 - WheelPos;
  if (WheelPos < 85) {
    return matrix.Color(255 - WheelPos * 3, 0, WheelPos * 3);
  } else if (WheelPos < 170) {
    WheelPos -= 85;
    return matrix.Color(0, WheelPos * 3, 255 - WheelPos * 3);
  } else {
    WheelPos -= 170;
    return matrix.Color(WheelPos * 3, 255 - WheelPos * 3, 0);
  }
}
Troubleshooting and FAQs
Common Issues and Solutions
No LEDs Light Up:
- Solution: Check the power supply and ensure the XIAO is properly connected to the RGB MATRIX.
- Verify that the
Adafruit_NeoPixellibrary is installed and included in your code.
Incorrect Colors or Flickering:
- Solution: Ensure the data pin is correctly connected and use a 330Ω resistor on the data line.
- Add a 1000µF capacitor across VCC and GND to stabilize the power supply.
Matrix Overheats:
- Solution: Reduce the brightness of the LEDs in your code to lower power consumption.
- Avoid running all LEDs at full brightness for extended periods.
Code Upload Fails:
- Solution: Ensure the XIAO is in bootloader mode and properly connected to your computer.
- Check the USB cable for data transfer capability (some cables are power-only).
FAQs
Can I chain multiple RGB MATRIX modules? Yes, connect the
DOUTpin of the first module to theDINpin of the next module.What is the maximum brightness of the LEDs? The maximum brightness is achieved when all three color channels (red, green, blue) are set to 255. However, this increases power consumption significantly.
Is the RGB MATRIX compatible with other microcontrollers? Yes, it can be used with other microcontrollers that support the WS2812B protocol, such as Arduino, ESP32, and Raspberry Pi.
How do I clean the RGB MATRIX? Use a soft, dry cloth to clean the surface. Avoid using liquids or abrasive materials.