Cirkit Designer Logo
Cirkit Designer
Your all-in-one circuit design IDE
Home / 
Component Documentation

How to Use Photoelectric Liquid Level Sensor: Examples, Pinouts, and Specs

Image of Photoelectric Liquid Level Sensor
Cirkit Designer LogoDesign with Photoelectric Liquid Level Sensor in Cirkit Designer

Introduction

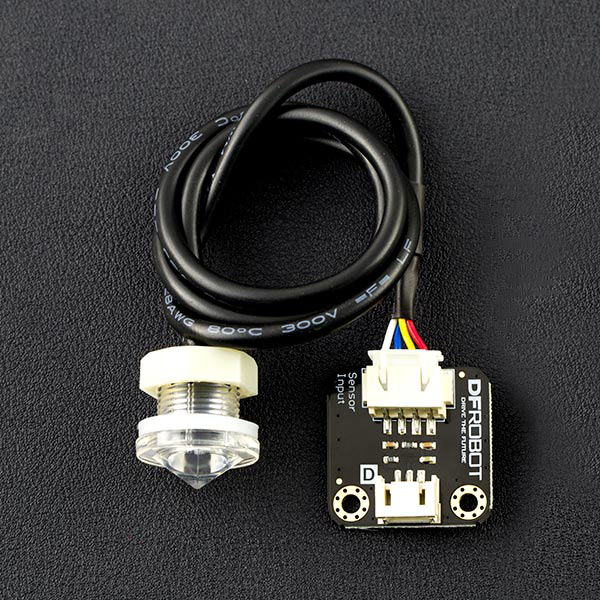
The Photoelectric Liquid Level Sensor (DFRobot SEN0205) is a compact and reliable device designed to detect the presence or absence of liquid at a specific level using light-based sensing technology. This sensor is non-contact, meaning it can detect liquid levels without direct exposure to the liquid, making it ideal for applications where contamination or corrosion must be avoided.

Explore Projects Built with Photoelectric Liquid Level Sensor

Use Cirkit Designer to design, explore, and prototype these projects online. Some projects support real-time simulation. Click "Open Project" to start designing instantly!
ESP32-Based Smart Water Level Controller with Ultrasonic Sensor and OLED Display
Image of Water monitoring: A project utilizing Photoelectric Liquid Level Sensor in a practical application
This circuit is a water level monitoring and control system using an ESP32 microcontroller, an ultrasonic sensor, and a relay to control a water pump. The ultrasonic sensor measures the water level, and the ESP32 displays the level on an OLED screen while controlling the pump based on predefined thresholds to maintain the water level within a specified range.
Cirkit Designer LogoOpen Project in Cirkit Designer
Arduino-Controlled Ultrasonic Water Level Indicator with LCD Display and Relay Switching
Image of water: A project utilizing Photoelectric Liquid Level Sensor in a practical application
This circuit is designed to monitor water levels using an HC-SR04 Ultrasonic Sensor and display the information on an LCD I2C Display. An Arduino UNO controls the sensor to measure distance, calculates the water level as a percentage, and toggles a relay to control a pump based on the water level and manual input from a pushbutton. The system allows for manual override of the pump operation and stores the set water level threshold in EEPROM for persistent control across power cycles.
Cirkit Designer LogoOpen Project in Cirkit Designer
Arduino-Controlled Ultrasonic Water Level Monitoring and Pump Management System
Image of auto water: A project utilizing Photoelectric Liquid Level Sensor in a practical application
This circuit is designed to monitor water levels using an HC-SR04 Ultrasonic Sensor and display the information on a 20x4 LCD with I2C interface, controlled by an Arduino UNO. When the water level falls below a predefined threshold, the Arduino activates a relay module, which in turn powers a mini diaphragm water pump to refill the tank. The system aims to maintain water levels within set boundaries, automating the process of water level management.
Cirkit Designer LogoOpen Project in Cirkit Designer
ESP32-S3 Based Water Level and Temperature Monitoring System with WiFi Connectivity
Image of Monitoraggio livello acqua: A project utilizing Photoelectric Liquid Level Sensor in a practical application
This circuit is designed to monitor the water level and temperature in a tank using an ESP32-S3 microcontroller. It employs a JSN-SR04T ultrasonic sensor to measure water level and a DS18B20 temperature sensor to monitor water temperature, with a 4.7k Ohm resistor for the DS18B20's signal line pull-up. The measured data is displayed on an I2C LCD and can be transmitted to a web service via WiFi.
Cirkit Designer LogoOpen Project in Cirkit Designer

Explore Projects Built with Photoelectric Liquid Level Sensor

Use Cirkit Designer to design, explore, and prototype these projects online. Some projects support real-time simulation. Click "Open Project" to start designing instantly!
Image of Water monitoring: A project utilizing Photoelectric Liquid Level Sensor in a practical application
ESP32-Based Smart Water Level Controller with Ultrasonic Sensor and OLED Display
This circuit is a water level monitoring and control system using an ESP32 microcontroller, an ultrasonic sensor, and a relay to control a water pump. The ultrasonic sensor measures the water level, and the ESP32 displays the level on an OLED screen while controlling the pump based on predefined thresholds to maintain the water level within a specified range.
Cirkit Designer LogoOpen Project in Cirkit Designer
Image of water: A project utilizing Photoelectric Liquid Level Sensor in a practical application
Arduino-Controlled Ultrasonic Water Level Indicator with LCD Display and Relay Switching
This circuit is designed to monitor water levels using an HC-SR04 Ultrasonic Sensor and display the information on an LCD I2C Display. An Arduino UNO controls the sensor to measure distance, calculates the water level as a percentage, and toggles a relay to control a pump based on the water level and manual input from a pushbutton. The system allows for manual override of the pump operation and stores the set water level threshold in EEPROM for persistent control across power cycles.
Cirkit Designer LogoOpen Project in Cirkit Designer
Image of auto water: A project utilizing Photoelectric Liquid Level Sensor in a practical application
Arduino-Controlled Ultrasonic Water Level Monitoring and Pump Management System
This circuit is designed to monitor water levels using an HC-SR04 Ultrasonic Sensor and display the information on a 20x4 LCD with I2C interface, controlled by an Arduino UNO. When the water level falls below a predefined threshold, the Arduino activates a relay module, which in turn powers a mini diaphragm water pump to refill the tank. The system aims to maintain water levels within set boundaries, automating the process of water level management.
Cirkit Designer LogoOpen Project in Cirkit Designer
Image of Monitoraggio livello acqua: A project utilizing Photoelectric Liquid Level Sensor in a practical application
ESP32-S3 Based Water Level and Temperature Monitoring System with WiFi Connectivity
This circuit is designed to monitor the water level and temperature in a tank using an ESP32-S3 microcontroller. It employs a JSN-SR04T ultrasonic sensor to measure water level and a DS18B20 temperature sensor to monitor water temperature, with a 4.7k Ohm resistor for the DS18B20's signal line pull-up. The measured data is displayed on an I2C LCD and can be transmitted to a web service via WiFi.
Cirkit Designer LogoOpen Project in Cirkit Designer

Common Applications and Use Cases

  • Industrial liquid level monitoring in tanks and reservoirs
  • Water purification systems
  • Medical devices and laboratory equipment
  • Food and beverage processing
  • Leak detection systems

Technical Specifications

The following table outlines the key technical details of the DFRobot SEN0205 Photoelectric Liquid Level Sensor:

Parameter Value
Operating Voltage 5V DC
Operating Current ≤ 5mA
Output Type Digital (High/Low)
Detection Range 0-10mm (through transparent container wall)
Response Time ≤ 500ms
Operating Temperature -25°C to 105°C
Material Compatibility Transparent containers (glass, plastic)
Dimensions 28mm x 28mm x 20mm
Weight 15g

Pin Configuration and Descriptions

The sensor has a 3-pin interface for easy integration into circuits. The pinout is as follows:

Pin Name Description
1 VCC Power supply input (5V DC)
2 GND Ground connection
3 OUT Digital output signal (High: Liquid detected, Low: No liquid)

Usage Instructions

How to Use the Sensor in a Circuit

  1. Power the Sensor: Connect the VCC pin to a 5V DC power source and the GND pin to the ground of your circuit.
  2. Connect the Output: Attach the OUT pin to a digital input pin of your microcontroller or other logic-level device.
  3. Mount the Sensor: Place the sensor on the outside of a transparent container at the desired liquid level. Ensure the sensor is securely attached and aligned properly.
  4. Read the Output: Monitor the OUT pin. A HIGH signal indicates the presence of liquid, while a LOW signal indicates the absence of liquid.

Important Considerations and Best Practices

  • Container Material: The sensor works best with transparent materials such as glass or plastic. Opaque or highly reflective materials may interfere with detection.
  • Mounting: Ensure the sensor is mounted flush against the container wall to avoid false readings.
  • Power Supply: Use a stable 5V DC power source to ensure accurate operation.
  • Environmental Conditions: Avoid exposing the sensor to extreme temperatures or environments with heavy condensation, as this may affect performance.

Example Code for Arduino UNO

Below is an example of how to use the DFRobot SEN0205 with an Arduino UNO to detect liquid levels:

// Define the pin connected to the sensor's OUT pin
const int sensorPin = 2; // Digital pin 2
const int ledPin = 13;   // Built-in LED for visual feedback

void setup() {
  pinMode(sensorPin, INPUT); // Set sensor pin as input
  pinMode(ledPin, OUTPUT);   // Set LED pin as output
  Serial.begin(9600);        // Initialize serial communication
}

void loop() {
  int sensorState = digitalRead(sensorPin); // Read the sensor output

  if (sensorState == HIGH) {
    // Liquid detected
    digitalWrite(ledPin, HIGH); // Turn on LED
    Serial.println("Liquid detected!");
  } else {
    // No liquid detected
    digitalWrite(ledPin, LOW);  // Turn off LED
    Serial.println("No liquid detected.");
  }

  delay(500); // Wait for 500ms before the next reading
}

Notes on the Code

  • The built-in LED on the Arduino UNO (pin 13) is used to provide visual feedback.
  • The Serial.println statements allow you to monitor the sensor's status via the Serial Monitor.

Troubleshooting and FAQs

Common Issues and Solutions

  1. Sensor Not Detecting Liquid

    • Cause: Improper mounting or misalignment.
    • Solution: Ensure the sensor is securely mounted and flush against the container wall.
  2. False Readings

    • Cause: Opaque or reflective container material.
    • Solution: Use a transparent container made of glass or plastic.
  3. No Output Signal

    • Cause: Incorrect wiring or insufficient power supply.
    • Solution: Double-check the wiring and ensure the power supply is stable at 5V DC.
  4. Intermittent Detection

    • Cause: Environmental interference or unstable power.
    • Solution: Avoid placing the sensor in areas with heavy condensation or electrical noise. Use a regulated power source.

FAQs

Q: Can the sensor detect liquids in opaque containers?
A: No, the sensor is designed to work with transparent containers. Opaque materials block the light used for detection.

Q: What types of liquids can this sensor detect?
A: The sensor can detect most liquids, provided they are inside a transparent container. It is not affected by the liquid's color or composition.

Q: Can I use this sensor with a 3.3V microcontroller?
A: The sensor requires a 5V power supply. If your microcontroller operates at 3.3V, you may need a level shifter for the output signal.

Q: Is the sensor waterproof?
A: The sensor is designed for external mounting and is not waterproof. It should not be submerged in liquid.

By following this documentation, you can effectively integrate the DFRobot SEN0205 Photoelectric Liquid Level Sensor into your projects for reliable liquid level detection.